
Can you turn a vase into a lamp? Yes, you absolutely can! Making a lamp out of a vase is a fantastic way to repurpose vase lamp creations and add a unique, personalized touch to your home decor. This DIY vase lamp project is surprisingly simple and doesn’t require advanced electrical knowledge, especially when using a vase to lamp kit. Whether you have a beautiful ceramic vase lamp or a delicate glass vase lamp, this guide will walk you through how to convert it into a functional and stylish table lamp. Let’s dive into how to wire a vase lamp and bring your decorative vase to life with light.
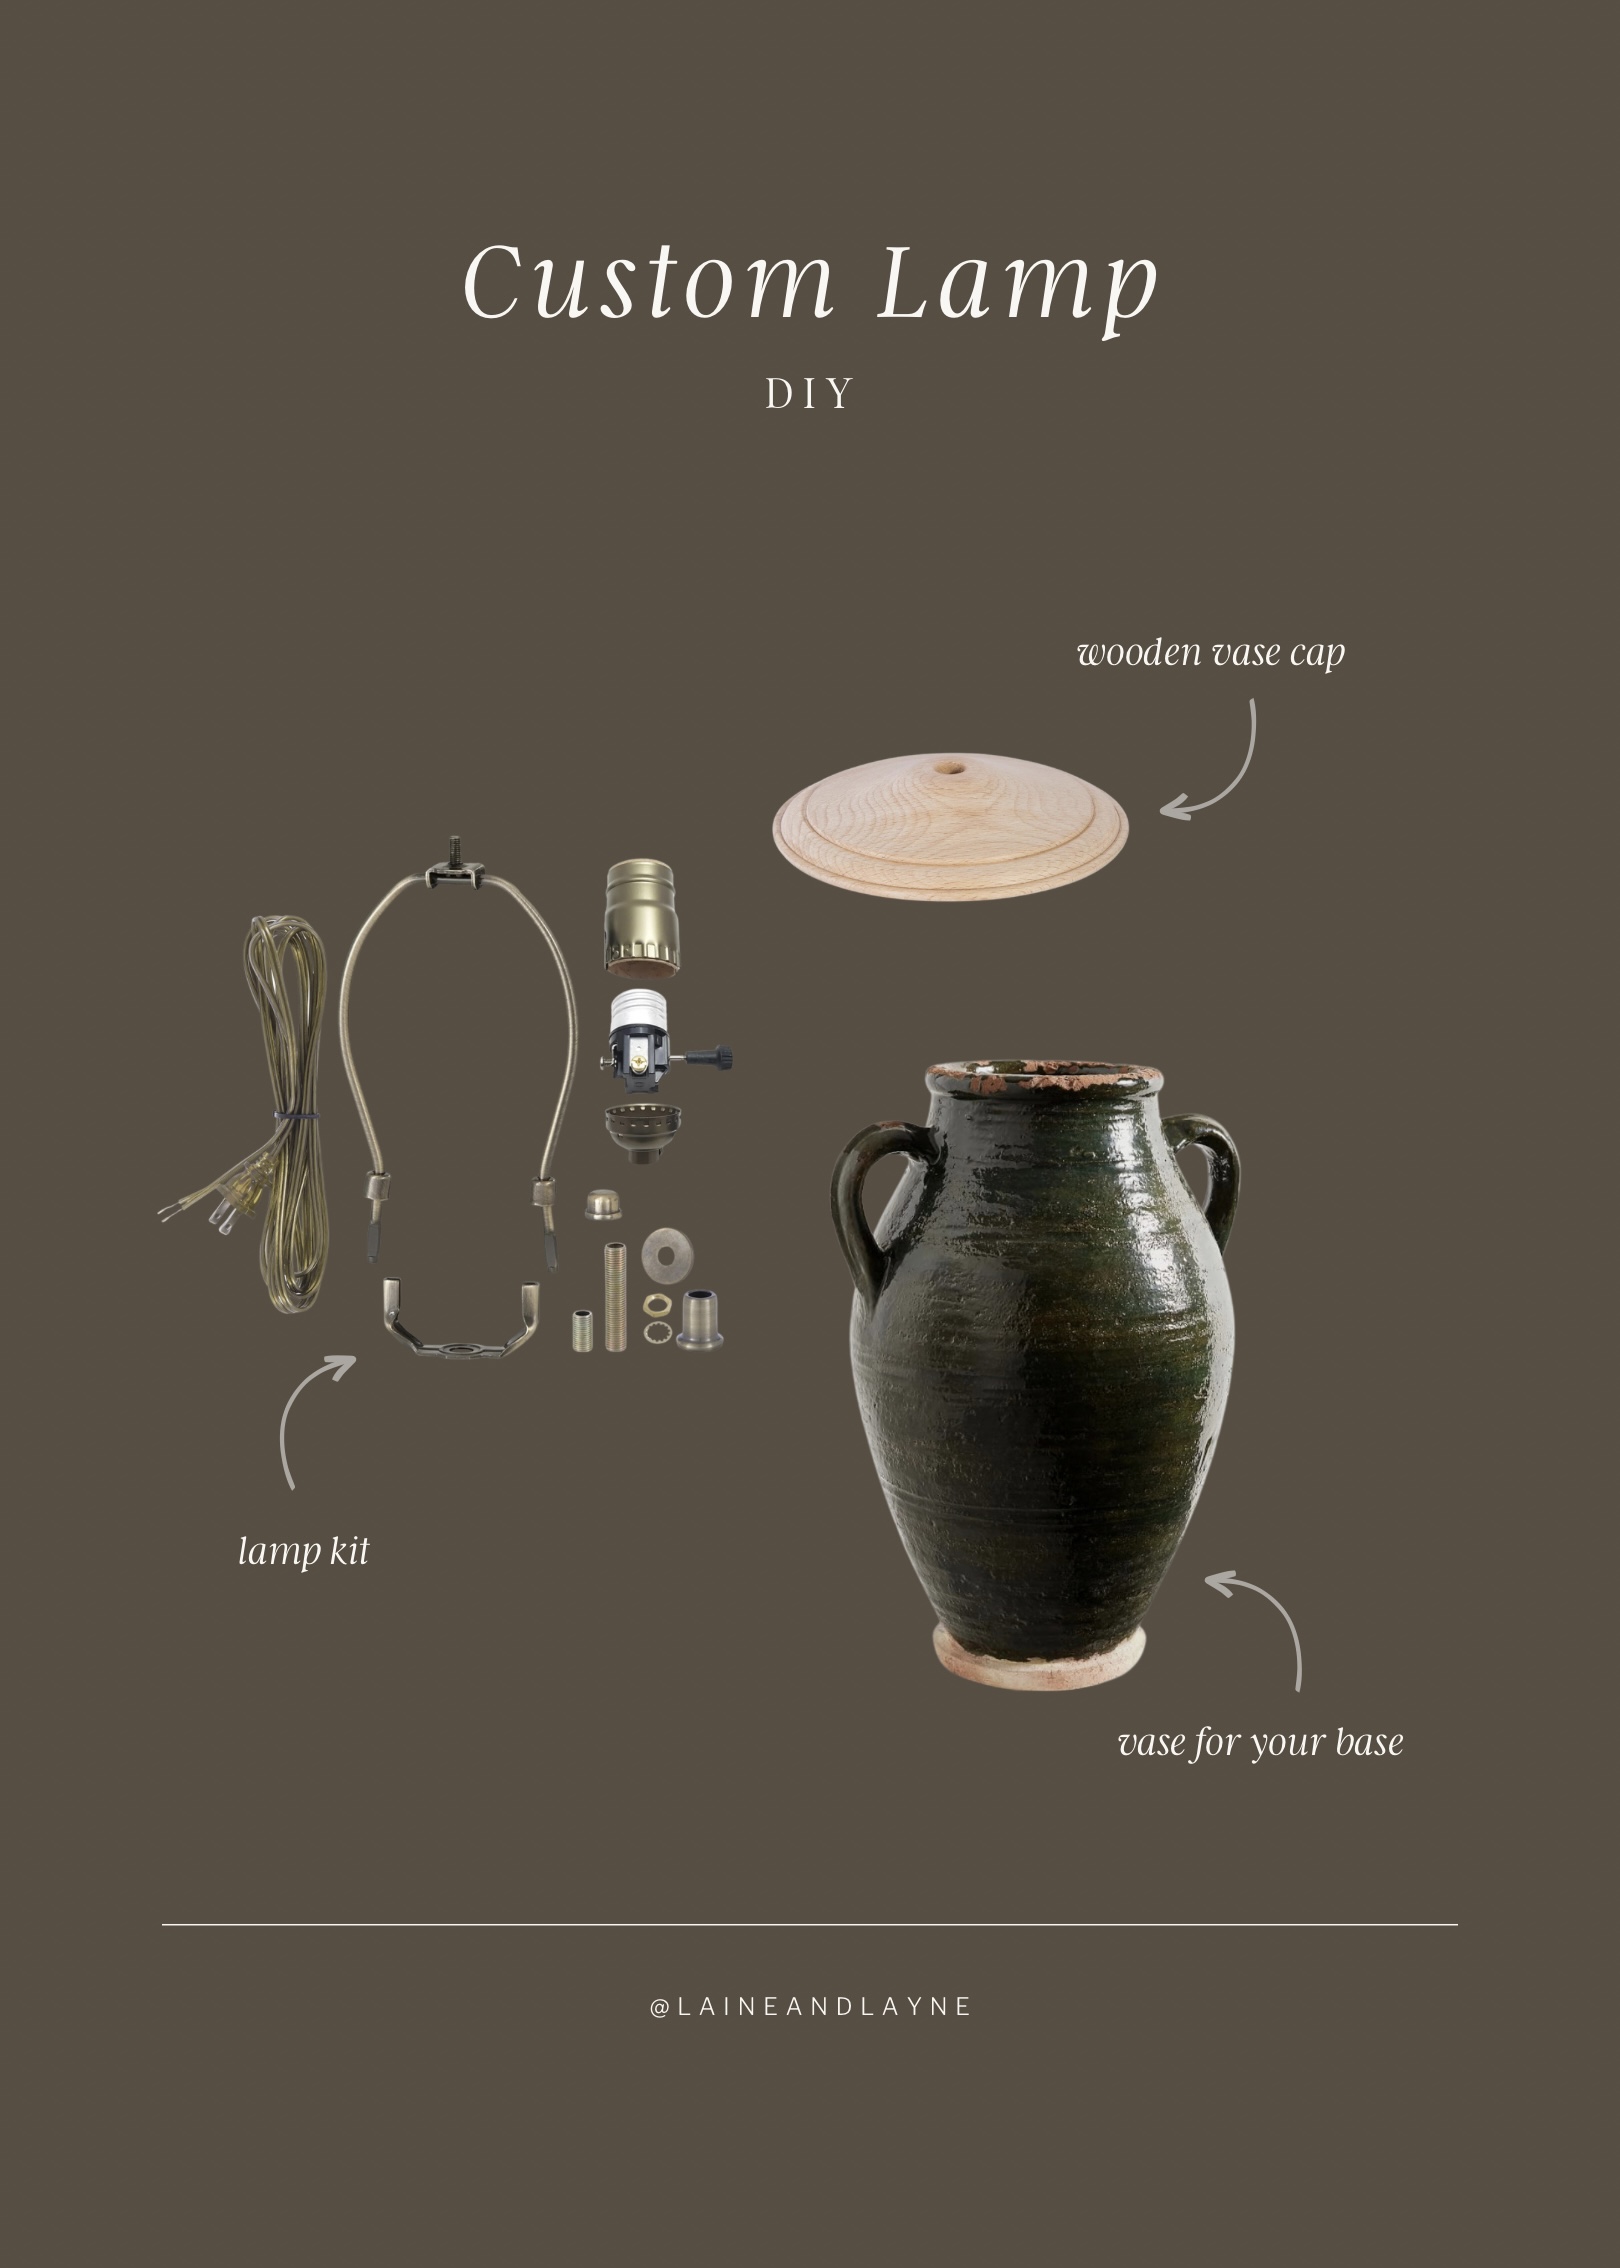
Image Source: laineandlayne.com
Why Convert a Vase into a Lamp?
There are many reasons why people choose to make a lamp out of a vase. It’s a creative way to:
- Personalize Decor: You can choose a vase that perfectly matches your existing style, from vintage finds to modern designs.
- Upcycle and Save Money: Instead of buying a new lamp, you can transform an item you already own or find affordably at a thrift store.
- Create Unique Lighting: You won’t find a lamp like yours anywhere else. It’s a conversation starter!
- Illuminate Decorative Pieces: If you have a vase with intricate patterns or beautiful colors, lighting it from within can showcase its beauty.
Gathering Your Materials
Before you start, ensure you have all the necessary components for your vase lamp conversion. Most of these items can be found at hardware stores, craft stores, or online.
Essential Components:
- The Vase: Choose a sturdy vase that is stable enough to hold a lamp assembly. Ceramic, glass, or even thick metal vases work well. Make sure it’s clean and dry.
- Lamp Kit: This is the easiest route. A vase to lamp kit typically includes a threaded rod, a socket assembly (with a harp holder), a finial, and sometimes a cord with a plug and switch.
- Lamp Harp: This U-shaped piece attaches to the socket and holds the lampshade. It usually comes with the lamp kit or can be purchased separately. The size of the harp matters for the lampshade.
- Lampshade: Select a shade that complements your vase and the style of the room.
- Light Bulb: Choose an LED bulb for energy efficiency and longevity. The wattage should be appropriate for the size of your lampshade and the socket.
- Lamp Cord with Plug (if not included): If your kit doesn’t have a cord, you’ll need one.
- Lamp Socket (if not included): This is where the bulb screws in.
- Threaded Rod (if not included): This goes through the vase to hold the lamp assembly together.
- Finial: This decorative cap screws onto the top of the harp to secure the lampshade.
Tools You Might Need:
- Drill and Drill Bits: You’ll likely need to drill a hole in the vase for the cord and possibly for the threaded rod. Diamond-tipped bits are best for glass.
- Screwdriver: For tightening connections.
- Wire Strippers: If you’re wiring the socket yourself.
- Pliers: For gripping and bending wires.
- Safety Glasses: Essential when drilling.
- Gloves: For handling glass or protecting your hands.
- Measuring Tape: To ensure proper fit.
- Lamp Base Stabilizer (Optional): For extra stability on delicate vases.
- Lamp Cord Strain Relief (Optional): Protects the cord where it exits the vase.
Step-by-Step Guide: Making Your Vase Lamp
This vase lamp tutorial will guide you through the process. We’ll cover both using a kit and a more hands-on approach.
Option 1: Using a Vase to Lamp Kit (The Easiest Way)
A vase to lamp kit simplifies the process significantly. These kits are designed to fit through the top opening of many vases or through a pre-drilled hole.
Step 1: Prepare Your Vase
- Clean the Vase: Wash and thoroughly dry your vase.
- Determine Cord Placement: Most kits are designed to have the cord exit from the top of the vase, near the neck, or through a pre-drilled hole at the base. If your kit requires a hole at the base for the cord, proceed to Step 2. If the kit is designed to have the cord exit from the top, you can often skip drilling a new hole.
Step 2: Drilling the Hole (If Necessary)
This is the most critical step, especially for glass vases. Safety first! Always wear safety glasses.
- For Ceramic or Sturdy Vases: Use a drill with a ceramic or masonry bit. Start with a small pilot hole and gradually increase the bit size until it’s large enough for your lamp cord to pass through. You might need a bit roughly the size of a dime or nickel. Go slowly, and don’t apply too much pressure.
- For Glass Vases: This requires more care. Use a diamond-tipped drill bit specifically designed for glass. It’s crucial to keep the drilling area wet to prevent the glass from overheating and cracking. You can create a small dam around the drilling spot with plumber’s putty or tape to hold water. Drill at a slow, consistent speed, applying light pressure. Patience is key here. You might also consider getting a pre-drilled vase or having a professional drill the hole if you’re uncomfortable.
Step 3: Assembling the Lamp Kit
- Thread the Cord: Feed the lamp cord through the hole you drilled at the base of the vase (or through the top opening if designed that way).
- Insert the Rod: Screw the threaded rod into the lamp socket assembly. If your kit has a separate base or locknut, attach that to the rod.
- Secure the Rod: If you drilled a hole at the base, feed the threaded rod up through the vase. Secure it at the top. Many kits have a threaded cap or a special fitting that screws onto the rod to hold it firmly in place. Ensure the rod is straight and stable.
- Attach the Harp: Screw the lamp harp onto the socket assembly. The harp is typically held in place by a threaded collar that screws onto the socket.
- Wire the Socket (If needed): If your kit didn’t come with a pre-wired socket, you’ll need to connect the cord wires to the socket terminals. This involves stripping a small amount of insulation from the ends of the wires and securing them to the appropriate terminals. Usually, there’s a neutral wire (often with ribbed insulation or a silver conductor) and a hot wire (smooth insulation or a gold conductor). Connect the neutral wire to the silver screw and the hot wire to the brass screw on the socket. Ensure no stray wire strands are exposed.
Step 4: Attaching the Lampshade and Finishing Touches
- Place the Shade: Rest the lampshade onto the lamp harp.
- Secure the Shade: Screw the finial onto the top of the harp to hold the lampshade securely.
- Install the Bulb: Screw in your chosen light bulb.
- Test: Plug in the lamp and turn it on.
Option 2: Building Your Own Lamp Assembly (More Advanced)
If you can’t find a pre-made kit or want more control over the components, you can assemble the parts yourself. This requires a bit more knowledge about how to wire a vase lamp.
Step 1: Prepare the Vase (Same as Option 1)
Drill a hole for the cord if needed.
Step 2: Prepare the Lamp Cord and Socket
- Thread the Cord: Feed the lamp cord through the drilled hole in the vase.
- Wire the Socket:
- Strip the Cord: Carefully strip about an inch of the outer insulation from the end of the lamp cord. Then, separate the two wires inside and strip about half an inch of insulation from the end of each wire.
- Connect to Socket: Most lamp sockets have two terminals, usually brass and silver. The neutral wire (often marked or with ribbed insulation) connects to the silver terminal. The hot wire (usually smooth insulation) connects to the brass terminal. Wrap the stripped wire around the terminal screws and tighten them securely. Ensure no bare wire is exposed outside the terminals.
- Secure the Cord: Use a cord grip or a knot (like an Underwriter’s knot) inside the socket assembly to prevent the cord from being pulled out.
Step 3: Create the Lamp Rod Assembly
- Threaded Rod: You’ll need a threaded rod that’s long enough to go through your vase and extend a few inches above the opening to accommodate the socket and harp.
- Secure the Rod:
- At the Base: If you drilled a hole at the base, feed the rod up. You might need a washer and nut or a decorative locknut to secure the rod from the bottom.
- At the Top: The rod needs to be firmly attached to the vase at the top. This is often done by having the rod extend through a hole in a cap that fits over the vase opening, or by screwing it into a pre-fitted base or adapter. Some kits include a threaded nipple that screws into the socket and then onto the rod.
- Socket Attachment: Screw the wired socket assembly onto the top of the threaded rod.
Step 4: Attach the Harp and Lampshade
- Harp Installation: Screw the lamp harp onto the socket.
- Lampshade Placement: Put the lampshade on the harp.
- Finial Tightening: Secure the lampshade with the finial.
Step 5: Finalizing and Testing
- Install Bulb: Screw in your light bulb.
- Test: Plug it in and check if it works.
Specific Considerations for Different Vase Types
Ceramic Vase Lamp
Ceramic vases are generally sturdy and easy to work with.
- Drilling: Use a ceramic or masonry bit. Start slowly and keep the area cool with water. Ceramic can be dusty, so wear a mask if drilling a lot.
- Weight: Ceramic is often heavy, providing good stability.
- Aesthetics: Ceramic offers a wide range of colors, glazes, and textures, allowing for diverse lamp designs.
Glass Vase Lamp
Glass requires extra caution due to its fragility.
- Drilling: Always use a diamond-tipped bit and keep the area wet. Patience is crucial to prevent cracking. If you’re not comfortable, look for vases with pre-drilled holes or use kits designed to work through the top opening without drilling.
- Stability: Thin or delicate glass vases might need a wider base or a stabilizing insert to prevent tipping.
- Light Diffusion: The translucency of glass can create beautiful diffused light effects.
Metal Vase Lamp
Metal vases can be tricky depending on the thickness and type of metal.
- Drilling: Use metal drill bits. Thicker metal might require pilot holes and progressively larger bits.
- Conductivity: Be mindful that metal is conductive. Ensure all wiring is properly insulated and secured to prevent any contact with the metal vase itself. Use rubber grommets where the cord exits.
- Finish: Consider how the metal finish will look with light shining through it or reflecting off it.
Frequently Asked Questions About Vase Lamps
Q1: What is the safest way to drill a hole in a glass vase?
The safest way to drill a hole in a glass vase is to use a diamond-tipped drill bit specifically designed for glass. Keep the drilling area wet by using a spray bottle or creating a water dam with plumber’s putty. Drill slowly and apply gentle, consistent pressure. Always wear safety glasses.
Q2: Can I use any vase to make a lamp?
While you can technically convert most vases, it’s best to choose one that is stable, sturdy, and made from a material that can be drilled safely if needed. Very thin or delicate vases might not be suitable for the weight and stability required for a lamp.
Q3: How do I choose the right size lamp harp?
The lamp harp size depends on the size of your lampshade and how high you want the shade to sit above the vase. Harps come in different lengths (measured from the socket to the top of the harp bow) and often have different numbers of inches for the “drop” (the distance from the socket to the bottom of the shade attachment point). Measure your desired shade’s fitting to ensure compatibility.
Q4: Where should the cord exit the vase?
The cord can exit the vase from the top, near the neck, or through a hole drilled in the base or side. Kits are available for both options. Exiting from the base often provides a cleaner look, but requires drilling. Exiting from the top is easier if the vase design allows it and the kit is designed for it.
Q5: How do I ensure the lamp is stable?
Choose a vase with a wide, flat base. If your vase is narrow or lightweight, consider using a decorative base or a heavy, flat disc that fits snugly inside the vase opening to add weight and stability. Ensure the threaded rod is securely fastened.
Q6: What type of light bulb should I use?
LED bulbs are highly recommended. They are energy-efficient, last longer, and produce less heat than incandescent bulbs, which is safer for your lampshade and the vase itself. Choose a wattage appropriate for your lampshade size and the socket’s rating.
Q7: Do I need to be an electrician to do this?
No, you don’t need to be an electrician, especially when using a pre-assembled vase to lamp kit. The most electrical work involved might be connecting wires to a socket if you’re not using a kit with a pre-wired socket, which is a straightforward process typically involving screwing wires to terminals.
Q8: How do I secure the lamp socket to the vase?
Typically, a threaded rod runs through the vase. The lamp socket screws onto the top of this rod, holding the assembly in place. Nuts and washers might be used at the base of the rod for further security, depending on the kit or your custom assembly.
Q9: What if my vase has a narrow opening?
If your vase has a very narrow opening and you don’t want to drill, you can often find kits with flexible gooseneck or bendable socket assemblies that can be maneuvered through the opening. Alternatively, some kits are designed to clamp onto the rim of the vase.
Lighting Up Your Creation: The Final Touch
Once your table lamp from vase is assembled, it’s time to admire your handiwork. You’ve successfully transformed a decorative item into a functional piece of art. Lighting up a vase in this way adds warmth and ambiance to any room. Whether it’s a ceramic vase lamp on your bedside table or a tall glass vase lamp in your living room, your custom creation will surely be a talking point. Enjoy your unique, handmade lamp!