
Can I add a switch to a lamp cord? Yes, you can absolutely add a switch to a lamp cord! It’s a common and useful modification that can give you more control over your lighting. This guide will walk you through how to install a switch on a lamp cord, whether you’re performing a simple inline switch installation or tackling a more involved lamp cord repair. We’ll cover everything from choosing the right switch to safely connecting the wires.
For those looking to give their lamps a functional upgrade or fix a broken one, learning how to install a switch on a lamp cord is an invaluable skill. This process is often referred to as lamp cord modification, and it allows you to add a switch to a lamp that might not have had one originally, or to replace a faulty one. Whether you’re dealing with an old lamp or a new purchase, knowing how to do this ensures your lighting is both convenient and safe. This guide focuses on the practical steps involved in attaching a switch to cord and performing a safe switch replacement on lamp.
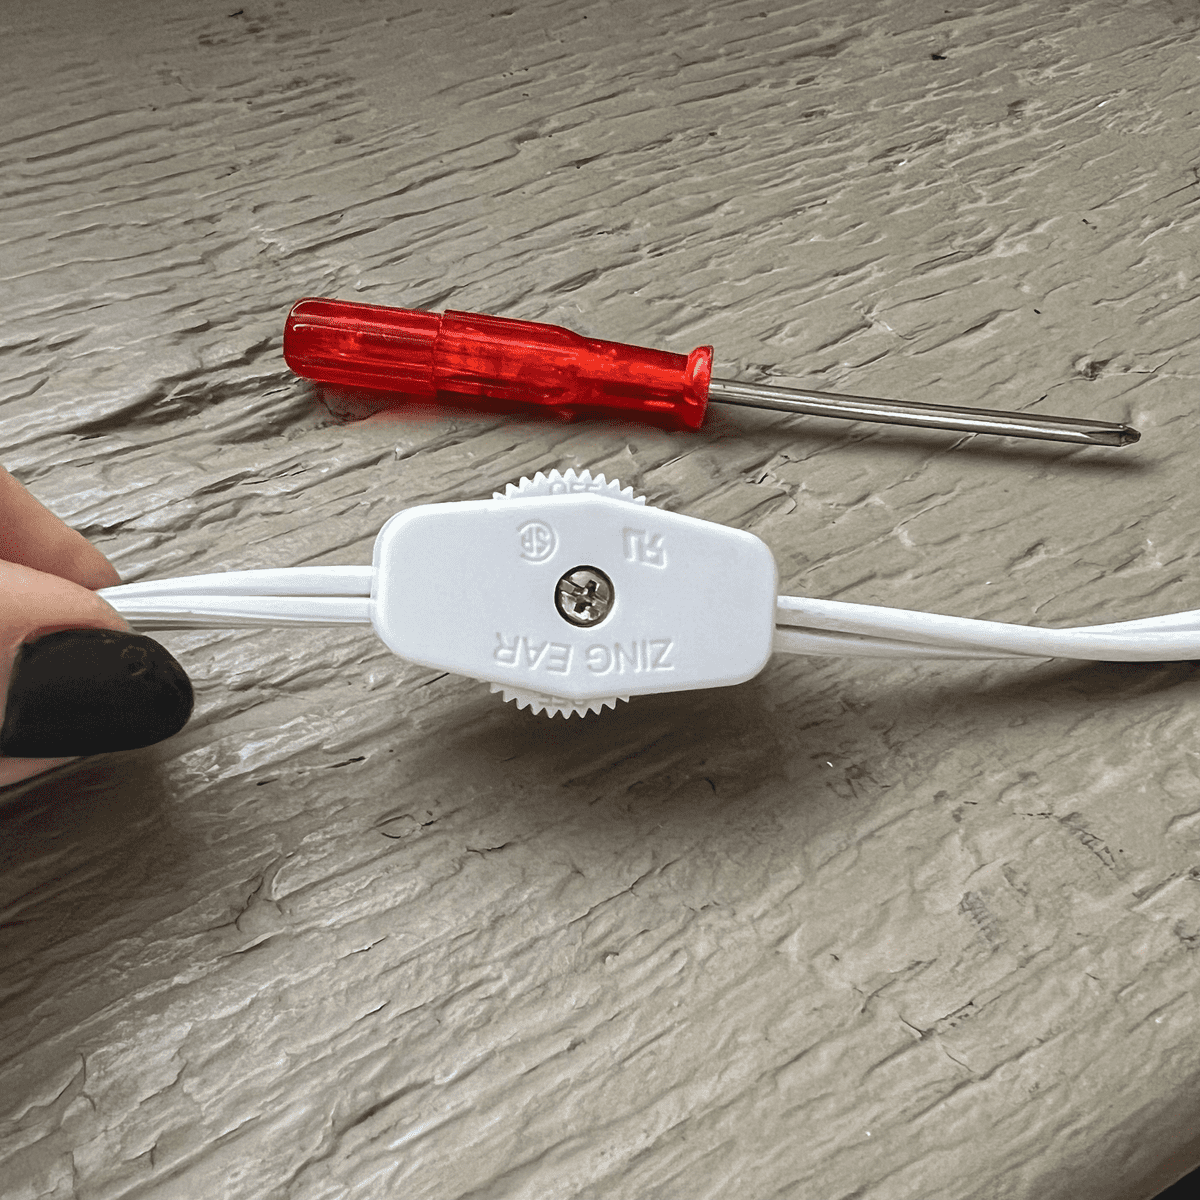
Image Source: www.theartofdoingstuff.com
Why Add or Replace a Lamp Switch?
There are several compelling reasons to learn how to install a switch on a lamp cord. The most obvious is convenience. Imagine reaching for a switch on the lamp itself instead of fumbling for the wall outlet plug. This is especially helpful for lamps that are difficult to access.
Another significant reason is lamp cord repair. Over time, lamp cords can become frayed, damaged, or the switch itself might break. Being able to replace a faulty switch or even splice in a new section of cord with a functional switch is a key part of effective lamp cord repair. Sometimes, a lamp cord repair kit will include the necessary components for this.
Finally, how to wire a lamp switch is a fundamental skill for anyone interested in DIY electrical projects. It opens up possibilities for customizing your lighting and ensuring your fixtures are in safe working order.
Types of Lamp Switches
Before you start attaching a switch to cord, it’s important to know the different types of switches you can use. The most common for lamp cords are:
1. Inline Switches
These are the most popular choice for adding a switch to an existing lamp cord. They are designed to be installed directly into the length of the cord.
- Rocker Switches: These have a visible rocker that you push to turn the lamp on or off.
- Push-Button Switches: These have a button that you press to toggle the power.
- Rotary Switches: These often have a knob that you turn to control the light.
2. In-line Cord Connectors with Switches
Some switches are integrated into a connector that replaces a section of the cord. These can offer a cleaner look.
3. Keyless Socket Switches
If your lamp has a socket without a switch, you might be able to replace the entire socket with one that has a built-in switch. This is a different approach than inline switch installation but achieves a similar result.
For this guide, we will focus on the inline switch installation as it’s the most common method for adding a switch to a lamp.
Tools and Materials You’ll Need
To successfully install a switch on your lamp cord, you’ll require a few basic tools and materials. Having everything ready before you begin will make the process smoother and safer.
Essential Tools:
- Wire Strippers/Cutters: These are crucial for safely removing insulation from the wires and cutting them to the correct length.
- Screwdriver: Usually a small Phillips head or flathead screwdriver will be needed, depending on the type of switch you buy.
- Pliers: Needle-nose pliers can be helpful for gripping and bending wires.
- Wire Nuts (optional, depending on switch type): If your switch requires splicing wires together, wire nuts are used to create secure connections. Many inline switches come with their own connectors.
- Electrical Tape: For insulating any exposed wire connections if not using wire nuts or the switch’s internal connectors.
- Utility Knife (optional): For carefully removing larger sections of cord insulation if needed.
- Multimeter (optional but recommended for advanced users): To check for continuity and ensure power is off.
Materials:
- Replacement Lamp Switch: Ensure it’s rated for the voltage and amperage of your lamp. For most household lamps, a standard switch will suffice. You can find these at hardware stores or online.
- New Lamp Cord (if doing extensive repair): If the cord is severely damaged, you might need a new cord as part of your lamp cord repair.
- A Lamp: The lamp you intend to modify.
Important Safety Note: Always unplug the lamp from the electrical outlet before you begin any work. Electricity can be dangerous, and safety should be your top priority throughout the entire process.
Step-by-Step Guide: Inline Switch Installation
This section details the process of how to wire a lamp switch using an inline switch. This is the most common method for adding a switch to a lamp or performing a switch replacement on lamp.
Step 1: Safety First – Unplug the Lamp
This cannot be stressed enough. Before you touch the lamp cord or any part of the lamp, ensure it is completely disconnected from the power source. Unplug it from the wall outlet. Double-check that it is indeed unplugged.
Step 2: Locate the Cord and Choose a Switch Location
Examine the lamp cord. Decide where you want the switch to be located. A good spot is usually somewhere along the cord that’s easily accessible when the lamp is in use, perhaps a foot or two away from the lamp base or near the middle of the cord. This placement will ensure convenient operation.
Step 3: Prepare the Cord for the Switch
- Mark the Location: Once you’ve chosen the spot, you can mark it with a pen or a piece of tape to make it easier to find.
-
Cut the Cord (Carefully): Using your wire cutters or a sharp utility knife, carefully cut the lamp cord at your chosen mark. Important: You are only cutting one side of the cord – the “hot” wire. You’ll be inserting the switch in line with this wire. However, most inline switches are designed to cut through both wires to create a clean break for the switch mechanism. For simplicity and common switch design, we’ll proceed with cutting both wires.
- Using wire cutters or a sharp utility knife, carefully cut through the outer insulation of the lamp cord at your chosen spot.
- You’ll see two internal wires (usually black and white, or sometimes a black and a ribbed white wire for polarity). Make sure you cut through both of these wires.
-
Strip the Insulation: Use your wire strippers to remove about 1-2 inches of the outer insulation from both ends of the cut cord. This exposes the two internal wires.
- Strip the Inner Wires: Now, carefully strip about ½ to ¾ inch of the insulation off the ends of each of the two inner wires (the black and white wires) on both sides of the cut. Be precise; you don’t want to nick the metal conductor inside.
Step 4: Connect the Switch
This is where inline switch installation really happens. The switch will have terminals or wire leads designed to accept the cord wires.
- Examine Your Switch: Look at your inline switch. Most have a top and a bottom half that screw or snap together. There will be designated spots for the wires to enter and exit.
-
Insert the Cord: Carefully feed one end of the cut lamp cord into one side of the switch housing. The wires will emerge inside the switch compartment. Do the same for the other end of the cord, feeding it into the opposite side of the switch housing.
-
Connecting the Wires (Specifics depend on switch design):
- Screw Terminals: If your switch has screw terminals, you’ll wrap the stripped end of each wire around the appropriate screw. Typically, one wire (often the black “hot” wire) goes to one terminal, and the other wire (the white “neutral” wire) goes to the other. The switch interrupts the flow of electricity through the circuit.
- Internal Connectors/Clips: Many modern inline switches have internal clips or connectors. You’ll simply push the stripped wire ends into the designated slots until they are securely held. These often have a mechanism to pierce the wire insulation and make contact. Follow the switch manufacturer’s instructions closely for this part, as designs vary.
Table: Wire Connections for a Typical Inline Switch
Lamp Cord Wire Switch Terminal/Connection Black (Hot) Terminal 1 / Hot Side White (Neutral) Terminal 2 / Neutral Side Note: Always refer to the specific instructions that come with your inline switch, as wiring configurations can differ.
-
Ensure Secure Connections: Tug gently on each wire to make sure it’s firmly seated in its terminal or connector. A loose connection is a fire hazard.
Step 5: Close the Switch Housing
Once all the wires are securely connected, carefully snap or screw the two halves of the switch housing back together. Make sure no wires are pinched between the housing halves. The cord should be held firmly by the strain relief grips on the switch.
Step 6: Test the Switch
- Plug It In: Carefully plug the lamp back into the electrical outlet.
- Test Operation: Flick the new switch. Does the lamp turn on and off? If so, congratulations! You’ve successfully performed an inline switch installation.
Step 7: Final Inspection and Securing
- Check for Heat: After the lamp has been on for a few minutes, carefully feel the switch area. It should not be excessively hot.
- Neaten the Cord: Ensure the cord is not kinked or stressed near the switch.
Performing Lamp Cord Repair with a Switch
Sometimes, your reason for how to install a switch on a lamp cord is to perform lamp cord repair. If the original switch on the lamp has failed, or if the cord itself is damaged near the switch, you can use the same inline switch installation process described above.
Replacing a Faulty Lamp Switch
If the switch that came with the lamp has broken, follow these steps for replacing lamp switch:
- Unplug the Lamp.
- Locate the Existing Switch: This might be an inline switch or a switch built into the lamp base. If it’s built into the base, this guide won’t cover that specific repair, as it involves dismantling the lamp. We’re focusing on cord-mounted switches.
- Remove the Old Switch: If it’s an inline switch, carefully open the housing as described in Step 4 of the installation guide. Disconnect the wires from the old switch.
- Install the New Switch: Use a new inline switch and follow Steps 4 and 5 of the installation guide to connect the wires to the new switch and close the housing.
- Test: Follow Step 6 to test your work.
Repairing a Damaged Cord Section
If the lamp cord itself is damaged (frayed, cut, or otherwise compromised) in a section where you want to add or replace a switch:
- Unplug the Lamp.
- Cut Out the Damaged Section: Using wire cutters, cut out the entire damaged portion of the cord.
- Prepare for Inline Switch: Now you have two separate ends of the lamp cord. You will use your inline switch to bridge this gap. Follow Steps 3 (preparing the cord), 4 (connecting the switch), and 5 (closing the housing) of the main inline switch installation guide. The new switch will effectively replace the section of cord you removed.
A lamp cord repair kit might contain the necessary inline switch and connectors for such repairs.
Advanced Considerations: Polarity and Wire Types
For most standard lamps, the distinction between the “hot” and “neutral” wires is crucial for safety.
- Polarized Cords: Many modern lamps use polarized cords. These have one prong on the plug that is wider than the other. The cord itself might also have markings to distinguish the two wires. Often, one wire will have smooth insulation, while the other will have ribbed or grooved insulation. The ribbed wire is typically the neutral wire.
- Non-Polarized Cords: Older lamps might have cords with two identical prongs on the plug. In these cases, it doesn’t matter which wire connects to which terminal on the switch, as long as the connections are secure.
How to Determine Hot vs. Neutral:
- Ribbing: Look for ribbing or a different texture on one of the inner wires. The ribbed wire is usually the neutral wire.
- Markings: Sometimes, the wire insulation itself will have markings or text.
- Testing (with caution): If you have a multimeter, you can test the continuity of the wires to the plug prongs to determine which is which. However, for simple inline switch installation on a standard lamp, relying on ribbing is usually sufficient.
Connecting to the Switch:
Ideally, the black (hot) wire from the lamp should be connected to the “hot” side of the switch, and the white (neutral) wire from the lamp should connect to the “neutral” side of the switch. However, many simple inline switches are designed to be used with non-polarized cords or in configurations where polarity isn’t critical for the switch’s function. Always refer to the specific instructions for your switch. If you are unsure, connecting the wires as they were cut is generally safe for a basic inline switch.
Safety Precautions and Best Practices
Working with electricity requires vigilance. Here are some essential safety tips for how to install a switch on a lamp cord:
- Always Unplug: We cannot say this enough. Make sure the lamp is unplugged before starting any work.
- Use the Right Tools: Use insulated tools if possible. Ensure wire strippers are the correct gauge for the wires.
- Secure Connections: Loose wire connections are a major cause of electrical fires. Ensure all connections are tight and secure.
- Inspect the Cord: Before installing a switch, check the entire length of the lamp cord for any signs of damage, cracking, or fraying. If the cord is significantly damaged, it’s better to replace the entire cord rather than just attempting a repair with a lamp cord repair kit.
- Proper Amperage/Voltage Rating: Ensure your replacement switch is rated for the voltage and amperage used by your lamp. For standard household lamps, this is usually not an issue as most inline switches are designed for common household power.
- Insulate Everything: Make sure all exposed wire connections are properly insulated, either by the switch housing itself, wire nuts, or electrical tape. No bare wire should be visible where it shouldn’t be.
- Strain Relief: Ensure the cord is properly seated in the strain relief mechanism of the switch. This prevents tugging directly on the wire connections.
- If in Doubt, Seek Professional Help: If you are not comfortable with electrical work, or if you encounter any problems you don’t understand, it’s always best to consult a qualified electrician.
Frequently Asked Questions (FAQ)
Here are some common questions people have when looking into how to install a switch on a lamp cord:
-
Q: Do I need a special type of switch for my lamp?
A: For most table lamps or floor lamps, a standard inline rocker or toggle switch designed for household use is sufficient. Ensure it’s rated for the voltage (e.g., 120V in North America) and amperage your lamp requires. You can usually find this information on the lamp’s tag. -
Q: Can I use a dimmer switch instead of a regular on/off switch?
A: Yes, you can, but you must use a dimmer specifically designed for lamps and compatible with the type of bulb you are using (e.g., incandescent, LED, CFL). Not all lamps or bulbs are dimmable. Make sure the dimmer is also an inline type that can be added to the cord. -
Q: What if my lamp cord is very thin or very thick?
A: Most general-purpose inline switches are designed to accommodate a range of common cord sizes. However, check the switch packaging or specifications to ensure compatibility with your cord gauge. If your cord is unusually thick or thin, you might need a specialized switch or connector. -
Q: My lamp has a three-prong plug. Can I still add an inline switch?
A: Standard inline switches are designed for two-wire cords. If your lamp has a three-prong plug (indicating it has a grounding wire for safety), you’ll need to ensure the switch you purchase is rated for grounded cords, or you may need to consider a different type of modification. Many inline switches are not designed to accommodate a grounding wire, which could compromise the lamp’s safety features. -
Q: How do I know which wire is hot and which is neutral?
A: Look for markings on the cord. Often, one wire will have a ribbed or textured surface, or fine parallel lines along its length, while the other wire will have smooth insulation. The ribbed wire is usually the neutral wire. If you’re unsure, consult an electrician or a reliable electrical reference. For many simple inline switches, the orientation might not matter for the switch’s operation itself, but it’s good practice to maintain polarity if possible. -
Q: My new inline switch doesn’t seem to work.
A: Double-check your connections. Ensure the wires are stripped adequately and making good contact with the terminals or connectors inside the switch. Make sure the switch housing is fully closed. If you’re still having trouble, the switch itself might be faulty, or there could be an issue with the lamp’s internal wiring. -
Q: Is it safe to use a lamp cord repair kit?
A: Yes, as long as the kit is from a reputable manufacturer and you follow the instructions carefully. These kits are designed for DIY repairs and often include components like new switches, connectors, and sometimes sections of cord. -
Q: Can I add a switch to a lamp that has a pull-chain socket switch?
A: You can add an additional inline switch to the cord of a lamp that already has a socket switch. This gives you two ways to turn the lamp on and off. The inline switch will control the power to the entire lamp, including the socket switch.
By following these steps and safety guidelines, you can confidently perform an inline switch installation, enhance the functionality of your lamps, and manage your lighting needs more effectively. Whether it’s a simple upgrade or a necessary lamp cord repair, this skill is a great addition to any home DIYer’s repertoire.