
Image Source: i.ytimg.com
How To Clean Brass Lamp Safely & Effectively
Can I use regular household cleaners on my brass lamp? No, it’s best to avoid harsh household cleaners as they can damage the brass finish.
Caring for a brass lamp involves more than just dusting. Over time, brass can lose its luster and develop tarnish. Knowing how to clean brass lamp fixtures safely and effectively will restore their gleam and ensure their longevity. This guide will walk you through the best methods for cleaning brass, from gentle upkeep to tackling stubborn tarnish. We’ll explore various brass cleaner for lamps options, including natural brass cleaner alternatives, and delve into techniques for removing tarnish from brass without causing harm. Whether you have a modern brass lamp or an antique brass lamp cleaning challenge, these tips will help you achieve a beautiful shine.
Preparing Your Brass Lamp for Cleaning
Before you start any cleaning, a little preparation goes a long way. This ensures you have everything you need and protects your lamp and surrounding areas.
Gather Your Supplies
Having all your materials ready before you begin will make the cleaning process smoother and more efficient.
- Soft cloths: Microfiber cloths are ideal for polishing and wiping. Have several on hand.
- Gloves: Protect your hands from cleaning solutions and oils.
- Cotton balls or swabs: Useful for reaching intricate areas.
- Small bowl: For mixing cleaning solutions.
- Mild soap: Such as dish soap, for initial dusting.
- Chosen brass cleaner: This could be a commercial brass polish, a DIY solution, or a specialized brass cleaner for lamps.
- Water: For rinsing and diluting.
- Old toothbrush: For getting into tight spots.
- Protective sheeting: To cover your work surface.
Assess the Lamp’s Finish
Not all brass is created equal. Many modern lamps have a lacquered finish to prevent tarnishing. Older or unlacquered brass will tarnish more readily.
- Lacquered Brass: This finish has a clear coat that protects the brass. You can often clean these lamps with mild soap and water. Avoid abrasive cleaners or polishes, as they can scratch or remove the lacquer. If the lacquer is peeling, it may need to be removed entirely before cleaning the brass itself.
- Unlacquered Brass: This is the type of brass that will tarnish. It requires specific cleaning methods to restore its shine.
Test Your Cleaning Method
Always test your chosen cleaning solution on an inconspicuous area of the lamp first. This will help you see how the brass reacts and ensure you don’t damage the finish. Wait for the test area to dry completely before proceeding with the rest of the lamp.
Gentle Cleaning for Everyday Maintenance
Regular dusting and light cleaning are crucial for maintaining the shine of your brass lamp and preventing dirt build-up. This is the first step in good brass care.
Daily Dusting
Dust can dull the shine of brass and make it look aged.
- Use a soft, dry microfiber cloth to wipe down the lamp regularly.
- Pay attention to areas where dust accumulates, like lampshades, finials, and the lamp base.
Mild Soap and Water Wash
For general grime or light dirt on lacquered brass or lightly tarnished unlacquered brass, a mild soap solution can be effective.
- Mix a few drops of mild dish soap with warm water in a small bowl.
- Dip a soft cloth into the solution and wring it out thoroughly so it’s just damp.
- Gently wipe down the brass surfaces.
- Use a cotton swab dipped in the solution to clean intricate details or crevices.
- Immediately dry the brass with a clean, dry microfiber cloth. Do not let water sit on the brass, as it can cause spotting.
Tackling Tarnish: Effective Brass Cleaning Methods
When your brass lamp shows signs of tarnish, it’s time for more targeted cleaning. Removing tarnish from brass can be done with commercial products or natural solutions.
Commercial Brass Polish: The Quick Fix
Commercial brass polish products are specifically formulated to remove tarnish and restore shine. They can be very effective, but it’s important to choose a reputable brand and follow the instructions carefully.
How to Use Commercial Brass Polish:
- Protect your workspace: Lay down protective sheeting.
- Apply a small amount: Put a small amount of brass polish onto a soft cloth.
- Polish gently: Rub the polished area in a back-and-forth motion, following the grain of the brass if visible.
- Buff: Use a clean, dry cloth to buff away any residue and bring out the shine.
- Repeat if necessary: For stubborn tarnish, you may need to apply the polish again.
- Clean intricate areas: Use cotton swabs dipped in polish for detailed work.
Pros of Commercial Brass Polish:
- Highly effective at removing tarnish.
- Often provide a long-lasting shine.
- Widely available.
Cons of Commercial Brass Polish:
- Can contain harsh chemicals.
- May scratch the brass if applied too aggressively.
- Some may remove patinas on antique pieces.
Natural Brass Cleaner: Gentle and Effective Solutions
For those who prefer a more natural approach, several household ingredients can be used as a natural brass cleaner. These methods are often gentler and cost-effective.
The Lemon and Baking Soda Paste
This is a popular and effective natural brass cleaner. The acidity of the lemon helps to break down tarnish, while the baking soda acts as a mild abrasive.
Ingredients:
- 1 tablespoon baking soda
- 1 tablespoon lemon juice (freshly squeezed is best)
- Optional: A few drops of water to create a paste
Method:
- Mix ingredients: Combine baking soda and lemon juice in a small bowl. If the mixture is too dry, add a few drops of water to form a thick paste.
- Apply the paste: Using a soft cloth or your fingers (wear gloves!), apply the paste to the tarnished areas of the brass.
- Let it sit: Allow the paste to sit on the brass for about 5-10 minutes.
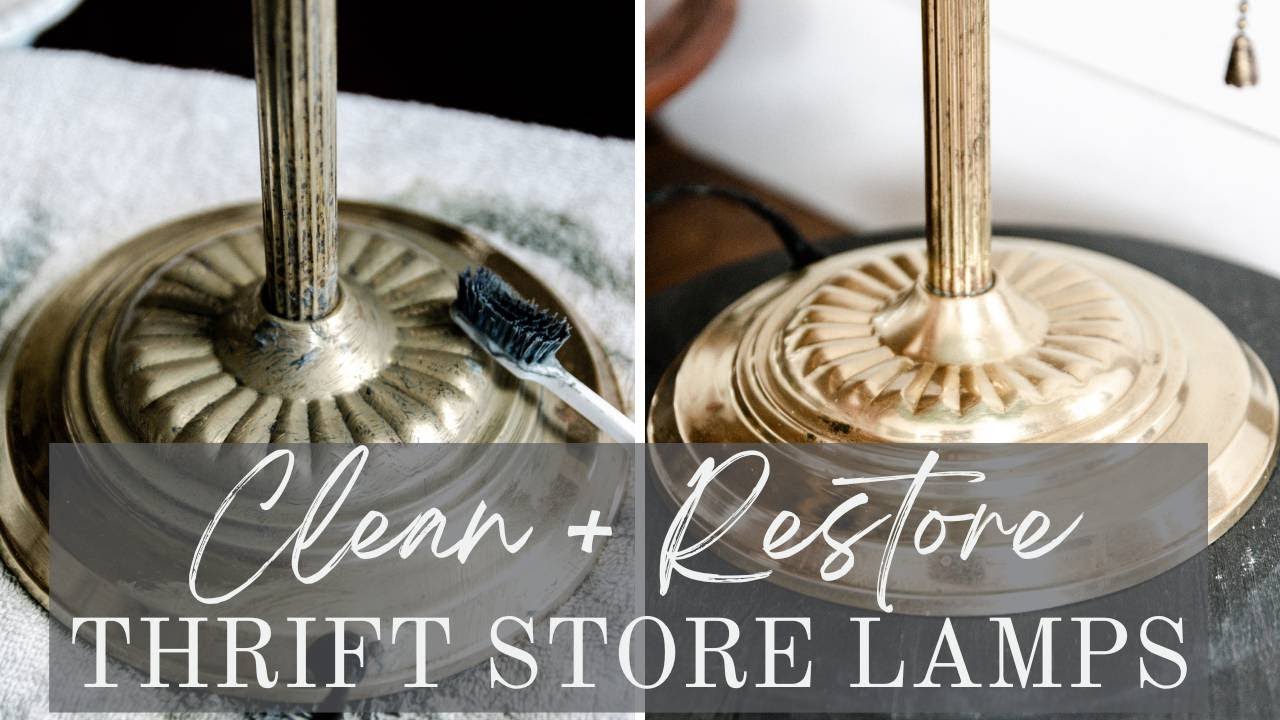
- Gently rub: Use a soft cloth or an old toothbrush to gently rub the tarnished areas in a circular motion.
- Rinse: Wipe away the paste with a damp cloth.
- Dry thoroughly: Immediately dry the brass with a clean, soft cloth.
The Vinegar and Flour Paste
Similar to the lemon paste, vinegar’s acidity can tackle tarnish. Flour helps to create a paste that adheres to the brass.
Ingredients:
- 1 tablespoon salt
- 1 tablespoon white vinegar
- 2 tablespoons all-purpose flour
Method:
- Mix ingredients: Combine salt and white vinegar in a bowl.
- Add flour: Gradually add flour to the vinegar mixture, stirring until you have a thick paste.
- Apply: Spread the paste evenly over the tarnished brass.
- Let it work: Let the paste sit for 15-30 minutes, or until it hardens.
- Gently scrub: Use a soft cloth or an old toothbrush to gently scrub away the dried paste.
- Rinse and dry: Wipe clean with a damp cloth and dry thoroughly with a soft cloth.
Ketchup or Tomato Paste
The mild acidity in tomatoes can also help to remove tarnish. This method is best for minor tarnishing.
Method:
- Apply ketchup: Apply a thin layer of ketchup or tomato paste to the tarnished brass.
- Let it sit: Allow it to sit for 10-15 minutes.
- Wipe and buff: Wipe it off with a damp cloth and buff with a dry cloth.
Pros of Natural Brass Cleaners:
- Generally safer and less toxic.
- Cost-effective and readily available ingredients.
- Good for those with sensitivities to chemicals.
Cons of Natural Brass Cleaners:
- May require more elbow grease for heavy tarnish.
- Results can vary depending on the severity of the tarnish.
- Need to be thoroughly rinsed and dried to prevent water spots.
Restoring Old or Heavily Tarnished Brass Lamps
When dealing with an antique brass lamp cleaning situation or brass that is heavily tarnished, you might need a more intensive approach. This is where how to restore brass becomes critical.
Using Specialized Brass Cleaners for Lamps
Some products are specifically designed for delicate or antique brass. These are often milder than general-purpose brass polishes. Always read the label and follow instructions precisely.
The Steel Wool Method (Use with Extreme Caution!)
For very stubborn tarnish on unlacquered brass, very fine steel wool (#0000 grade) can be used, but this is a more aggressive method. This should be a last resort and used with extreme caution.
Method:
- Test first: Always test on a small, hidden area.
- Use the finest grade: Only use #0000 steel wool.
- Use lubricant: Apply a bit of mineral oil or your chosen cleaner to the steel wool.
- Rub gently: Rub the steel wool very gently in the direction of any visible grain. Do NOT scrub hard.
- Wipe and assess: Wipe away residue immediately with a soft cloth. Assess the results. If the tarnish is gone, stop.
- Neutralize and clean: After using steel wool, it’s crucial to clean the brass thoroughly with a mild soap and water solution and dry it completely.
- Polish: Follow up with a good brass polish to restore shine.
Why this is risky: Steel wool can scratch the brass surface, and if used too aggressively, it can permanently damage the finish. It’s generally not recommended for valuable antiques unless you are experienced.
Removing Lacquer Before Cleaning (If Necessary)
If your lamp has a peeling or damaged lacquer, you might need to remove it entirely before cleaning the brass itself.
Method:
- Choose a lacquer thinner: Hardware stores sell specialized lacquer thinners.
- Test: Test on an inconspicuous area.
- Apply with care: Apply the thinner with a soft cloth or cotton ball. Work in a well-ventilated area.
- Scrub gently: As the lacquer softens, gently scrub it away with a soft cloth or an old toothbrush.
- Clean the brass: Once the lacquer is removed, clean the exposed brass using one of the methods described above.
- Rinse and dry: Ensure all thinner residue is removed, and dry the brass completely.
Maintaining the Shine: Brass Care and Protection
Once you’ve cleaned your brass lamp, keeping it looking good is important. Proper brass maintenance will prevent rapid re-tarnishing.
Applying a Protective Coating
For unlacquered brass, applying a protective coating can help keep it from tarnishing for longer.
- Wax Polish: A good quality paste wax, like beeswax or carnauba wax, can provide a protective barrier. Apply a thin layer with a soft cloth and buff to a shine. Reapply periodically.
- Specialty Lacquers: You can also purchase clear lacquers specifically designed for brass. These offer a more durable protective coating. Follow application instructions carefully, as proper ventilation and a dust-free environment are crucial for a smooth finish.
Regular Cleaning as a Preventive Measure
The best way to keep your brass lamp looking its best is through regular brass maintenance. Consistent, gentle dusting and occasional light cleaning will prevent heavy tarnish build-up, making future cleaning easier.
Specific Brass Lamp Cleaning Scenarios
Let’s look at some common brass lamp situations and how to handle them.
Cleaning Brass Fixtures on a Lamp (e.g., Base, Socket, Finial)
These smaller parts often have intricate details.
- Disassembly: If possible, disassemble the lamp to clean individual parts. This makes it easier to reach all areas.
- Cotton Swabs and Old Toothbrushes: These are invaluable for cleaning threads, screws, and decorative elements. Dip them in your chosen cleaner and gently work on the tarnish.
- Soaking (with caution): For small, removable brass parts that are heavily tarnished and not lacquered, you might consider a short soak in a gentle cleaning solution. However, prolonged soaking is not recommended as it can damage the brass or any internal components if water seeps in. Always dry thoroughly immediately after.
Antique Brass Lamp Cleaning: Preserving Value
Cleaning an antique brass lamp requires extra care to preserve its historical value and original finish.
- Identify the Finish: Determine if the brass is lacquered, plated, or solid unlacquered brass.
- Gentle is Best: Opt for the mildest cleaning methods first. A soft cloth and mild soap solution are often sufficient for routine cleaning.
- Avoid Harsh Chemicals: Steer clear of abrasive cleaners, strong acids, and aggressive polishing techniques that could remove original patina, which often adds to an antique’s value.
- Consult an Expert: If you are unsure about the best approach, consider consulting a professional restorer or conservator.
What to Avoid When Cleaning Brass Lamps
Even with the best intentions, some common mistakes can damage your brass lamp.
- Abrasive Materials: Do not use steel wool (unless it’s #0000 and used with extreme caution as a last resort), scouring pads, or abrasive powders. These will scratch the surface.
- Harsh Chemicals: Bleach, ammonia, and strong acidic cleaners can corrode brass and remove protective coatings or patina.
- Excessive Water: Letting water sit on brass can cause spotting and corrosion. Always dry immediately and thoroughly.
- Polishing Too Aggressively: Over-polishing or scrubbing too hard can wear away the brass or its finish.
- Cleaning Lacquered Brass with Tarnish Removers: If your brass is lacquered, using tarnish removers will strip the protective coating.
Frequently Asked Questions About Cleaning Brass Lamps
Here are answers to some common questions about brass care.
Q1: How often should I clean my brass lamp?
A1: For general maintenance, dusting weekly is ideal. Light cleaning with soap and water can be done as needed. For unlacquered brass that tarnishes, cleaning to remove tarnish might be necessary every few months, depending on your environment and how the brass is exposed.
Q2: My brass lamp has a green patina. Should I remove it?
A2: The green patina, often called verdigris, is a form of oxidation and can be a sign of age and character, especially on antique pieces. Whether to remove it depends on your preference and the lamp’s value. If it’s an antique, it’s often best to leave the patina intact as it can add to its value and historical appeal. If you dislike the look on a modern lamp, you can clean it off using the methods described for removing tarnish.
Q3: Can I use toothpaste to clean brass?
A3: Some people use non-gel toothpaste as a mild abrasive. While it might work for light tarnish, it’s not ideal. Toothpaste contains many ingredients, some of which could be too abrasive or leave a residue. Dedicated brass polish or natural pastes like lemon and baking soda are generally safer and more effective.
Q4: What is the best way to clean brass fixtures that are attached to the lamp?
A4: For cleaning brass fixtures that are integral to the lamp, use cotton swabs, soft cloths, and an old toothbrush dipped in your chosen cleaner. Work gently to avoid damaging the lamp’s electrical components or fabric parts. Always ensure no liquid seeps into electrical sockets.
Q5: How do I know if my brass lamp is lacquered or unlacquered?
A5: The easiest way to tell is to try cleaning a small, inconspicuous area with a mild soap and water solution. If it cleans up easily and regains its shine without any special polish, it’s likely lacquered. If it continues to look dull or shows signs of tarnish, it’s likely unlacquered brass. Sometimes, a very gentle rub with a bit of brass polish on an unlacquered piece will show immediate tarnish removal, whereas on lacquered brass, it might just smear or have no effect.
By following these detailed steps and understanding the nuances of different brass finishes, you can effectively and safely clean your brass lamps. Regular brass maintenance and the right brass cleaner for lamps will ensure your brass pieces remain a beautiful focal point in your home for years to come.