
Can you hardwire a lamp? Yes, you absolutely can hardwire a lamp safely and easily with the right guidance and precautions. This guide will walk you through the entire process, from understanding the basics of lamp wiring to completing the final electrical connections lamp. Whether you’re looking to replace a damaged lamp cord or build a custom lamp from scratch, these steps will help you connect lamp cord securely and attach power cord effectively.
Image Source: abeautifulmess.com
Deciphering Lamp Wiring Basics
Before we dive into the practical steps, it’s crucial to grasp a few fundamental concepts about lamp wiring. Every lamp needs a path for electricity to flow from the wall outlet to the bulb. This path is created through the various components of the lamp, collectively known as the lamp assembly.
Essential Lamp Components
- Power Cord: This is the lifeline, bringing electricity from the wall. It has two main wires: a hot wire and a neutral wire. Some cords also have a grounding wire (typically green or bare copper) for added safety.
- Plug: This connects the power cord to the wall outlet.
- Switch: This controls the flow of electricity, turning the lamp on and off. It can be in-line on the cord or integrated into the lamp base.
- Socket: This holds the light bulb and makes the electrical connections lamp.
- Internal Wiring: Wires that run through the lamp body, connecting the socket to the switch and the power cord.
Safety First: Crucial Precautions
Working with electricity can be dangerous if not done correctly. Always prioritize safety.
- Unplug Everything: Before you begin any work, ensure the lamp is unplugged from the wall. Double-check that no power is flowing.
- Know Your Wires: Identify the hot, neutral, and ground wires. Hot wires are usually black or red. Neutral wires are typically white. Ground wires are green or bare copper.
- Use Insulated Tools: Employ screwdrivers, pliers, and wire strippers with insulated handles to prevent electrical shocks.
- Proper Connections: Ensure all electrical connections lamp are secure and insulated. Loose wires can cause sparks or short circuits.
- Grounded Outlets: Always plug your hardwired lamp into a properly grounded outlet.
- Inspect Existing Components: If you’re rewiring a lamp or replacing a cord, inspect all other components for damage. A frayed cord or a cracked socket needs replacement.
Step-by-Step Guide to Hardwiring a Lamp
This comprehensive guide will cover the entire process, from preparing your components to making the final connections. We’ll focus on how to wire a lamp socket and how to attach power cord to the internal wiring.
Step 1: Gather Your Tools and Materials
Having the right tools makes the job smoother and safer.
Tools Needed:
- Screwdriver set (Phillips and flathead)
- Wire strippers/cutters
- Pliers (needle-nose are useful)
- Utility knife or blade
- Electrical tape
- Multimeter (optional, for testing connections)
- Work light or headlamp
Materials Needed:
- Replacement power cord with plug (ensure it’s rated for the lamp’s wattage)
- New lamp socket (if replacing)
- Wire nuts or terminal connectors (appropriate size for your wires)
- Lamp socket adapter (if needed for your lamp assembly)
- Replacement switch (if your current one is faulty)
- Insulating material (e.g., heat shrink tubing)
Step 2: Prepare the Lamp Assembly
This involves disassembling the lamp to access the internal wiring and the socket.
Disassembling the Lamp
- Unplug the Lamp: Again, this is the most critical first step.
- Remove the Shade and Bulb: Take off the lampshade and unscrew the light bulb.
- Access the Socket: Most lamp sockets are held in place by a threaded collar or a screw. Unscrew the collar or locate and remove the screw holding the socket assembly to the harp or socket extension.
- Locate the Cord Entry Point: Find where the power cord enters the lamp base. You might need to remove a base plate or a decorative cover to access this.
- Inspect Existing Wiring: Take a moment to observe how the current wiring is connected. If you’re replacing a cord, note how the old one was routed and connected.
Step 3: Replacing the Power Cord (If Necessary)
If your existing power cord is damaged, frayed, or you’re building a new lamp, you’ll need to connect lamp cord securely.
Attaching a New Power Cord
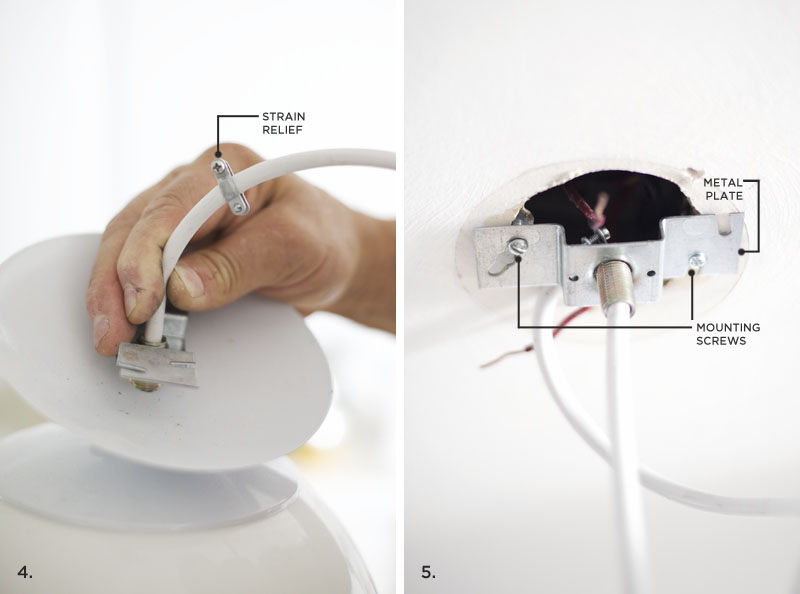
- Route the New Cord: Feed the new power cord through the entry point in the lamp base. Ensure it’s routed safely, away from any sharp edges or moving parts.
- Prepare the Cord Ends: Use wire strippers to carefully remove about 1/2 to 3/4 inch of insulation from the end of the power cord wires. You should expose the hot, neutral, and possibly ground wires. If the cord has a braided outer jacket, you might need to strip that back as well.
- Identify Wire Functions:
- Hot Wire: This wire typically has a ribbed or raised texture on the insulation, or it’s black/red.
- Neutral Wire: This wire usually has a smooth insulation, or it’s white.
- Ground Wire: This is usually green or bare copper.
- Connect to the Socket: This is where you wire a lamp socket. The socket will have terminals.
- Hot Terminal: Connect the hot wire from the power cord to the terminal that controls the switch. This is usually the darker colored terminal screw (often brass).
- Neutral Terminal: Connect the neutral wire from the power cord to the other terminal screw, which is typically silver.
- Ground Terminal (if applicable): If your socket has a third terminal, often a green screw, connect the ground wire from the power cord to this terminal.
Step 4: Wiring the Lamp Socket
Properly wiring the lamp socket is crucial for the lamp to function and for safety.
Connecting Lamp Socket Wires
- Loosen Terminal Screws: On the lamp socket, you’ll see small screws on the sides. Loosen these screws enough to wrap the bare wire around them.
- Wrap Wires Around Terminals:
- Hot Wire: Wrap the exposed hot wire around the screw on the “hot” side of the socket (usually brass). Ensure the wire goes clockwise around the screw so it tightens as you screw it in.
- Neutral Wire: Wrap the exposed neutral wire around the screw on the “neutral” side of the socket (usually silver). Again, wrap clockwise.
- Secure Terminal Screws: Tighten the terminal screws firmly. Make sure no bare wire is exposed beyond the screw. If there’s a bit of exposed wire, you can trim it or ensure it’s tucked neatly under the screw head.
- Ground Wire (if present): Connect the ground wire to the green screw on the socket.
Step 5: Integrating the Switch
If you’re replacing an in-line switch or the switch is part of the socket assembly, here’s how to connect it.
Connecting the Switch
- In-line Switch: These switches typically have two sets of wire terminals. You’ll cut the power cord and connect the wires from each side of the cord to the corresponding terminals on the switch. Often, the hot wire is interrupted by the switch.
- Socket-Integrated Switch: If the switch is part of the socket assembly (like a turn-knob or push-button on the socket itself), the wiring is usually internal to the socket, and you’ve already connected the power cord wires to the socket terminals.
Step 6: Making Electrical Connections Lamp Secure
This step involves ensuring all wire-to-wire connections are safe and insulated.
Securing Wire Connections
- Wire Nuts: If you have separate wires that need joining (e.g., connecting the power cord to internal lamp wires that aren’t directly connected to the socket), use wire nuts. Twist the bare ends of the wires together clockwise, then screw on a wire nut tightly over the twisted ends. Give a gentle tug to ensure the connection is secure.
- Terminal Blocks: Some lamps might use small terminal blocks. Insert the stripped wire ends into the appropriate slots and tighten the screws to secure them.
- Insulation: After making all connections, especially if you used wire nuts or if there’s any possibility of wires touching each other or the lamp’s metal parts, wrap them with electrical tape. Ensure all connections are completely insulated.
Step 7: Final Lamp Assembly and Testing
Once all the wiring is done, it’s time to put the lamp back together and test it.
Reassembling and Testing
- Secure the Socket: Place the socket back into its position and reattach the collar or screw. Make sure the cord is not pinched.
- Tidy Internal Wiring: Carefully arrange all the internal wires within the lamp base. Ensure they are not snagged or pinched when you reattach any covers or base plates.
- Reassemble Base: Reattach any base plates or covers you removed.
- Install Bulb and Shade: Screw in a new light bulb and place the lampshade back on.
- Plug In and Test: Plug the lamp into a working outlet and turn it on using the switch. If it doesn’t work, immediately unplug it and recheck all your connections.
Replacing a Lamp Cord
The process of replacing a lamp cord is very similar to attaching a new power cord when building a lamp from scratch. The key difference is that you’ll be disconnecting the old cord first.
Steps for Lamp Cord Replacement:
- Unplug and Disassemble: As always, unplug the lamp and disassemble it to access the socket and cord entry point.
- Disconnect Old Cord: Carefully disconnect the old power cord wires from the socket terminals and any switches or internal connections. Note which wire goes where.
- Remove Old Cord: Pull the old cord out of the lamp base.
- Install New Cord: Feed the new cord through the lamp base, ensuring correct routing.
- Connect New Cord: Wire a lamp socket and any switches using the new cord, following the connection patterns of the old cord. Refer to the sections above on wiring the socket and switch.
- Secure and Test: Reassemble the lamp and test for functionality and safety.
Troubleshooting Common Issues
Even with careful work, you might encounter problems. Here are some common issues and how to address them.
Table: Common Lamp Wiring Problems and Solutions
| Problem | Possible Cause | Solution |
|---|---|---|
| Lamp doesn’t turn on | 1. Bulb is burnt out. 2. Lamp is not plugged in. 3. Switch is faulty. 4. Loose wire connection. 5. Power cord is damaged internally. |
1. Replace the bulb. 2. Ensure the lamp is plugged in securely. 3. Test or replace the switch. 4. Unplug the lamp and carefully recheck all electrical connections lamp. 5. Test the power cord with a multimeter or replace it if suspect. |
| Lamp flickers | 1. Loose connection at the socket or switch. 2. Faulty bulb. 3. Internal wiring issue. |
1. Unplug and tighten all wire connections. 2. Replace the bulb. 3. Inspect internal wiring for damage or looseness. |
| Lamp blows a fuse or trips a breaker | 1. Short circuit (wires touching incorrectly). 2. Lamp is drawing too much power (overloaded). 3. Faulty component. |
1. Unplug immediately. Carefully re-examine all electrical connections lamp for exposed wires touching metal or each other. Ensure proper insulation. 2. Ensure the bulb wattage does not exceed the lamp’s rating. 3. Test or replace components like the socket or switch. |
| Lamp plug installation is loose or damaged | 1. Plug is worn out. 2. Wires inside the plug are loose. |
1. Replace the entire power cord with a new one that includes a plug. 2. If the plug itself is the issue, you can sometimes replace just the plug if the cord is intact. |
Advanced Lamp Wiring Considerations
For those looking to customize or tackle more complex lamp projects, consider these advanced techniques.
Adding a Dimmer Switch
If you want to control the brightness of your lamp, you can replace the standard switch with a dimmer.
Installing a Dimmer Switch:
- Compatibility: Ensure the dimmer switch is compatible with your lamp’s wattage and bulb type (incandescent, LED, etc.).
- Wiring: Dimmer switches typically have two wires that connect to the power source (hot and neutral) and two wires that connect to the load (the lamp socket). Follow the manufacturer’s wiring diagram precisely.
- Placement: Dimmer switches can be in-line on the cord or integrated into the lamp base.
Using Different Socket Types
There’s a variety of lamp sockets available for different purposes and aesthetics.
Socket Variety:
- Standard Sockets: E26 (medium base) and E12 (candelabra base) are most common.
- Keyless Sockets: These have no integrated switch, relying on an in-line switch.
- Pull-Chain Sockets: Feature a pull chain for on/off control.
- Lamp Holder Sockets: Designed to be mounted directly to surfaces or lampshades.
When you wire a lamp socket, ensure it’s rated for the correct voltage and wattage.
Building a Custom Lamp
For the DIY enthusiast, hardwiring a lamp is the foundation for creating unique lighting fixtures.
Custom Lamp Assembly Tips:
- Choose Quality Components: Invest in good quality power cords, sockets, and switches for longevity and safety.
- Consider Aesthetics: Select cords and plugs that match your lamp’s design.
- Secure All Wiring: Ensure all internal wiring is neatly managed and secured to prevent damage during use or movement.
- Test Thoroughly: Before use, always perform rigorous safety checks.
Frequently Asked Questions (FAQ)
Q1: What is the maximum wattage I can use with a hardwired lamp?
A1: The maximum wattage is determined by the lamp’s components, particularly the socket and the power cord. Most standard lamp sockets and cords are rated for up to 60 or 100 watts. Always check the specifications of your components and the lamp itself. Using a bulb with a higher wattage than the rating can cause overheating and fire hazards.
Q2: Can I use a dimmer with any type of light bulb?
A2: No. Dimmer switches are designed for specific types of bulbs. Incandescent and halogen bulbs are generally dimmable. Many LED and CFL bulbs are also dimmable, but you must look for bulbs specifically labeled as “dimmable.” Non-dimmable bulbs used with a dimmer can flicker, hum, or be damaged.
Q3: What safety standards should I look for when buying replacement parts?
A3: When purchasing replacement parts like power cords, plugs, or sockets, look for certifications from reputable organizations like UL (Underwriters Laboratories) or ETL (Intertek). These certifications indicate that the product has been tested and meets safety standards.
Q4: How do I know if my lamp needs rewiring?
A4: Signs your lamp needs rewiring include a frayed or damaged power cord, a socket that feels loose or sparks, an overheating plug or socket, or a switch that doesn’t work reliably. Any visible damage to the insulation of the wires is also a cause for concern.
Q5: Can I connect two lamp cords together?
A5: It is generally not recommended to connect two lamp cords together to extend their length. This creates an additional point of failure and potential hazard. It’s safer and easier to purchase a power cord of the appropriate length for your needs. If you must extend a cord, use a properly rated extension cord and ensure all connections are made with appropriate connectors and insulation.
Q6: What is the purpose of the ground wire in a lamp?
A6: The ground wire provides a safety path for electricity to flow to the ground in the event of a fault, such as a short circuit where a hot wire touches the metal casing of the lamp. This helps prevent electric shock to the user. Lamps with metal bases or parts that a user can touch should ideally have a ground wire.
By following these detailed instructions and prioritizing safety, you can confidently hardwire a lamp, whether it’s for a simple repair or a creative new project. Remember, when in doubt, consult a qualified electrician.