
Can I polish a brass lamp? Yes, you absolutely can polish a brass lamp to restore its beautiful glow! Tarnished brass can make even the most exquisite lamp look dull and lifeless. This comprehensive guide will walk you through everything you need to know about brass cleaning and brass restoration, from choosing the right polish to the best polishing methods to keep your brass fixtures looking their best. We’ll cover DIY brass polish options and discuss the best brass cleaner for different situations.
Brass, with its warm, golden hue, adds a touch of elegance to any home. However, it’s prone to tarnishing, a natural chemical reaction that leaves it looking dull and discolored. Fret not! With the right techniques and a little elbow grease, you can bring back the luster to your beloved brass lamps. This article delves deep into brass care, offering practical advice for achieving a brilliant shine.
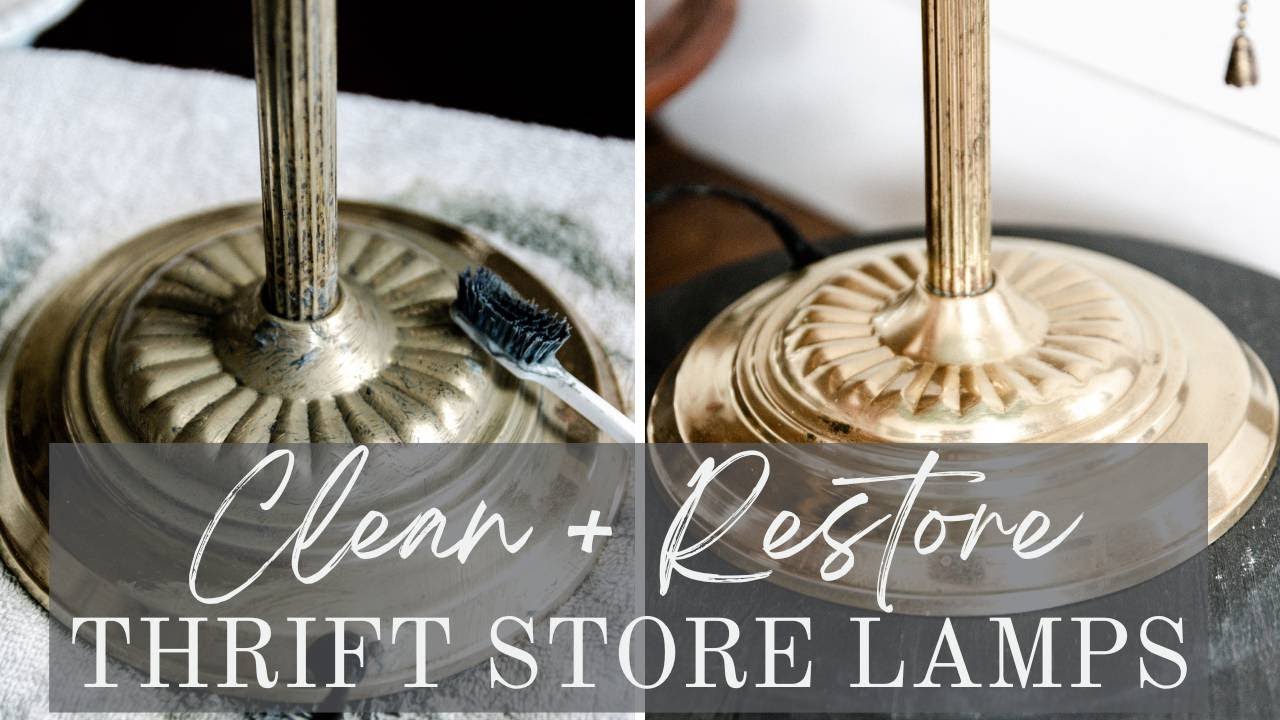
Image Source: i.ytimg.com
Why Does Brass Tarnish?
Before we dive into polishing, it’s helpful to know why brass gets tarnished. Brass is an alloy, primarily made of copper and zinc. When copper is exposed to oxygen and moisture in the air, it undergoes oxidation. This reaction creates a layer of copper oxide, which is the tarnish we see. Other elements, like sulfur compounds in the air (often from pollution), can also react with brass, forming copper sulfides, which can appear as dark spots or a greenish patina. The more humid or polluted the environment, the faster brass will tarnish.
Deciding on the Right Approach: Lacquered vs. Unlacquered Brass
One of the most crucial steps in polishing brass is to determine if your lamp has a protective lacquer coating. Many modern brass items are lacquered to prevent tarnishing and maintain their shine.
Identifying Lacquered Brass
- Visual Inspection: Lacquered brass often has a slightly glossier, more uniform finish. You might see a faint yellowish or amber tint.
- Rub Test: Gently rub a small, inconspicuous area with a soft cloth and a bit of gentle cleaner (like soapy water). If the cloth picks up brass-colored residue, it’s likely unlacquered. If the cloth remains clean, it’s probably lacquered.
- Acetone Test: A stronger indicator is using acetone (nail polish remover). Apply a small amount of acetone to a cotton swab and rub a hidden spot. If the finish begins to soften or peel, it’s lacquered.
Polishing Lacquered Brass
If your brass lamp is lacquered, you should not use aggressive brass cleaning methods or standard metal polish. The goal here is to clean the lacquer, not the brass itself.
- Gentle Cleaning: Use a soft cloth dampened with warm, soapy water. Mild dish soap is usually sufficient.
- Rinse and Dry: Wipe down the lamp with a clean, damp cloth to remove soap residue. Immediately dry the lamp thoroughly with a soft, lint-free cloth to prevent water spots.
- Waxing (Optional): For extra protection and shine, you can apply a thin coat of carnauba wax or a specialized furniture polish designed for lacquered surfaces.
Important Note: If the lacquer is peeling or damaged, you’ll need to remove it entirely before you can polish the underlying brass. This process is discussed in the unlacquered brass section.
Polishing Unlacquered Brass
Unlacquered brass will tarnish over time and requires direct polishing to restore its shine. This is where most of our brass restoration efforts will focus.
Gathering Your Supplies for Brass Polishing
Before you begin polishing, ensure you have the right tools and materials. Having everything ready will make the process smoother.
Essential Supplies:
- Soft Cloths: Plenty of soft, lint-free cloths (microfiber cloths are excellent). You’ll need them for cleaning, applying polish, and buffing.
- Gloves: To protect your hands from the polish and tarnish.
- Brass Cleaner or Metal Polish: We’ll discuss options below.
- Small Brush: An old toothbrush or a soft-bristled paintbrush is useful for getting into crevices and decorative details.
- Lukewarm Water: For initial cleaning.
- Mild Soap: Such as dish soap.
- Newspaper or Drop Cloth: To protect your work surface.
Choosing the Best Brass Cleaner and Metal Polish
The market offers a variety of options for brass cleaning. Selecting the right metal polish is key to achieving optimal results without damaging the brass.
Commercial Brass Cleaners and Polishes
These are readily available and often very effective. They are specifically formulated to cut through tarnish and bring out the shine.
- Brasso: A classic and widely recognized brass polish. It’s a liquid polish that works well on various metals, including brass.
- Hagerty Silversmiths’ Spray: While marketed for silver, it’s also excellent for brass and other metals. It offers a good shine and some anti-tarnish protection.
- Twinkle Brass & Copper: A popular cream polish that is easy to apply and buff.
- Simichrome Polish: Known for its exceptional polishing capabilities, often used for automotive and metal restoration. It’s a fine polishing compound that can bring out a deep shine.
When using any commercial metal polish, always read and follow the manufacturer’s instructions carefully. Test the polish in an inconspicuous area first.
DIY Brass Polish Options
For those who prefer a more natural or economical approach, several effective DIY brass polish recipes can be made at home.
-
Lemon and Baking Soda Paste:
- Ingredients: 1 tablespoon baking soda, 1/2 tablespoon lemon juice, a few drops of water (if needed).
- How to Make: Mix baking soda and lemon juice to form a paste. Add a tiny bit of water if the paste is too thick.
- How to Use: Apply the paste with a soft cloth, gently rub the tarnished areas, then rinse thoroughly with water and dry immediately.
-
Vinegar and Flour Paste:
- Ingredients: 1 tablespoon salt, 1 tablespoon flour, 1 tablespoon white vinegar.
- How to Make: Mix all ingredients into a smooth paste.
- How to Use: Apply the paste to the brass, let it sit for 15-30 minutes (depending on the level of tarnish), then wipe off with a damp cloth, rinse, and dry thoroughly.
-
Ketchup:
- How to Use: The mild acidity in tomatoes can help lift tarnish. Apply a thin layer of ketchup to the tarnished brass, let it sit for a few minutes, then wipe off with a damp cloth, rinse, and dry. This is best for light tarnish.
Table: DIY Brass Polish Comparison
| DIY Polish | Ingredients | Best For | Notes |
|---|---|---|---|
| Lemon & Baking Soda | Baking soda, lemon juice, water | Moderate Tarnish | Effective for general cleaning and shine. |
| Vinegar & Flour | Salt, flour, white vinegar | Heavier Tarnish | Requires a bit more dwell time. |
| Ketchup | Tomato ketchup | Light Tarnish | Quick fix for minor dullness. |
Always remember to rinse off any DIY polish thoroughly and dry the brass immediately to prevent water spots or further reaction.
The Step-by-Step Guide to Polishing Your Brass Lamp
Now that you have your supplies and know your brass type, let’s get to the actual polishing methods. This process is crucial for successful brass restoration.
Step 1: Prepare Your Workspace and Lamp
- Protect Your Surface: Lay down newspaper or a drop cloth on a well-lit, flat surface. This will catch any drips or residue from the polish.
- Disassemble (If Possible): If your lamp has removable shades or other parts, carefully disassemble them. This allows for easier access to all surfaces.
- Dust the Lamp: Use a dry, soft cloth to remove any loose dust or debris.
Step 2: Initial Cleaning
Before applying any polish, it’s essential to clean the lamp thoroughly. This removes dirt, grime, and any oily residues that could interfere with the polishing process.
- Mix Cleaning Solution: In a bowl, mix a few drops of mild dish soap with lukewarm water.
- Wipe Down: Dampen a soft cloth with the soapy water. Wring out the cloth well so it’s not dripping wet.
- Clean Gently: Wipe down the entire brass lamp, paying attention to any crevices or intricate details. Use your small brush for hard-to-reach areas.
- Rinse: Use a separate clean cloth dampened with plain water to wipe away all soap residue.
- Dry Thoroughly: Immediately dry the lamp with a clean, dry, lint-free cloth. Ensure no moisture is left behind, especially in decorative grooves, as this can lead to water spots or dullness.
Step 3: Apply the Brass Cleaner or Polish
This is where the magic happens! Choose your preferred cleaner or polish and apply it according to the instructions.
Using Commercial Polish:
- Read Instructions: Always refer to the product label for specific usage directions.
- Apply a Small Amount: Put a small amount of polish onto a clean, soft cloth. Don’t apply it directly to the lamp.
- Rub in Sections: Work on small sections of the lamp at a time. Rub the polish onto the brass surface in a circular motion or with the grain of the metal.
- Allow to Work (If Required): Some polishes require a short dwell time to penetrate the tarnish. Check the product’s instructions.
Using DIY Polish:
- Prepare Paste: Mix your chosen DIY polish ingredients to form a paste.
- Apply Paste: Using a soft cloth or your small brush, apply the paste to the tarnished areas of the brass.
- Rub Gently: Rub the paste into the brass in a circular motion. For heavier tarnish, you might need to apply a bit more pressure.
- Dwell Time: For the vinegar and flour paste, let it sit for 15-30 minutes. For the lemon and baking soda paste, you can usually proceed to wiping off immediately after rubbing.
Step 4: Buffing to a Shine
Once you’ve applied the polish and allowed it to work (if necessary), it’s time to buff away the residue and reveal the shine.
- Use a Clean Cloth: Take a clean, dry, soft cloth.
- Buff Vigorously: Rub the polished area with the dry cloth using a firm, circular motion. You’ll start to see the tarnish disappear and the shine emerge.
- Repeat if Necessary: For heavily tarnished areas, you might need to repeat the polishing and buffing process. Apply more polish to those spots and buff again.
- Clean Crevices: Use your small brush or a cotton swab to gently buff intricate details and remove any polish residue left in grooves.
Step 5: Final Wipe Down and Protection
After achieving the desired shine, give the entire lamp a final wipe-down.
- Buff the Entire Lamp: Use a clean, dry cloth to give the entire lamp a final buff. This helps to remove any remaining polish residue and ensures an even shine.
- Consider a Protective Coat (Optional): For unlacquered brass, you can apply a thin coat of clear paste wax (like carnauba wax) or a specialized metal protectant. This will help to slow down future tarnishing and make cleaning easier. Apply the wax with a clean cloth, let it haze over for a few minutes, then buff it to a soft sheen with another clean cloth.
Dealing with Stubborn Tarnish and Patina
Sometimes, tarnish can be deep-seated, or you might encounter a desirable patina.
Removing Deep Tarnish
For very stubborn tarnish that doesn’t respond to initial polishing, you might need a stronger metal polish or repeat applications. Some fine-grade metal polishes are designed for more challenging situations. Always use with caution and test in a small area first.
Preserving a Desirable Patina
Some people appreciate the aged look of brass and the subtle patina that develops over time. If this is the case, you can clean the lamp gently with soap and water as described in Step 2, then dry it thoroughly. You can also apply a protective wax to prevent further tarnishing while preserving the existing look.
Polishing Specific Brass Lamp Components
Different parts of a brass lamp might require slightly different handling.
Brass Lamp Base and Body
These larger, more accessible areas are usually straightforward. Follow the general polishing steps. For ornate bases with lots of detail, use your small brush to get into all the nooks and crannies.
Brass Lamp Stem and Arms
These can be tricky due to their shape. It’s often easier to wrap a cloth around them or use a cloth-covered stick to reach difficult spots. Gentle twisting motions can help polish cylindrical stems.
Brass Lamp Finials and Accents
These small decorative pieces often have intricate designs. Use a cotton swab or the tip of a soft cloth to apply polish and buff these small components. A soft-bristled brush is also invaluable here.
Maintaining the Shine: Ongoing Brass Care
Once you’ve restored your brass lamp’s glow, consistent brass care is essential to keep it looking its best.
- Regular Dusting: Dust your lamp regularly with a soft, dry cloth. This prevents dust from settling and contributing to dullness.
- Gentle Cleaning: If the lamp gets smudged or dirty, clean it with a damp, soft cloth and mild soap, then dry it immediately.
- Avoid Harsh Chemicals: Never use abrasive cleaners, steel wool, or ammonia-based cleaners on brass, as these can scratch the surface or remove the protective finish.
- Consider the Environment: Minimize exposure to high humidity or direct sunlight, which can accelerate tarnishing.
- Reapply Wax (Optional): If you applied a protective wax, consider reapplying it every 6-12 months, depending on your home environment, to maintain the protection.
Frequently Asked Questions About Polishing Brass Lamps
Here are answers to some common questions about brass cleaning and brass restoration:
Q1: How often should I polish my brass lamp?
The frequency depends on your environment and how quickly your brass tarnishes. For most homes, a polish every 6-12 months is sufficient. If your lamp is in a humid area or exposed to pollutants, you might need to polish it more often. Regular dusting and occasional gentle cleaning with soapy water will help extend the time between polishes.
Q2: Can I use toothpaste to polish brass?
While toothpaste can have a mild abrasive quality that might remove some tarnish, it’s not ideal for brass. The abrasives can be too harsh, leading to micro-scratches on the surface, especially on lacquered brass. It’s better to use specialized metal polish or the recommended DIY pastes for a safer and more effective clean.
Q3: My brass lamp has dark spots. How do I remove them?
Dark spots often indicate more advanced tarnishing, possibly due to corrosion. You’ll likely need a good quality metal polish and a bit more elbow grease. For very deep pitting or corrosion, you might need a stronger cleaner, but always test in an inconspicuous area first to ensure it doesn’t damage the brass.
Q4: What if I accidentally scratch my brass lamp during polishing?
Minor scratches might be buffed out with a very fine metal polish. If the scratch is deep, it might be difficult to completely remove without professional refinishing. Always use soft cloths and gentle pressure to avoid this.
Q5: Can I polish antique brass lamps?
Yes, but with extreme caution! Antique brass items can be delicate and may have a historical patina that is valuable. Always identify if the item is lacquered first. If it’s unlacquered antique brass, start with the gentlest cleaning methods (mild soap and water) and a very mild polish. Test in an inconspicuous area. Sometimes, it’s best to consult with a professional conservator before attempting extensive brass restoration on valuable antiques.
Q6: Is it okay to use vinegar directly on brass?
Using undiluted vinegar directly on brass can be too harsh and may cause etching or discoloration. It’s best to use vinegar in a diluted form or as part of a paste, as recommended in the DIY polish section, and always rinse thoroughly afterward.
By following these detailed steps and brass care tips, you can effectively polish your brass lamp and restore its natural, radiant glow. Enjoy your beautifully shining lamp!