
Can you connect an LED light directly to a battery? Yes, you can connect an LED light directly to a battery, but only if the battery’s voltage precisely matches the LED’s forward voltage and the battery can supply sufficient current without overheating. However, this is rarely the case and can easily damage the LED. The safest and most effective way to connect an LED light involves using a LED driver connection or a LED power supply designed for that specific LED or array of LEDs. This guide will walk you through the essential steps and considerations for successfully connecting your LED lights.
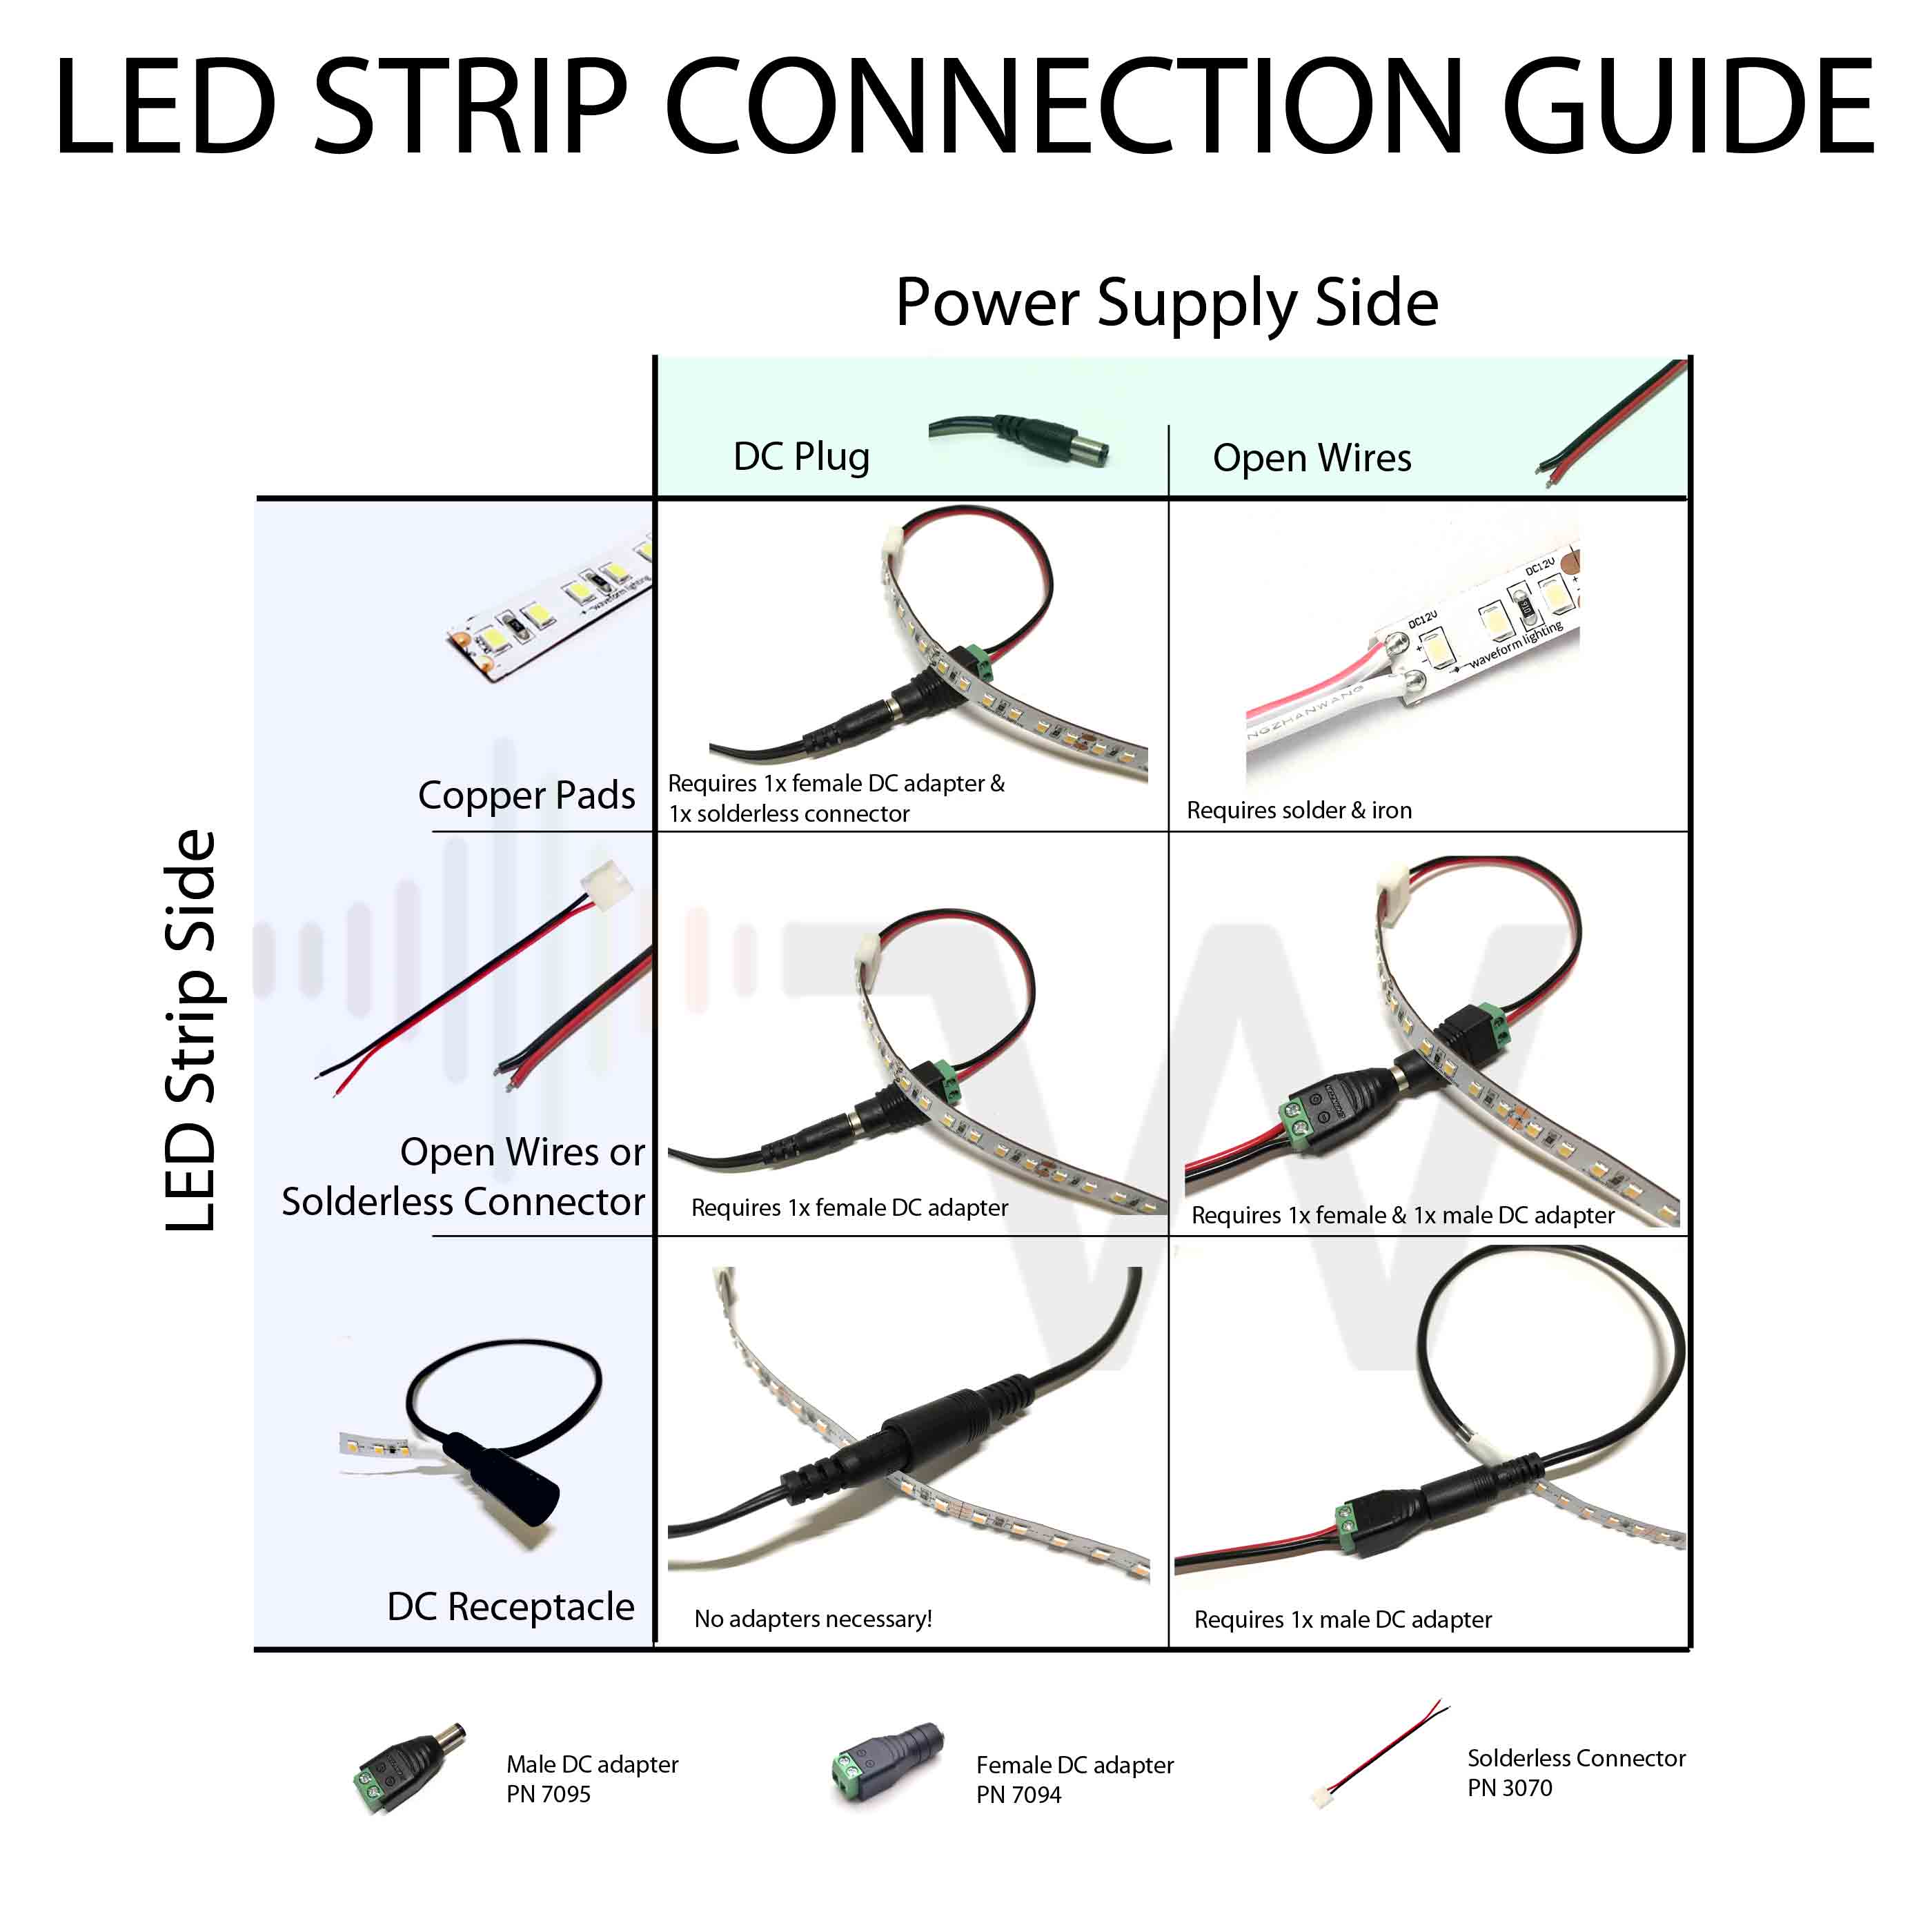
Image Source: www.waveformlighting.com
Introduction to LED Lighting
LEDs, or Light Emitting Diodes, are semiconductor devices that emit light when an electric current passes through them. They are incredibly energy-efficient, long-lasting, and versatile, making them a popular choice for everything from home lighting to complex electronic displays. Unlike traditional incandescent bulbs, LEDs are not simple resistors; they are diodes with specific electrical requirements. This means that LED wiring needs careful attention to ensure proper function and longevity. Connecting an LED improperly can lead to it burning out quickly or not lighting up at all.
Fathoming LED Basics
At its core, an LED has two terminals: an anode (positive) and a cathode (negative). Current must flow from the anode to the cathode for the LED to illuminate. This directionality is a fundamental characteristic of diodes. The amount of light an LED emits is related to the current flowing through it. Too little current, and it will be dim; too much, and it will be damaged.
Comprehending LED Voltage
One of the most crucial aspects of connecting LEDs is understanding LED voltage. Each LED has a “forward voltage” (Vf) – the minimum voltage required to make it emit light. This voltage varies depending on the LED’s color and type, typically ranging from 1.8V for red LEDs to 3.3V or higher for blue and white LEDs. Exceeding this voltage without proper current limiting will almost certainly destroy the LED.
Essential Components for Connecting LEDs
Before you begin how to wire an LED, gather these vital components:
- LEDs: The light-emitting diodes themselves. These can be individual components, integrated into a strip, or part of a fixture.
- Power Source: This could be a battery, a wall adapter, or a dedicated power supply.
- Current Limiting Device: This is absolutely critical. It can be a resistor, a constant current LED driver, or a constant voltage power supply.
- Wiring: Insulated wires to connect the components.
- Connectors/Soldering Equipment: Depending on your setup, you might use wire connectors, terminal blocks, or need to LED soldering equipment.
Resistors: The Simple Current Limiters
For individual LEDs or simple circuits, a resistor is often used. The resistor “drops” the excess voltage and limits the current.
Calculating the Right Resistor
To figure out the correct resistor value, you’ll need to know:
- Source Voltage (Vs): The voltage of your power supply (e.g., a 9V battery).
- LED Forward Voltage (Vf): The voltage the LED needs to light up (e.g., 3V for a red LED).
- Desired LED Current (If): The maximum current the LED can handle, usually found in its datasheet (e.g., 20mA or 0.02A).
The formula for calculating the required resistance (R) is:
R = (Vs – Vf) / If
Example:
If Vs = 9V, Vf = 3V, and If = 0.02A:
R = (9V – 3V) / 0.02A = 6V / 0.02A = 300 ohms
You would then select a standard resistor value close to this, ideally slightly higher to be safe.
LED Drivers: For More Advanced Setups
For multiple LEDs, higher power LEDs, or consistent brightness, an LED driver connection is often preferred. LED drivers are specifically designed to provide a constant current or constant voltage to the LEDs, ensuring they operate optimally and safely.
Constant Current vs. Constant Voltage Drivers
- Constant Current Drivers: These are ideal for most LEDs, especially higher-power ones. They maintain a steady current flow, regardless of small fluctuations in voltage. This ensures consistent brightness and protects the LEDs from overcurrent.
- Constant Voltage Drivers: These are typically used for LED strip connection where the strip itself has built-in resistors. The driver provides a steady voltage (e.g., 12V or 24V), and the resistors on the strip limit the current to each individual LED.
Power Supplies: The Energy Source
The LED power supply is the heart of your LED circuit, providing the necessary electricity. Common sources include:
- Batteries: Useful for portable applications. You can connect LED to battery, but always with a current-limiting resistor or proper driver.
- Wall Adapters (AC to DC Converters): These convert household AC power to a lower DC voltage suitable for LEDs.
- Dedicated LED Power Supplies: These are often more robust and efficient, designed for continuous operation of LED lighting systems.
Basic LED Wiring Methods
There are two primary ways to wire multiple LEDs: series vs. parallel LED configurations. Each has its advantages and disadvantages.
Series Wiring
In a series connection, LEDs are wired end-to-end, forming a single loop. The current flows through each LED sequentially.
How it works:
- The anode of one LED connects to the cathode of the next.
- The total forward voltage required for the circuit is the sum of the individual LED forward voltages.
- The current through all LEDs is the same.
Advantages:
- Simpler wiring for a chain of LEDs.
- Requires only one current-limiting resistor (or driver).
Disadvantages:
- If one LED fails (opens), the entire chain goes out.
- Requires a higher source voltage that can accommodate the total forward voltage.
LED Circuit Diagram (Series):
+—-[R]—-|>|—-|>|—-|>|—-+ | | [Vs] [GND] | | +——————————–+
(Where [R] is the resistor, |>| represents an LED, [Vs] is the voltage source positive, and [GND] is the voltage source negative.)
Fathoming Series Calculations
If you have three LEDs, each with a Vf of 3V, and you want them to run at 20mA (0.02A) from a 12V power supply, the calculation is:
- Total LED Forward Voltage (Vf_total): 3V + 3V + 3V = 9V
- Voltage Drop across Resistor (Vr): Vs – Vf_total = 12V – 9V = 3V
- Required Resistor (R): Vr / If = 3V / 0.02A = 150 ohms
Parallel Wiring
In a parallel connection, LEDs are wired side-by-side, with their anodes connected together and their cathodes connected together.
How it works:
- The voltage across each LED is the same as the source voltage (after accounting for any series resistors).
- The total current drawn from the source is the sum of the current through each LED.
Advantages:
- If one LED fails (opens), the other LEDs will continue to light up.
- Each LED only requires the individual LED’s forward voltage.
Disadvantages:
- Requires individual current-limiting resistors for each LED (or a constant current driver).
- Can be more complex wiring.
- Uneven current distribution can occur if LEDs have slightly different forward voltages, potentially leading to some LEDs being brighter than others or failing prematurely.
LED Circuit Diagram (Parallel):
+—-|>|—-+ | | +—-|—-|>|—-|—-+ | | | | [Vs] +—-|>|—-+ [GND] | | +———————-+
(This diagram shows the basic parallel connection. For current limiting, each LED would typically have its own resistor in series.)
Deciphering Parallel Wiring Considerations
When connecting LEDs in parallel without a constant current driver, it’s essential to include a resistor in series with each LED. This is because slight variations in the forward voltage of individual LEDs can cause significant current imbalances in a parallel setup.
Example for Parallel:
If you have three LEDs, each with a Vf of 3V and a desired If of 20mA (0.02A), and you are using a 5V power supply:
- Voltage Drop across Resistor (Vr) for each LED: Vs – Vf = 5V – 3V = 2V
- Required Resistor (R) for each LED: Vr / If = 2V / 0.02A = 100 ohms
Series-Parallel Combinations
For larger lighting projects, you might combine series and parallel wiring. For instance, you might wire several LEDs in series to meet the voltage requirement, and then connect these series “strings” in parallel. This approach balances the advantages and disadvantages of both methods.
Advanced Connection Techniques
LED Soldering
For a durable and reliable connection, LED soldering is often the best method. It creates a strong electrical bond between the LED leads and the wires or PCB pads.
Steps for Soldering LEDs:
- Prepare the Work Area: Ensure good lighting and ventilation. Have your soldering iron, solder, flux, wire strippers, and helping hands tool ready.
- Identify Terminals: Locate the anode (+) and cathode (-) of your LED. The longer lead is usually the anode, and the flat edge on the LED casing indicates the cathode. If using an LED strip, the pads are usually marked.
- Tin the Leads/Pads: Apply a small amount of solder to the tip of your soldering iron and then to the LED leads or PCB pads. This helps heat transfer.
- Strip and Tin Wires: Strip a small amount of insulation from your wires and tin them with solder.
- Make the Connection: Hold the tinned wire against the tinned LED lead or pad. Apply heat from the soldering iron to both simultaneously until the solder flows, creating a smooth, shiny joint.
- Cool and Insulate: Allow the joint to cool completely before moving. You can use heat shrink tubing or electrical tape to insulate the connection.
Important Note: Avoid overheating the LED, as this can damage the semiconductor. Work quickly and efficiently.
Using Terminal Blocks and Connectors
For less permanent installations or if you’re not comfortable with soldering, screw terminals or push-in wire connectors can be used.
- Terminal Blocks: These allow you to insert stripped wires and tighten them with screws. Ensure the wires are securely clamped.
- Wire Connectors (e.g., Wago connectors): These are quick and easy to use. You strip the wire to the recommended length and push it into the connector.
LED Strip Connection
LED strip connection is a common application. LED strips usually come with pre-soldered wires or connection points.
Connecting LED Strips:
- Cut to Size: Most LED strips can be cut at designated points (usually marked with a scissor icon).
- Prepare the Strip: If you need to extend or connect sections, you can use special connectors that clip onto the copper pads, or you can solder directly to the pads.
- Connect to Power: Connect the positive (+) and negative (-) wires from your LED strip to your power supply or LED driver, ensuring correct polarity. For LED strips powered by a constant voltage power supply, you’ll connect the strip directly to the output terminals.
Series vs. Parallel LED: A Deeper Dive
Choosing between series vs. parallel LED wiring depends heavily on your project’s specifics.
| Feature | Series Connection | Parallel Connection |
|---|---|---|
| Voltage | Sum of individual LED forward voltages | Same as the source voltage (for each LED branch) |
| Current | Same through all LEDs | Sum of current through each LED |
| Current Limiting | One resistor/driver for the whole string | Individual resistor/driver for each LED branch |
| Failure Mode | If one LED fails open, the whole string goes out | If one LED fails open, others remain lit |
| Brightness | Generally consistent if driven correctly | Can vary if LEDs have different Vf values |
| Complexity | Simpler wiring for long chains | Can be more complex, especially with resistors per LED |
| Source Voltage | Requires a higher source voltage | Can use lower source voltages |
| Best For | High-power LEDs, consistent brightness | Low-power LEDs, robustness against single LED failure |
When to Connect LED to Battery Safely
If you intend to connect LED to battery, always use a resistor or a suitable voltage regulator/driver.
-
Example: Connecting a single 3V LED to a 9V battery.
- Vf = 3V, Vs = 9V. Let’s aim for 20mA (0.02A).
- Vr = 9V – 3V = 6V
- R = 6V / 0.02A = 300 ohms. Use a 300-ohm or slightly higher resistor.
-
Example: Connecting multiple 3V LEDs in series to a 12V battery.
- If you have 3 LEDs (3V each), Vf_total = 9V.
- Vr = 12V – 9V = 3V
- R = 3V / 0.02A = 150 ohms. Connect all three LEDs in series, then connect the series string to the battery through a 150-ohm resistor.
Troubleshooting Common LED Issues
If your LEDs aren’t working, here are some common problems and solutions:
LED Not Lighting Up
- Check Polarity: Ensure the anode is connected to the positive side and the cathode to the negative side.
- Check Connections: Verify that all wires are securely connected and there are no loose contacts.
- Check Voltage: Is the power source providing the correct voltage?
- Check Resistor/Driver: Is the current-limiting resistor the correct value, or is the LED driver functioning properly?
- Check the LED: The LED itself might be faulty. Try testing it with a known good power source and resistor.
LED is Too Dim
- Insufficient Voltage: The power source might be too low.
- Too Much Resistance: The current-limiting resistor might have too high a value.
- Low Current: The power supply might not be able to provide enough current.
- LED Type: The LED might be rated for lower brightness.
LED is Too Bright or Flickering
- No Current Limiting: This is the most common cause of rapid LED failure. Ensure you have a resistor or driver.
- Incorrect Resistor Value: The resistor might be too small, allowing too much current.
- Unstable Power Source: The power supply might be fluctuating.
Frequently Asked Questions (FAQ)
Q: Do I need a resistor for every LED on an LED strip?
A: Typically, no. Most LED strips have resistors built into the strip itself, usually in series with groups of LEDs. When connecting an LED strip to a LED power supply, you usually only need to ensure the power supply provides the correct voltage (e.g., 12V or 24V) and sufficient current.
Q: What happens if I connect an LED without a resistor?
A: Connecting an LED directly to a power source with a higher voltage than its forward voltage will allow excessive current to flow. This will heat the LED rapidly and, in most cases, cause it to burn out permanently within seconds or minutes.
Q: Can I use a higher resistance value than calculated?
A: Yes, using a slightly higher resistance value is generally safe. It will reduce the current flowing through the LED, making it dimmer but also prolonging its lifespan. Using a lower resistance is dangerous.
Q: How do I determine the current rating for an LED?
A: The current rating (forward current, If) is always specified in the LED’s datasheet. This is the maximum current the LED can safely handle.
Q: What is an LED driver connection?
A: An LED driver connection refers to wiring an LED or a string of LEDs to a specialized electronic circuit called an LED driver. Drivers provide a constant current or voltage, regulate the power, and protect the LEDs.
Q: How do I know which wire is positive and negative on an LED strip?
A: Most LED strips are clearly marked with “+” and “-” symbols near the connection points. If not, you can usually infer it from the wiring: often, the red wire is positive, and the black wire is negative, but always check any accompanying documentation.
Q: Can I power LEDs from a 12V car battery?
A: Yes, but you must use appropriate resistors or a 12V LED driver. If your LEDs require a lower voltage (e.g., 3V), you’ll need to configure them in series with resistors or use a DC-DC converter/driver to step down the voltage and limit the current.
Q: Is it better to wire LEDs in series or parallel?
A: It depends on the application. Series wiring is simpler and better for consistent brightness but fails completely if one LED breaks. Parallel wiring is more resilient to individual LED failures but requires more careful current management for each LED.
By following these guidelines and paying close attention to voltage and current requirements, you can confidently connect your LED lights for a variety of projects, from simple indicator lights to sophisticated illumination systems. Remember, safety and proper component selection are key to successful and long-lasting LED installations.