
Can you fix a loose LED strip connector? Yes, you absolutely can! This guide will walk you through fixing your LED light strip connectors, whether you have a loose LED strip connection, faulty LED connector troubleshooting needs, or you’re dealing with LED strip wire adapter issues. We’ll cover everything from simple fixes to more involved LED strip connector repair so you can get your lights shining bright again. Whether it’s a loose LED strip connection that’s flickering or a complete failure, this guide will help you with LED strip connection fix and reconnecting LED strip lights. We’ll also tackle repairing LED strip power connector problems and issues with the LED strip to controller connection. If you’re facing LED strip extension connector problems or need damaged LED strip connector replacement, this is for you.
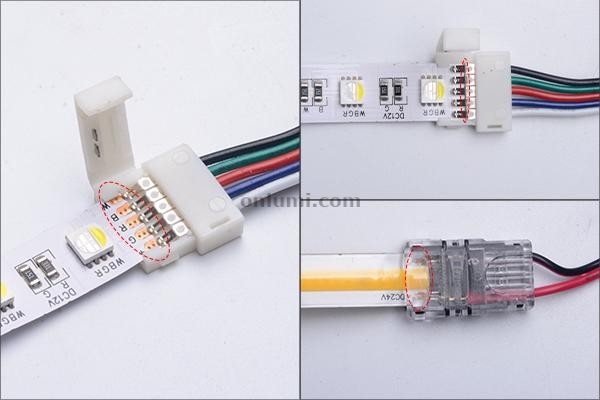
Image Source: www.onlumi.com
Why Connectors Fail
LED light strips are amazing for adding ambiance and light. But sometimes, the connections can go bad. This can happen for a few reasons:
- Wear and Tear: Over time, constant bending or pulling can loosen connections.
- Poor Installation: If the connectors weren’t attached firmly during setup, they can fail.
- Moisture or Dirt: Exposure to water or dust can corrode the metal parts inside the connector.
- Bad Quality Connectors: Sometimes, the connectors themselves are just not made very well and break easily.
- Incorrect Usage: Forcing the wires into the connector the wrong way can damage it.
Tools You’ll Need
Gathering the right tools makes the job much easier. Here’s what you might need for LED strip connector repair:
| Tool Name | Purpose | Notes |
|---|---|---|
| Wire Strippers | To remove the plastic coating from LED strip wires. | Choose a size appropriate for small wires. |
| Small Phillips Head Screwdriver | For removing or tightening screws in certain connector types. | A precision set is often helpful. |
| Pliers (Needle-Nose) | For gripping small wires or connector pieces. | Good for delicate work. |
| Heat Gun or Hair Dryer | To shrink heat shrink tubing for a secure seal. | A hairdryer on a high setting can work. |
| Heat Shrink Tubing | To insulate and protect wire connections. | Get a variety of sizes. |
| Electrical Tape | As a temporary fix or for added insulation. | Use good quality tape. |
| Multimeter (Optional) | To check for voltage and continuity, helping with faulty LED connector troubleshooting. | Great for diagnosing if power is reaching the strip. |
| Soldering Iron & Solder | For a more permanent and robust LED strip connection fix. | If you’re comfortable with soldering. |
| Replacement Connectors | If your current ones are beyond repair or you need damaged LED strip connector replacement. | Buy the right type for your strip. |
| Small Wire Cutters | For trimming excess wire. | Sharp cutters prevent fraying. |
| Safety Glasses | To protect your eyes from debris or stray solder. | Always wear them when working with tools. |
Common LED Strip Connector Problems and Fixes
Let’s dive into the specific issues you might face and how to fix them.
Problem 1: Loose LED Strip Connection
This is super common. It happens when the wires inside the connector aren’t making good contact with the LED strip or the connector pins.
Symptoms:
- Flickering lights.
- Sections of the LED strip not lighting up.
- Lights turning on and off by themselves.
How to Fix:
- Safety First: Always unplug your LED strip from the power source before you start.
- Inspect the Connector: Carefully look at the connector attached to your LED strip. If it’s a clip-on type, gently try to push the wires further into the connector. Make sure the copper contacts inside are touching the wires firmly.
- For Clip-On Connectors:
- Open the clip.
- Make sure the exposed copper ends of the LED strip wires are clean and bright. If they look dull or corroded, gently scrape them with a small knife or sandpaper.
- Ensure the wires are correctly positioned under the metal prongs inside the connector. The red wire usually goes to the positive (+) terminal, and the black wire to the negative (-). Check your specific strip for markings.
- Close the clip firmly. You should feel a slight snap as it secures.
- Gently pull on the wires to check if they are held securely.
- For Solderless Squeeze Connectors:
- These connectors have small pins that pierce the wire insulation. Check if these pins are properly embedded in the wires.
- You might need to re-squeeze the connector with pliers to ensure a tight fit. Some connectors have a small cover you might need to open first.
- If the Connection is Still Loose:
- Consider reconnecting LED strip lights using a new, high-quality connector. This is often the most reliable fix for a persistently loose LED strip connection.
- For a more robust LED strip connection fix, soldering is an excellent option, especially for reconnecting LED strip lights or when dealing with LED strip extension connector problems.
Problem 2: Damaged LED Strip Connector Replacement
Sometimes, a connector is just too far gone. It might be cracked, corroded, or the pins might be bent or broken. In these cases, damaged LED strip connector replacement is necessary.
Symptoms:
- Visible physical damage to the connector.
- No power to the LED strip at all.
- Corrosion or rust on metal parts.
How to Fix:
- Safety First: Unplug the LED strip power supply.
- Remove the Old Connector:
- If the connector is clipped on, you might be able to gently pry it open with a small flathead screwdriver.
- If it’s a solderless crimp connector, you might need to carefully cut the wire just before the connector.
- If the connector is attached to the strip itself (common for the start of a strip), you’ll need to cut off the damaged section of the strip. Ensure you cut on the designated cutting line on the LED strip.
- Prepare the New Connector:
- Purchase the correct type of connector for your LED strip (e.g., 4-pin for RGB, 2-pin for single color). Make sure it matches the width of your LED strip.
- If you’re using a new clip-on connector, it will likely come with a small piece of wire or a pre-attached wire lead. If it’s just the connector, you’ll need a separate connector with wires.
- Attach the New Connector:
- For Clip-On Connectors:
- If you had to cut the strip, expose a clean copper pad on the strip end.
- Carefully insert the LED strip into the new connector, ensuring the copper pads on the strip align with the pins in the connector. For RGB strips, align the colors (e.g., R, G, B, V+/12V) correctly.
- Close the clip firmly.
- For Solderless Connectors (with wires):
- Strip about 5-7mm of insulation from the end of the LED strip wires (if applicable) and the wires from the new connector.
- Insert the wires into the correct channels in the connector. For RGB strips, match the colors: Red to Red, Green to Green, Blue to Blue, and the common anode/cathode wire (often white or black) to its corresponding terminal.
- Use pliers to firmly crimp the connector. This will pierce the wire insulation and make the connection.
- For Clip-On Connectors:
- Secure and Test:
- If using heat shrink tubing, slide a piece over the wire before making the connection. After a successful connection, slide the tubing over the exposed metal and heat it to shrink, providing insulation.
- Plug in the power supply and test the LED strip.
Problem 3: LED Strip Wire Adapter Issues
The adapter connects your LED strip to the power supply. If this connection is faulty, your lights won’t turn on.
Symptoms:
- The LED strip doesn’t light up at all.
- The connection feels loose where the wire plugs into the adapter.
- The adapter itself seems damaged or burnt.
How to Fix:
- Safety First: Unplug the power supply.
- Inspect the Connection:
- Check the male and female ends where the adapter connects to the power supply and the LED strip. Are they clean and free of debris?
- Are the pins bent or damaged?
- For Barrel Connectors (Common):
- Many LED strips use a common barrel connector (like a laptop charger). Ensure the plug from the power adapter is pushed all the way in.
- If the connection feels loose, the internal connector might be damaged. Sometimes, you can carefully bend the metal tabs inside the female connector slightly to create a tighter grip. Be very gentle.
- If the connector is broken, you’ll need to replace it. This might involve cutting off the old connector and soldering or using a new LED strip wire adapter with a compatible connector.
- For Wire-to-Wire Connectors:
- If your adapter connects wires directly, ensure the wires are stripped correctly and making good contact. Re-crimp or re-solder if necessary.
- Testing the Adapter (Advanced):
- If you have a multimeter, you can test the adapter. Plug the adapter into the power supply. Set your multimeter to DC voltage. Measure the voltage at the end of the adapter that connects to the LED strip. It should match the voltage of your power supply (usually 12V or 24V). If there’s no voltage, the adapter is likely faulty. This is crucial for faulty LED connector troubleshooting.
Problem 4: LED Strip to Controller Connection
For RGB or addressable LED strips, the connection to the controller is vital. Problems here can cause incorrect colors, no light, or erratic behavior.
Symptoms:
- Wrong colors displayed.
- Only some colors work.
- No response when changing colors or modes.
- Flickering or pulsing lights.
How to Fix:
- Safety First: Turn off and unplug the power supply to the controller.
- Check the Pin Alignment:
- Most LED strip controllers have a small connector that plugs into the LED strip. Ensure the pins align perfectly. For RGB strips, the order is usually R, G, B, and then the positive (12V/24V) or negative (GND) connection.
- Look for markings on both the controller and the strip connector to ensure correct alignment.
- If the pins are bent, gently try to straighten them with needle-nose pliers.
- Secure the Connection:
- Ensure the connector is pushed all the way in. Some controllers have screw terminals where you insert the wires; make sure these are tightened.
- For RGB strips, a loose LED strip connection here can lead to color mixing issues.
- Inspect for Damage:
- Check the controller’s connector and the LED strip’s connector for any visible damage, corrosion, or bent pins. This is part of LED strip to controller connection troubleshooting.
- Clean Contacts:
- If there’s any dust or grime on the metal contacts, gently clean them with a cotton swab dipped in isopropyl alcohol. Let it dry completely before reconnecting.
- Consider the Controller:
- If the LED strip and its connection to the controller seem fine, the controller itself might be faulty. You might need to consider damaged LED strip connector replacement or a new controller.
Problem 5: LED Strip Extension Connector Problems
When you use extension cables to connect different sections of your LED strip, the connectors at either end can be a source of issues.
Symptoms:
- A section of the LED strip not lighting up after the extension.
- Flickering or inconsistent brightness in extended sections.
- Colors not matching between sections.
How to Fix:
- Safety First: Unplug the power.
- Check the Connectors:
- These are typically clip-on or solderless connectors. Inspect both the connector on the LED strip and the connector on the extension cable.
- Ensure the wires are securely seated in their respective connectors.
- Verify Wire Order:
- For RGB strips, double-check that the R, G, B, and common wires are connected in the same order on both ends of the extension. An incorrect connection here is a common cause of LED strip extension connector problems.
- Secure the Connection:
- If using clip-on connectors, make sure they are snapped shut firmly.
- If using solderless crimp connectors, ensure they are properly crimped.
- Use Quality Extensions:
- Cheap extension cables can have thin wires or poor connectors that cause voltage drop or intermittent connections. If you suspect the extension cable itself, consider replacing it with a higher-quality one.
- Soldering for Reliability:
- For the most reliable LED strip connection fix with extensions, soldering the wires directly between the strips or to extension wires is highly recommended. This bypasses potential issues with connectors and is a robust solution for reconnecting LED strip lights. After soldering, use heat shrink tubing for insulation and protection.
Problem 6: Repairing LED Strip Power Connector
This usually refers to the connector that plugs into the wall power supply or the connector on the power supply itself that plugs into the strip.
Symptoms:
- No power to the entire strip.
- The power supply unit seems dead.
- The connector that plugs into the strip from the power adapter is damaged.
How to Fix:
- Safety First: Unplug the power supply from the wall.
- Inspect the Wall Plug and Power Brick: Ensure there’s no visible damage to the power adapter itself. If the power brick is faulty, you’ll need to replace the entire power supply.
- Focus on the Strip-Side Connector: This is the most common point of failure for repairing LED strip power connector issues.
- If it’s a barrel jack: Check if the center pin is bent or broken. If the outer casing is loose, it might not make contact. You might need to replace this connector, often involving cutting the old one off and attaching a new one, either by soldering or using a screw-terminal connector.
- If it’s a wire lead: Ensure the wires are securely attached to the power supply’s output wire. Check for breaks in the wire insulation.
- Soldering is Often Best: For repairing LED strip power connector problems where the connection is directly on the power supply output wire, soldering provides the strongest and most reliable fix. Strip the wires, twist them together, solder them, and then insulate with heat shrink tubing.
Soldering: The Ultimate LED Strip Connection Fix
If you’re comfortable with a soldering iron, this is often the most durable and reliable method for LED strip connector repair, especially for reconnecting LED strip lights or fixing LED strip extension connector problems.
Steps for Soldering:
- Safety: Unplug everything. Wear safety glasses. Ensure good ventilation.
- Prepare the LED Strip: Cut off the damaged connector or the end of the strip on a designated cutting line. Use a knife or wire stripper to carefully expose about 5mm of the copper pads on the LED strip.
- Prepare the Wire: If you’re connecting a new wire or extension, strip about 5mm of insulation from the end of the wire.
- Tin the Pads and Wires:
- Heat your soldering iron.
- Apply a small amount of solder to the tip of the iron (tinning).
- Touch the hot iron to the copper pad on the LED strip for a second, then touch the solder to the pad (not the iron). The solder should flow onto the pad. Do this for each pad (e.g., V+, R, G, B).
- Twist the strands of the wire together and apply a small amount of solder to the wire end (tinning the wire).
- Solder the Connection:
- Hold the tinned wire against the tinned pad on the LED strip.
- Touch the hot soldering iron to both the wire and the pad to melt the solder and create a strong bond.
- Repeat for all wires. Ensure no solder bridges connect adjacent pads.
- Insulate:
- Slide a piece of heat shrink tubing over each soldered connection, ensuring it overlaps the solder joint and extends a bit onto the wire insulation.
- Use a heat gun or hair dryer to shrink the tubing tightly around the connection.
- Test: Plug in and test your connection.
Preventing Future Connector Issues
- Handle with Care: Avoid bending or pulling the LED strips and their connectors excessively.
- Use Quality Connectors: Invest in good quality connectors and extension cables.
- Proper Sealing: If your LEDs are in a damp environment, ensure all connections are properly sealed with silicone or waterproof connectors.
- Secure Connections: Make sure all clip-on connectors are firmly snapped and any screw terminals are tightened.
- Correct Wiring: Always double-check the positive (+) and negative (-) connections, especially for RGB strips.
Frequently Asked Questions (FAQ)
Q1: Can I fix a broken LED strip connector without soldering?
A1: Yes, you can often fix a loose LED strip connection or perform damaged LED strip connector replacement using good quality clip-on or crimp-style connectors. However, soldering generally provides a more durable and reliable LED strip connection fix.
Q2: My LED strip is flickering. What could be the cause?
A2: Flickering is usually a sign of a loose LED strip connection, a faulty LED connector troubleshooting is needed. It could be at the strip itself, the power adapter connection, or the controller connection. Check all connection points for a secure fit.
Q3: How do I know which connector to buy for my LED strip?
A3: Check the type and width of your LED strip. Single-color strips usually use 2-pin connectors, while RGB strips typically use 4-pin connectors (for R, G, B, and a common wire). Ensure the connector matches the strip’s width (e.g., 8mm, 10mm).
Q4: Is it safe to repair LED strip connectors myself?
A4: Yes, it is generally safe as long as you always unplug the power supply before working on the connections. Take care when stripping wires or soldering to avoid injury.
Q5: What causes the colors on my RGB LED strip to be wrong?
A5: Incorrect color mixing is almost always due to misaligned connections. This can be an issue with the LED strip to controller connection or LED strip extension connector problems. Ensure the R, G, B, and common wires are connected in the exact same order on all parts of the strip and controller.
By following these steps, you can effectively tackle most common issues related to LED light strip connectors and enjoy your beautifully lit spaces again.