
The ideal chick heat lamp height is typically between 12 and 18 inches above the chicks, but this can vary based on the specific wattage of the bulb, the size of the brooder, and the ambient temperature of the room. Always check your chicks’ behavior to gauge if they are too hot or too cold, as this is the most reliable indicator. This article will delve into the nuances of brooder lamp distance and how to find the best heat lamp height for chicks to ensure a healthy start for your new flock.
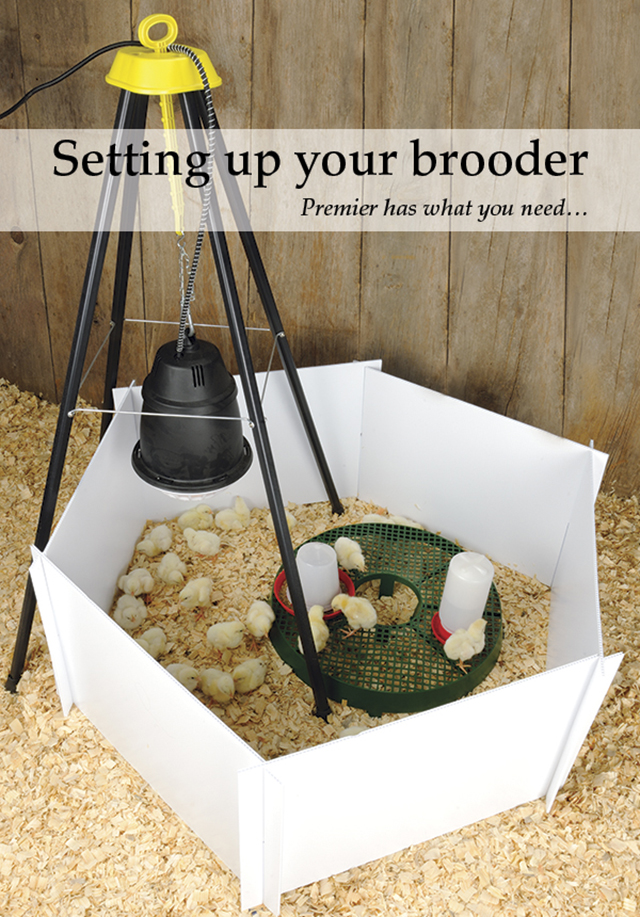
Image Source: www.premier1supplies.com
Establishing the Right Brooder Environment
Bringing baby chicks into your home is an exciting experience, but it also comes with a significant responsibility: providing them with the correct environment for growth and development. The most critical element in a chick’s early life is a consistent and appropriate heat source. Without it, chicks can quickly become chilled, leading to illness and even death. A chick starter heat lamp is essential, but its effectiveness hinges on proper placement. This is where understanding chick heat lamp height becomes paramount. It’s not just about having a heat lamp; it’s about using it correctly to create a warm, safe, and comfortable space for your vulnerable young birds.
Why Heat is Crucial for Baby Chicks
Newly hatched chicks are born without the ability to regulate their own body temperature effectively. Their downy feathers provide minimal insulation, and they rely entirely on external heat to stay warm. Think of them as tiny, feathered newborns; they need a consistent “warm hug” from their environment to thrive.
- Thermoregulation: Chicks need a temperature range that allows their bodies to function properly. Too cold, and their metabolism slows down, making them lethargic and susceptible to illness. Too hot, and they can overheat, dehydrate, and suffer stress.
- Growth and Development: Proper temperature is directly linked to efficient digestion, nutrient absorption, and overall growth. Chicks that are consistently too cold or too hot will not grow as quickly or as healthily as those kept in optimal conditions.
- Disease Prevention: A strong immune system is vital for young chicks. When chicks are stressed by improper temperatures, their immune systems are compromised, making them more vulnerable to common chick ailments.
Understanding Chick Brooder Temperature
The chick brooder temperature is not static; it changes as the chicks grow. Young chicks (0-1 week old) require the warmest temperatures, while older chicks can tolerate progressively cooler conditions. This gradual reduction in heat mimics the natural process of a mother hen gradually allowing her chicks to explore and develop their own thermoregulation skills.
- Week 1: 95°F (35°C)
- Week 2: 90°F (32°C)
- Week 3: 85°F (29°C)
- Week 4: 80°F (27°C)
- Week 5: 75°F (24°C)
- Week 6 onwards: If room temperature is above 70°F (21°C), they may no longer need supplemental heat.
Important Note: These are general guidelines. Always observe your chicks’ behavior, as they are the best indicators of whether the temperature is right.
Deciphering the Ideal Heat Lamp Height
The core question remains: How high should heat lamp be above chicks? The answer is a range, and it’s about creating a temperature gradient within the brooder. Chicks should be able to move away from the heat source if they become too warm. This is why the brooder lamp distance is so important.
The Role of Wattage and Bulb Type
The wattage of your heat lamp bulb plays a significant role in determining the ideal height. Higher wattage bulbs produce more heat, meaning they need to be placed higher to achieve the same temperature at chick level. Common wattage for chick heat lamps are 150W or 250W.
- 150W Bulb: Generally requires a slightly lower height.
- 250W Bulb: Will need to be positioned higher to avoid overheating.
Different types of bulbs also exist. Ceramic heat emitters (CHEs) provide radiant heat without light, which can be beneficial for allowing chicks to sleep undisturbed. However, they can produce intense heat, so their baby chick heat source distance needs careful consideration. Standard incandescent or halogen bulbs produce both heat and light, which is useful for observation but can disrupt sleep if left on 24/7.
Initial Placement: A Starting Point
When you first introduce your chicks to the brooder, start with the heat lamp at the higher end of the recommended range – around 18 inches. This allows you to gauge the temperature at chick level without immediately exposing them to excessive heat.
- Using a Thermometer: A reliable meat or candy thermometer is your best friend. Place it at chick level, near where they are congregating. The goal is to reach that initial 95°F (35°C) target for the first week.
- Observation is Key: Watch your chicks. Are they huddled directly under the lamp, chirping loudly? This usually means they are too cold. Are they spread out to the edges of the brooder, panting or trying to get away from the heat? This indicates they are too hot. Are they spread out evenly, comfortably pecking and moving around? This is the sweet spot.
Adjusting Chick Heat Lamp
The beauty of using a heat lamp is its adjustability. You can easily raise or lower the lamp to fine-tune the temperature. This is a process of adjusting chick heat lamp based on your observations and thermometer readings.
- If chicks are too cold: Lower the lamp by a few inches (2-3 inches at a time) or consider using a bulb with a slightly higher wattage if your current bulb is already at its lowest safe height.
- If chicks are too hot: Raise the lamp by a few inches. Ensure there is adequate space in the brooder for them to move to cooler areas.
Table: General Guidelines for Heat Lamp Height (Based on Wattage and Temperature)
| Week Old | Target Temperature | General Height (150W Bulb) | General Height (250W Bulb) |
|---|---|---|---|
| 0-1 | 95°F (35°C) | 12-15 inches | 15-18 inches |
| 1-2 | 90°F (32°C) | 15-18 inches | 18-20 inches |
| 2-3 | 85°F (29°C) | 18-20 inches | 20-22 inches |
| 3-4 | 80°F (27°C) | 20-22 inches | 22-24 inches |
Crucial Caveat: This table provides a starting point. Always prioritize chick behavior and thermometer readings over exact measurements. The ideal heat lamp distance is what keeps your chicks content and healthy.
Practical Heat Lamp Placement Chicks
Proper heat lamp placement chicks involves more than just height. You need to consider the size of the brooder and how the heat is distributed.
Brooder Size and Shape
The size of your brooder is important. A larger brooder allows for a more pronounced temperature gradient, giving chicks more options to regulate their temperature.
- Small Brooders: In a small brooder, the heat from the lamp will spread more quickly. You may need to keep the lamp slightly higher than recommended for a larger space to prevent the entire area from becoming too hot.
- Large Brooders: A large brooder can accommodate a wider temperature range. You can position the lamp so that one side is warmer than the other, allowing chicks to choose their preferred temperature zone.
Creating a Temperature Gradient
The goal is to create a “warm zone” directly under the heat lamp and progressively cooler zones further away. This allows chicks to move to where they feel most comfortable.
- Positioning the Lamp: The lamp should be positioned directly over the center of the brooder area where the chicks will be spending most of their time.
- Brooder Bedding: Ensure the bedding material (pine shavings or paper) is dry and clean. Damp bedding can contribute to a cooler environment and promote bacterial growth.
Safety First: Preventing Fires
Heat lamps are a fire hazard if not used properly. This is a critical aspect of heat lamp placement chicks.
- Secure Mounting: Always use a secure clamp or fixture to hold the heat lamp. It should be firmly attached to the side of the brooder or a stand and should not be able to fall into the brooder.
- Heat-Resistant Fixtures: Use fixtures specifically designed for heat lamps.
- No Combustibles: Keep the heat lamp and wiring away from any flammable materials, including dry bedding or nearby curtains.
- Backup Plan: Consider having a backup heat source, like a ceramic heat emitter or a heating pad designed for livestock, in case the primary lamp fails. Always have a fire extinguisher readily available.
Observing Chick Behavior: The Ultimate Guide
While guidelines and measurements are helpful, the most accurate way to determine if your chick heat lamp height is correct is by observing your chicks. Their behavior is a direct reflection of their comfort level.
Signs of Chicks Being Too Cold
- Huddling: Chicks are tightly packed together directly under the heat lamp, often chirping loudly and incessantly.
- Lethargy: They appear inactive, listless, and reluctant to move.
- Shivering: You might notice subtle trembling.
- Seeking Other Heat Sources: They might try to crowd against the brooder walls or any other available heat source.
If you see these signs, it’s time to lower the brooder lamp distance or check if the bulb is functioning properly.
Signs of Chicks Being Too Hot
- Panting/Gasping: Chicks are holding their wings away from their bodies and appear to be breathing rapidly.
- Spreading Out: They are spread far out from the heat lamp, often congregating at the coolest edges of the brooder.
- Lethargy (Heat Stress): Similar to being too cold, excessive heat can also cause lethargy and dehydration.
- Dryness: Their down may appear dry and puffed out.
If you observe these signs, it’s time to raise the baby chick heat source distance.
Signs of Just-Right Temperature
- Even Distribution: Chicks are spread out evenly throughout the brooder, with some closer to the heat source and others further away.
- Active and Alert: They are actively pecking at food and water, exploring their environment, and moving around comfortably.
- Occasional Resting: They will rest or sleep, but not in dense, huddled groups.
- Quiet Chirping: Minimal, soft chirping is normal.
This indicates your chick heat lamp height is likely correct.
Gradual Reduction of Heat
As chicks grow, they develop the ability to regulate their own body temperature. This means you’ll need to gradually reduce the heat provided by the lamp. This is a key part of adjusting chick heat lamp.
- Weekly Decreases: Follow the temperature guidelines mentioned earlier, decreasing the temperature by approximately 5°F (3°C) each week.
- Raising the Lamp: To reduce the heat, the simplest method is to raise the heat lamp higher by a few inches each week, in conjunction with the temperature reduction.
- Monitoring Behavior: Continue to watch your chicks. If you lower the heat too quickly, they will show signs of being too cold. If you notice this, raise the lamp back up slightly or delay further reductions.
- External Factors: Be aware of the ambient room temperature. If your house is particularly warm, you may be able to reduce the heat more quickly. Conversely, if it’s cold, you might need to keep the heat lamp on longer.
Transitioning Away from the Heat Lamp
By the time chicks are around 4-6 weeks old, they typically no longer need supplemental heat, provided the ambient room temperature is suitable.
- Observe During Transition: You can try turning the heat lamp off for short periods during the day and observing the chicks. If they remain active and comfortable, you can gradually increase the duration of these “off” periods.
- Final Check: When you are confident they can maintain their own body temperature, you can remove the heat lamp entirely.
Common Mistakes to Avoid
- Overheating: This is a common and dangerous mistake. Chicks can quickly become dehydrated and stressed if the brooder is too hot. Always err on the side of slightly cooler rather than too hot, especially in the first few days.
- Underheating: While less immediately dangerous than overheating, keeping chicks too cold for extended periods weakens their immune systems and hinders growth.
- Inconsistent Heat: Fluctuations in temperature can be just as harmful as consistently incorrect temperatures.
- Ignoring Chick Behavior: Relying solely on a thermometer without observing the chicks’ actions can lead to incorrect adjustments.
- Improper Lamp Mounting: A falling heat lamp is a serious fire risk and can injure or kill chicks.
FAQ: Frequently Asked Questions About Heat Lamps for Chicks
Q1: How far from chicks heat lamp should I keep it on the first day?
A1: On the first day, aim for a chick heat lamp height of about 12-15 inches for a 150W bulb, or 15-18 inches for a 250W bulb. Always check the temperature with a thermometer at chick level and observe chick behavior.
Q2: Can I use more than one heat lamp?
A2: For very large broods or brooders, you might need multiple heat sources. However, ensure they are spaced appropriately to avoid creating a single, overwhelmingly hot area and that the overall temperature gradient is maintained. Two lamps closer together are generally not as effective as one well-placed lamp.
Q3: My chicks are crowding under the lamp. What does this mean?
A3: This is a clear sign that they are too cold. You need to lower the brooder lamp distance or check if your bulb is functioning correctly.
Q4: My chicks are panting and spread far out. What should I do?
A4: This means they are too hot. Raise the baby chick heat source distance immediately. Ensure the brooder is large enough for them to escape the heat.
Q5: How long do chicks need a heat lamp?
A5: Chicks typically need a heat lamp for about 4 to 6 weeks, gradually reducing the heat as they grow and their ability to regulate their own temperature improves.
Q6: What is the best heat lamp height for chicks that are a week old?
A6: For week-old chicks, the target temperature drops to around 90°F (32°C). You would typically raise the heat lamp another 2-3 inches from its initial placement, so approximately 15-18 inches for a 150W bulb or 18-20 inches for a 250W bulb. Always verify with a thermometer and chick behavior.
Q7: Is a red heat lamp bulb better than a clear one?
A7: Red bulbs produce less visible light, which can help chicks sleep more soundly and reduce pecking. However, both produce heat. The height requirement remains similar regardless of bulb color, as it’s the heat output that dictates the ideal heat lamp distance.
Q8: What if I don’t have a thermometer? How do I know the temperature?
A8: While a thermometer is highly recommended, you can rely solely on chick behavior. If they are comfortably spread out, it’s likely the right temperature. If they are huddled or panting, adjust the chick heat lamp height accordingly.
Q9: Can I use a heat lamp with a thermostat?
A9: Yes, a thermostat can be a very useful tool for maintaining a consistent chick brooder temperature. It allows you to set a target temperature, and the thermostat will cycle the heat lamp on and off to maintain it. However, you still need to set the initial brooder lamp distance correctly and monitor chick behavior.
Q10: My chicks seem to be avoiding the food and water. Could it be the heat lamp?
A10: If the heat is too intense and chicks are trying to get away from it, they might avoid the food and water if these are located too close to the heat source. Ensure food and water are in a cooler part of the brooder, and that the chick heat lamp height allows them to comfortably access all amenities.
By carefully considering these guidelines and paying close attention to your chicks, you can ensure they receive the optimal warmth necessary for a healthy and robust start in life. The best heat lamp height for chicks is ultimately the height that fosters contentment and growth.