
Can you dim LED lights? Yes, you can dim LED lights, but only if they are specifically designed as dimmable LED bulbs and paired with a compatible LED dimmer. Not all LED bulbs can be dimmed, and using a standard incandescent dimmer with a non-dimmable LED can lead to flickering, buzzing, or even damage to the bulb or dimmer.
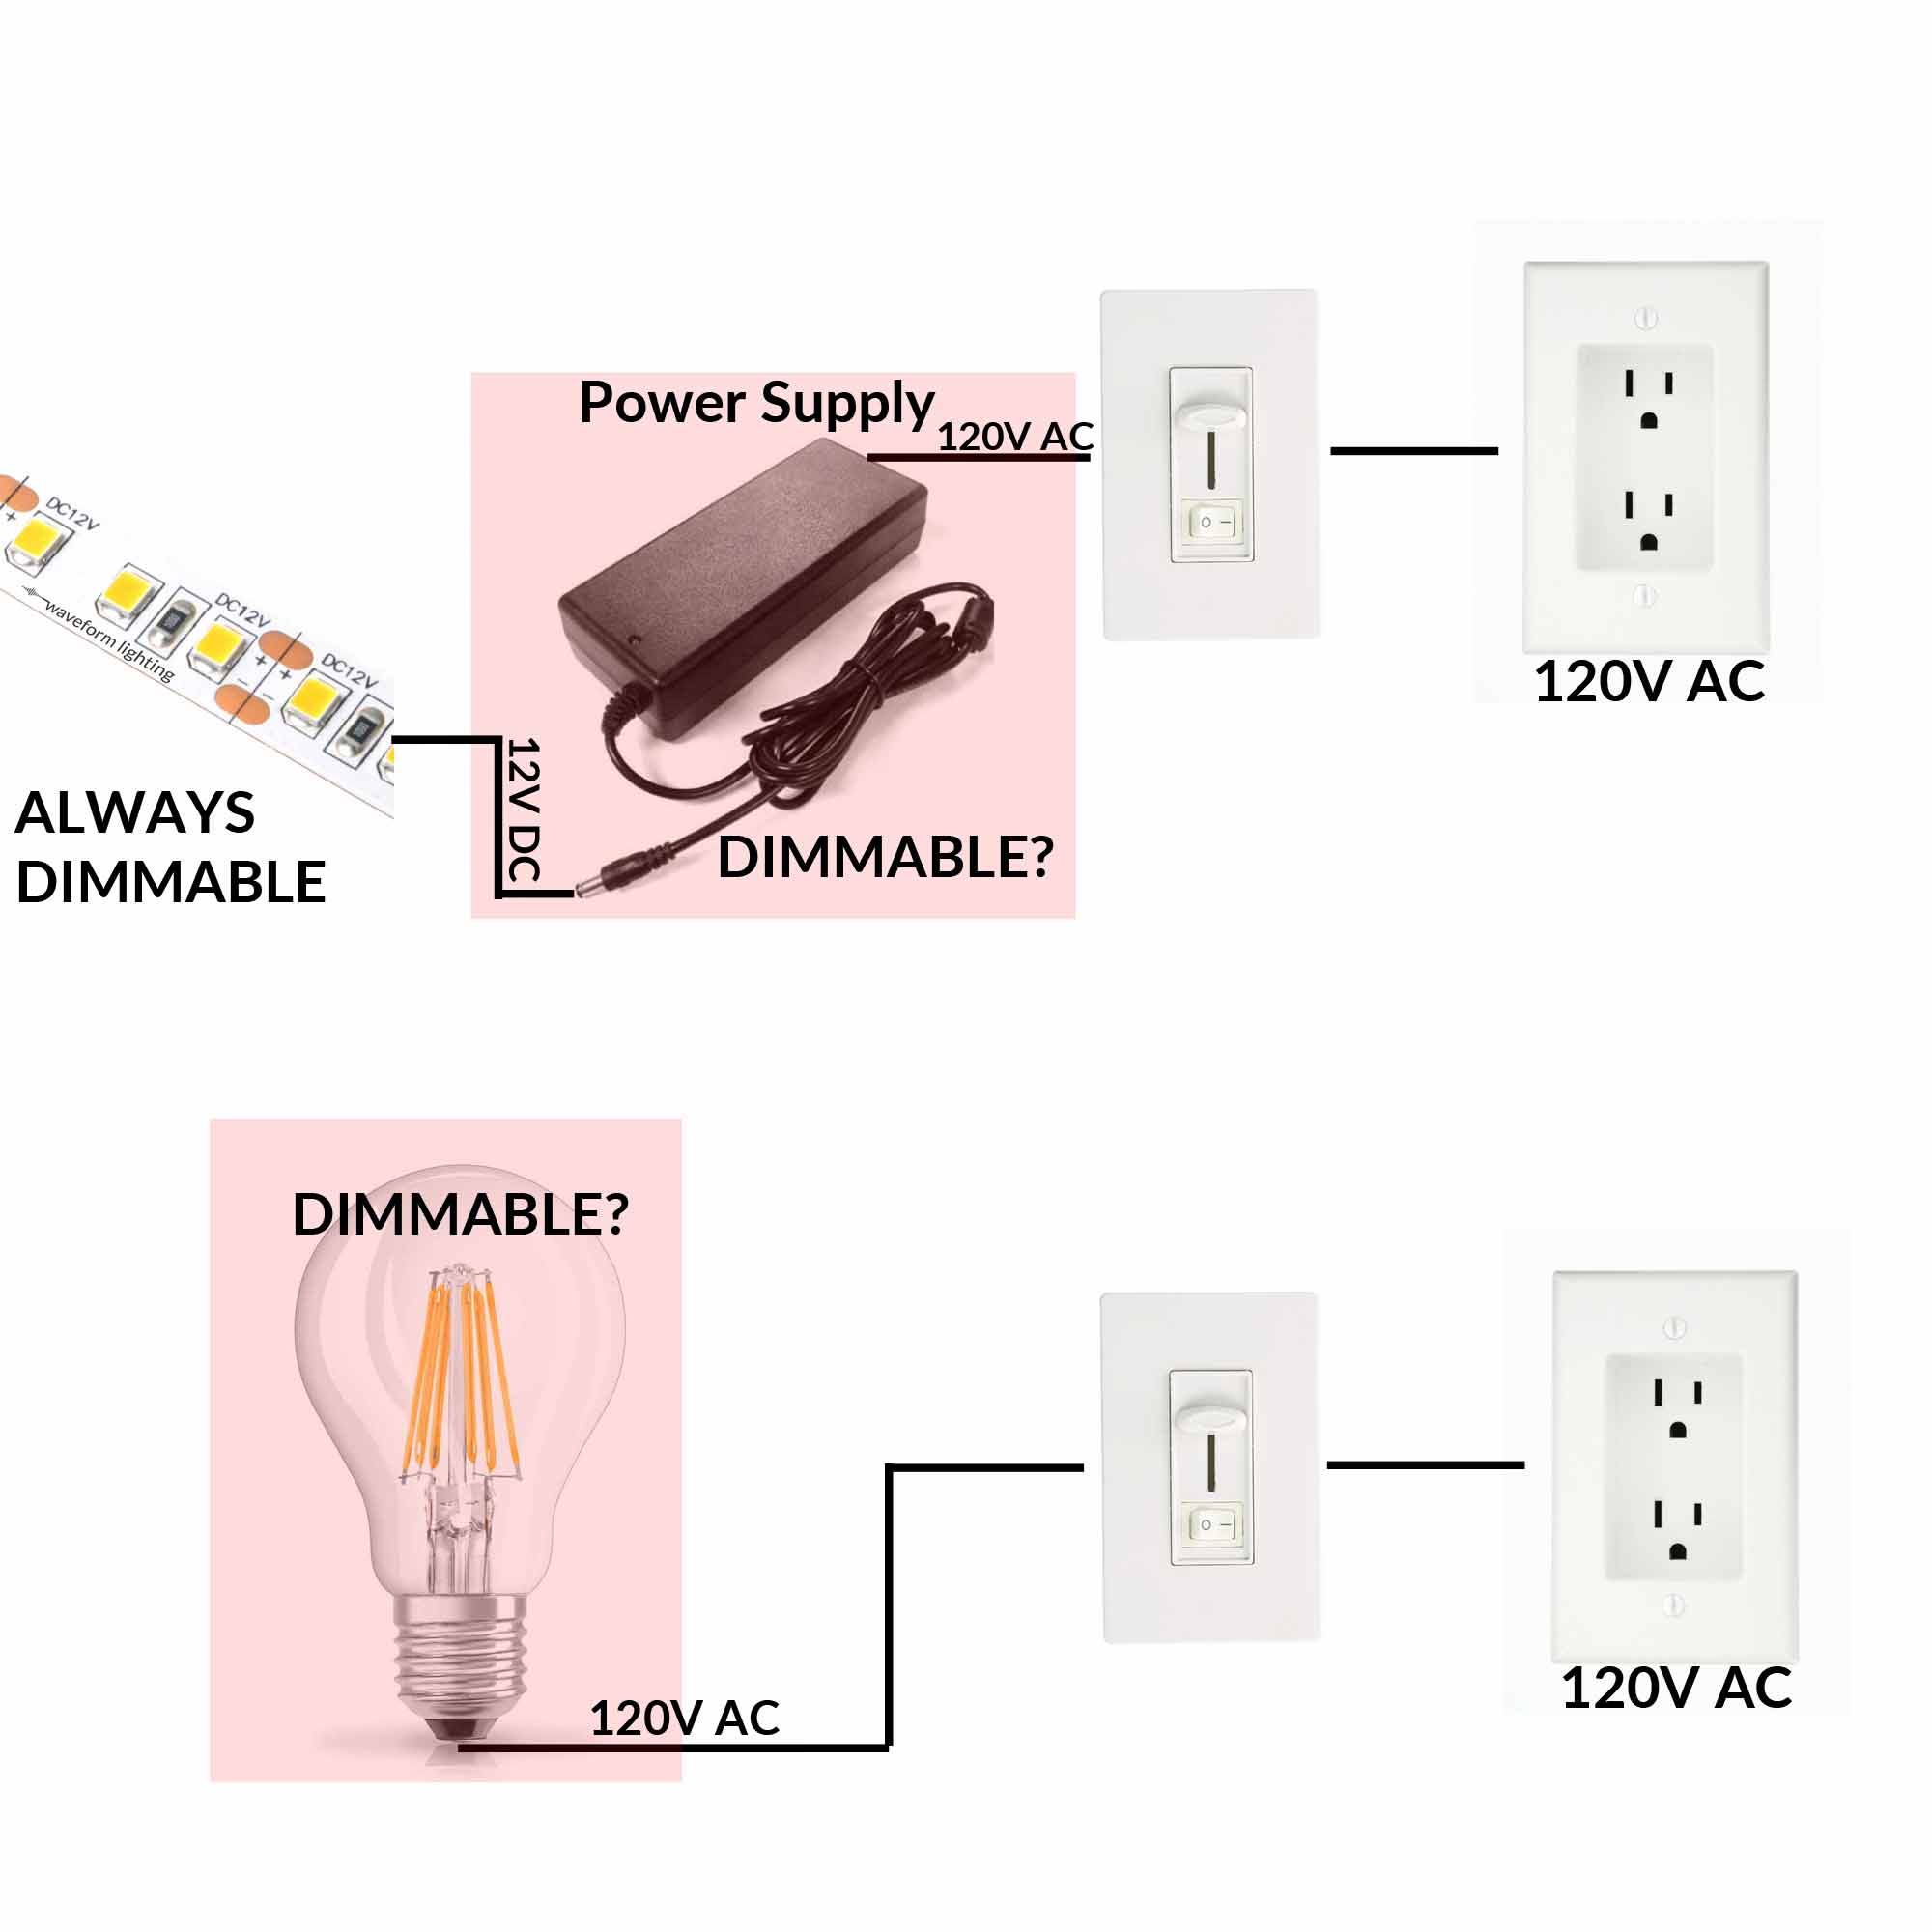
Image Source: www.waveformlighting.com
Fathoming the Mechanics of LED Dimming
The ability to control the brightness of light has been a staple of modern living for decades. While incandescent bulbs offered a straightforward dimming experience, the advent of LED technology presented a new set of challenges and opportunities. Understanding how LED light dimmers work is crucial for achieving the perfect ambiance in any space without encountering frustrating technical issues. This guide will delve into the various methods used to dim LEDs, explain the critical role of the LED driver, and highlight the importance of compatibility.
Deciphering LED Dimmer Types
The world of LED dimming is diverse, with several technologies employed to achieve smooth and efficient brightness control. Each method has its unique approach to altering the light output, catering to different applications and performance expectations.
PWM Dimming: The Pulse of Precision
What is PWM dimming? Pulse Width Modulation (PWM) dimming is a digital control method that rapidly switches the LED on and off. The speed of these on/off cycles is so fast that the human eye perceives it as a steady light. The brightness is controlled by varying the width of the “on” pulse. A wider “on” pulse means the LED is illuminated for a longer duration within each cycle, resulting in higher brightness. Conversely, a narrower “on” pulse means less time illuminated, leading to lower brightness.
How PWM Dimming Works:
- Rapid Switching: The LED driver, which converts AC power from the wall to the DC power LEDs need, is instructed to switch the LED on and off thousands of times per second.
- Duty Cycle: This on/off ratio is known as the “duty cycle.” A 100% duty cycle means the LED is always on, providing maximum brightness. A 50% duty cycle means the LED is on for half the time and off for half the time, resulting in approximately 50% brightness.
- Perceived Brightness: Because the switching is so rapid, the light appears continuous. The brain averages the light intensity over time, creating the illusion of dimmer light.
Advantages of PWM Dimming:
- High Efficiency: PWM dimming is very energy efficient. The LED is either fully on or fully off, minimizing wasted power.
- Smooth Dimming: It can provide very smooth and consistent dimming across a wide range of brightness levels.
- Precise Control: It offers precise control over the light output.
- Color Consistency: Generally maintains color consistency even at low brightness levels.
Disadvantages of PWM Dimming:
- Audible Noise: At lower frequencies, some PWM dimmers can produce an audible buzzing or humming sound.
- Complexity: Requires more complex circuitry within the LED driver or dimmer.
- Flicker at Low Frequencies: If the switching frequency is too low, some people might perceive flicker, especially in their peripheral vision.
TRIAC Dimming: The Traditional Approach
What is TRIAC dimming? TRIAC (Triode for Alternating Current) dimming is a method inherited from older incandescent dimmer technology. It works by chopping off a portion of each AC sine wave that powers the light.
How TRIAC Dimming Works:
- Phase Cutting: A TRIAC dimmer uses a semiconductor switch that turns on at a specific point in each half-cycle of the AC power waveform. By adjusting the “firing angle” of the TRIAC, the dimmer controls how much of the AC waveform reaches the LED.
- Leading-Edge vs. Trailing-Edge:
- Leading-Edge (Forward-Phase): This is the older type. It cuts off the beginning of the AC waveform. It’s typically used for incandescent and halogen bulbs. Many early “LED compatible” dimmers were leading-edge, leading to compatibility issues.
- Trailing-Edge (Reverse-Phase): This is more suitable for LEDs. It cuts off the end of the AC waveform. It tends to produce smoother dimming and is less prone to audible noise with LED loads.
Advantages of TRIAC Dimming:
- Familiar Technology: It’s a well-established and widely understood technology, making it readily available and cost-effective for basic dimming.
- Simple Installation: Often straightforward to install, especially for replacing existing light switches.
Disadvantages of TRIAC Dimming:
- Compatibility Issues: Many TRIAC dimmers are designed for the resistive load of incandescent bulbs. LEDs have a more complex electronic load, which can cause:
- Flickering: Especially at low dimming levels.
- Buzzing/Humming: The TRIAC switching can create audible noise.
- Reduced Dimming Range: The lowest dimming level might be higher than desired.
- Bulb/Dimmer Damage: Mismatched loads can stress components.
- Lower Efficiency: Chopping the waveform can lead to some power loss.
- Color Shift: At very low dimming levels, some LEDs may exhibit slight color shifts.
0-10V Dimming: The Analog Standard
What is 0-10V dimming? 0-10V dimming is an analog control system that uses a low-voltage DC signal (ranging from 0 to 10 volts) to control the brightness of compatible LED fixtures. A separate low-voltage control wire is run from the dimmer switch to the LED driver.
How 0-10V Dimming Works:
- Separate Control Circuit: The dimmer switch doesn’t directly interrupt the power to the LED. Instead, it sends a variable voltage signal (0-10V) through a dedicated control wire to the LED driver.
- Driver Interpretation: The LED driver interprets this 0-10V signal. A 0V signal typically means the LED is off, and a 10V signal means maximum brightness. Intermediate voltages correspond to intermediate brightness levels.
- Dimming Range: Standard 0-10V dimming typically offers a dimming range down to about 10% of full brightness. “Advanced” or “1% dimming” 0-10V systems exist, which can dim down to 1%.
Advantages of 0-10V Dimming:
- Smooth and Reliable: Provides very smooth and flicker-free dimming.
- Wide Compatibility: Widely used in commercial and industrial lighting applications.
- Energy Efficient: The control signal itself consumes very little power.
- Centralized Control: Multiple drivers can be controlled by a single 0-10V dimmer.
Disadvantages of 0-10V Dimming:
- Wiring Requirement: Requires an additional low-voltage control wire, which can add complexity and cost to installation, especially in retrofits.
- Not for Standard Home Outlets: Typically found in fixtures, not designed for standard wall switches for single bulbs.
DALI Dimming: The Digital Network
What is DALI dimming? DALI (Digital Addressable Lighting Interface) is a digital communication protocol specifically designed for lighting control. It allows for individual control, grouping, and scene setting of lighting fixtures.
How DALI Dimming Works:
- Digital Commands: Instead of analog voltage, DALI uses digital commands sent over a two-wire bus. Each DALI-compatible LED driver has a unique address.
- Two-Wire Control: A simple two-wire bus connects all DALI devices. The bus carries both power for the devices and the communication signals.
- Addressability and Control: A DALI controller sends commands to specific devices or groups of devices, telling them to turn on/off or dim to a particular level.
- Scene Setting: DALI allows for the creation of complex lighting scenes that can be recalled with a single command.
- Feedback: DALI devices can also send feedback, such as status or error messages, back to the controller.
Advantages of DALI Dimming:
- Precise and Flexible Control: Offers highly precise and flexible control, including individual addressing and grouping.
- Advanced Features: Supports scene setting, scheduling, and responsiveness to sensors.
- Robust and Reliable: Digital communication is less susceptible to interference.
- Easy Reconfiguration: Devices can be easily re-addressed or regrouped without rewiring.
- Energy Monitoring: Can often integrate energy consumption monitoring.
Disadvantages of DALI Dimming:
- Higher Cost: DALI systems are generally more expensive than other dimming methods due to the cost of DALI controllers and drivers.
- Specialized Equipment: Requires DALI-certified components and specialized installation knowledge.
- Not for Standard Home Use: Primarily used in commercial, architectural, and high-end residential applications.
The Crucial Role of the LED Driver
The LED driver is the unsung hero of any dimmable LED system. It’s a sophisticated electronic device that performs several vital functions:
- AC to DC Conversion: LEDs require direct current (DC) power, while household electricity is alternating current (AC). The driver converts the mains AC power into the low-voltage DC power that LEDs need to operate.
- Current Regulation: LEDs are very sensitive to current. Too much current can burn them out, while too little can cause them to perform poorly. The driver strictly regulates the current flowing to the LEDs.
- Dimming Signal Interpretation: This is where the driver’s intelligence comes into play for dimming.
- For PWM dimming, the driver itself often incorporates the PWM circuitry, switching the DC current to the LEDs at varying duty cycles based on the dimmer’s signal.
- For 0-10V dimming, the driver has an input that receives the analog voltage signal. It then adjusts its output to the LEDs proportionally to this voltage.
- For DALI dimming, the driver has a DALI interface that receives digital commands and translates them into appropriate dimming levels.
- For TRIAC dimming, the driver needs to be specifically designed to handle the chopped AC waveform from a TRIAC dimmer. It often includes internal circuitry to smooth out the power and manage the load.
What About Voltage Control Dimming?
While less common as a primary method for LED dimming compared to PWM or current control within the driver, voltage control dimming can be conceptually related. In some very basic or older LED systems, the brightness might have been controlled by varying the input voltage. However, this method is inefficient for LEDs and can lead to color shifts and inconsistent performance. Modern LED dimming systems rely on more precise methods like PWM or analog/digital control signals that influence the current or on-time of the LEDs via the driver.
The Importance of Dimmer Compatibility
Achieving smooth, flicker-free dimming hinges on ensuring your LED bulbs and your dimmer switch are compatible. This is arguably the most critical factor for a successful dimming setup.
What is Dimmer Compatibility?
Dimmer compatibility means that the dimmer switch and the dimmable LED bulb (and its associated driver) are designed to work together without causing adverse effects like flickering, buzzing, or reduced lifespan.
Why is Compatibility So Crucial?
- Load Requirements: Incandescent bulbs are resistive loads, meaning they present a consistent resistance to electricity. LEDs are electronic loads with complex internal circuitry (drivers). A dimmer designed for a resistive load may not correctly interpret or manage the electronic load of an LED.
- Minimum Load: Many older TRIAC dimmers require a minimum power draw to operate correctly. Many LED bulbs use significantly less power than incandescent bulbs. If the total wattage of your LED bulbs is below the dimmer’s minimum load requirement, the dimmer may not function properly, leading to flickering or the dimmer not turning on the lights at all.
- Dimming Technology Mismatch: Using a leading-edge dimmer with an LED designed for trailing-edge dimming (or vice versa) can cause issues. Similarly, using a non-dimmable LED with any type of dimmer will not work.
- Driver Behavior: The LED driver dictates how the LED responds to the dimmer signal. If the driver isn’t designed for the specific dimming technology of the switch, erratic behavior is likely.
Identifying Compatible Components:
- Dimmable LED Bulbs: Always look for “dimmable” clearly marked on the bulb’s packaging or specifications. There are different types of dimmable LEDs, some designed for TRIAC dimmers, others for specific digital protocols.
- LED Dimmer Switches: Modern dimmer switches are often labeled as “LED+”, “Universal Dimmer,” or specifically list compatibility with LED bulbs. These usually incorporate technology to handle the electronic loads of LEDs, often featuring trailing-edge switching or offering multiple dimming modes.
- Manufacturer Specifications: The best way to ensure compatibility is to check the specifications from both the LED bulb manufacturer and the dimmer manufacturer. They often provide compatibility lists or charts.
The LED Dimmer Circuit: A Glimpse Inside
The internal workings of an LED dimmer circuit vary significantly depending on the dimming technology.
TRIAC Dimmer Circuit (Simplified):
- DIAC: A DIAC (Diode for Alternating Current) is a two-terminal semiconductor device that conducts current in either direction when the voltage across it reaches a specific breakdown voltage. In a TRIAC dimmer, the DIAC is typically triggered by a potentiometer (the dimmer knob/slider) and a capacitor.
- Potentiometer: This variable resistor controls the charging rate of the capacitor.
- Capacitor: The capacitor charges through the potentiometer.
- TRIAC: Once the voltage across the capacitor reaches the DIAC’s breakdown voltage, the DIAC fires, triggering the TRIAC. The TRIAC then conducts for the remainder of the AC half-cycle. By adjusting the potentiometer, you change when the DIAC fires, thereby changing the portion of the AC waveform that reaches the light.
PWM Dimmer Circuit (Simplified):
- Microcontroller: A microcontroller often controls the switching.
- Switching Element (MOSFET/Transistor): This component rapidly switches the current to the LED driver on and off.
- Control Signal: The microcontroller receives input from the user (via buttons, touch controls, or a communication bus) and calculates the appropriate duty cycle for the switching element.
- LED Driver: The driver receives the PWM signal and implements it, controlling the current flow to the LED array.
0-10V Dimmer Circuit (Simplified):
- Potentiometer/Electronic Control: The dimmer contains a way to generate a voltage between 0V and 10V. This could be a physical potentiometer or electronic control.
- Power Supply for Control: A small internal power supply provides the low voltage for the control signal.
- Control Output: Two wires carry the 0-10V signal to the LED driver.
Frequently Asked Questions (FAQ)
Q1: Can I use my old dimmer switches with new LED bulbs?
A1: It depends. If your old dimmer is a standard TRIAC dimmer designed for incandescent bulbs, it might work with some dimmable LED bulbs, but compatibility is not guaranteed. You may experience flickering, buzzing, or a limited dimming range. It’s always best to check the LED bulb manufacturer’s compatibility list for your specific dimmer model or replace the dimmer with one explicitly designed for LEDs.
Q2: Do all LED bulbs need a special dimmer?
A2: Only dimmable LED bulbs require a special or compatible dimmer. Non-dimmable LED bulbs cannot be dimmed and attempting to do so can damage them.
Q3: What happens if I use a non-dimmable LED bulb with a dimmer?
A3: If you try to dim a non-dimmable LED bulb, it will likely not dim. You might see no change in brightness, it could flicker erratically, make buzzing noises, or in some cases, the bulb or the dimmer could be damaged due to incompatible load.
Q4: How can I tell if my LED bulbs are dimmable?
A4: Look for the word “Dimmable” printed on the bulb itself, its packaging, or in the product’s specifications. If it doesn’t state that it’s dimmable, assume it is not.
Q5: What is the difference between leading-edge and trailing-edge dimming for LEDs?
A5: Leading-edge dimming (older style) cuts off the beginning of the AC power wave and is best for resistive loads like incandescent bulbs. Trailing-edge dimming cuts off the end of the AC wave and is generally better suited for the electronic loads of LEDs, offering smoother dimming and less noise. Many modern “LED compatible” dimmers use trailing-edge technology or a universal design that can handle both.
Q6: My LED lights flicker when dimmed. What could be the cause?
A6: Common causes include:
* Incompatibility: The dimmer and LED bulbs are not compatible.
* Minimum Load: The total wattage of the LED bulbs is below the dimmer’s minimum load requirement.
* Loose Connections: Check all wiring connections.
* Faulty Dimmer or Bulb: One of the components may be defective.
* Low Dimming Level: Some LEDs may exhibit slight flicker at their absolute lowest dimming setting.
Q7: Can I dim LED strips?
A7: Yes, LED strips can be dimmed, but they typically require a compatible LED driver and a corresponding dimmer controller. The type of dimmer (PWM, 0-10V, DALI) will depend on the specifications of the LED strip and its driver.
Conclusion
The journey to perfectly dimmed LED lighting involves a careful consideration of technology and compatibility. From the precise switching of PWM dimming to the analog control of 0-10V and the digital precision of DALI, each method offers distinct advantages. The LED driver acts as the crucial intermediary, translating dimmer signals into actionable commands for the LEDs. Ultimately, ensuring that your dimmable LED bulbs and dimmer switches are designed to work in harmony is the key to unlocking the full potential of LED dimming, creating the ideal atmosphere for any occasion.