
The ideal distance for a heat lamp from chicks is typically between 18 to 24 inches, but this can vary based on the lamp’s wattage, the age of the chicks, and the ambient temperature. But how far should you put your heat lamp from your chicks? This guide will help you find that sweet spot to ensure your feathered friends are comfortable and healthy.
Keeping baby chicks warm is one of the most critical aspects of raising them successfully. Their ability to regulate their own body temperature is still developing, making them highly susceptible to both chilling and overheating. The heat lamp is the cornerstone of the brooder setup, and its placement is paramount. Getting the chick brooder temperature right can be the difference between thriving chicks and those that struggle.
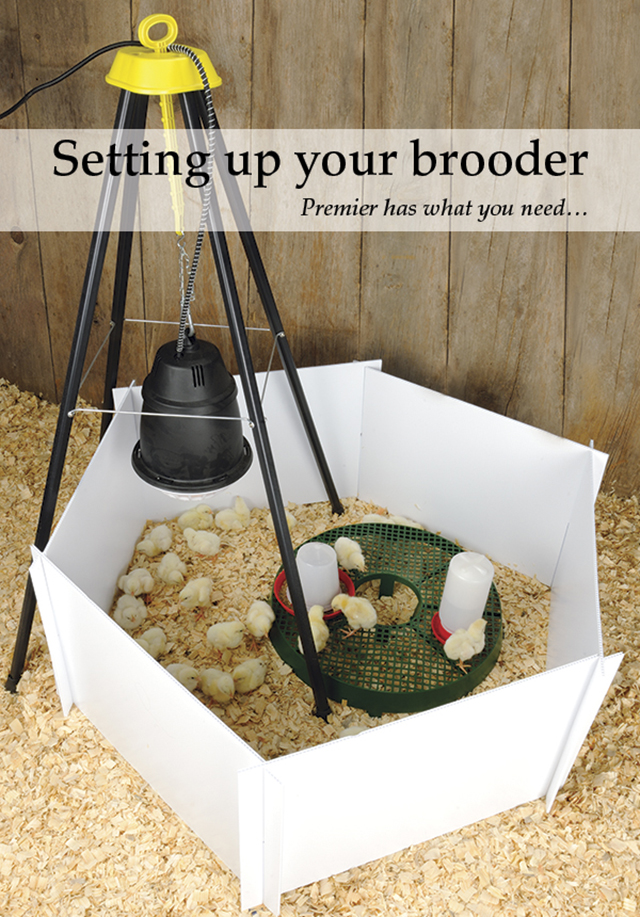
Image Source: www.premier1supplies.com
The Importance of Proper Heat Lamp Placement
When you bring newborn chick home, they are essentially helpless in regulating their body heat. Mother hens provide this warmth, but without one, a heat lamp becomes their substitute. The correct heat lamp placement chicks ensures they have access to a comfortable temperature gradient. This means they can move closer to the heat if they are cold and further away if they are too warm.
Incorrect chicks heat lamp distance can lead to a variety of problems:
- Too Close: Overheating is a significant danger. Overheated chicks can become dehydrated, stressed, and even suffer heatstroke, which can be fatal. They may pant, huddle tightly together, or try to escape the heat source.
- Too Far: If the lamp is too high, the chicks won’t receive enough warmth. They will huddle together constantly, appearing restless and chirpy. This can lead to pasty butt, chilling, and a general lack of growth and vigor.
Gauging the Right Temperature: A Chick’s Perspective
How can you tell if your chick heating needs are being met? Observe your chicks! They are your best indicators.
- Contented Chicks: If your chicks are spread out comfortably, actively pecking at food and water, and occasionally dozing, your heat lamp is likely at the right distance.
- Chicks Huddled Directly Under the Lamp: This is a clear sign they are too cold. They are trying to get as close as possible to the heat source. You need to lower the lamp or increase its wattage.
- Chicks Huddled Together Away from the Lamp: This means they are too hot. They are trying to escape the direct heat. You need to raise the lamp.
- Chicks Panting or Trying to Get Away from the Heat: This indicates they are overheated. Raise the lamp immediately.
Factors Influencing Heat Lamp Distance
Several factors dictate the precise chick heat lamp height:
Wattage of the Heat Lamp
Higher wattage bulbs produce more heat. A 250-watt bulb will require a greater chicks heat lamp distance than a 150-watt bulb to achieve the same temperature. Always check the wattage of your bulb and adjust accordingly.
Age of the Chicks
Newborn chick require the most heat. As they grow, they develop downy feathers, which act as insulation, and their internal temperature regulation improves. This means you will gradually increase the heat lamp height as they get older.
- Week 1: Chicks need the warmest environment, usually around 90-95°F (32-35°C) at chick level.
- Week 2: Reduce the temperature by about 5°F (3°C) per week.
- Subsequent Weeks: Continue reducing the temperature by 5°F (3°C) each week until they reach approximately 70°F (21°C) or can tolerate room temperature.
Ambient Room Temperature
The temperature of the room where the brooder is located plays a significant role. A drafty garage or a cooler basement will require the heat lamp to be placed lower or to be a higher wattage than a heated room. Conversely, if the room is naturally warm, you might be able to position the lamp higher.
Type of Chicks
While the general principles apply to all chicks, there can be slight variations. For example, heat lamp height broiler chicks might differ slightly from heat lamp height laying hens in their peak need for warmth due to their rapid growth rate. However, the observation of the chicks themselves remains the most reliable method.
Recommended Heat Lamp Heights and Temperatures
Let’s break down the general guidelines for heat lamp placement chicks based on age. These are starting points; always observe your chicks!
Initial Setup: Day 1 to Week 1
- Target Temperature: 90-95°F (32-35°C) at chick level.
- Initial Lamp Distance: Start with the lamp about 18-24 inches above the bedding.
- Observation: Place a thermometer under the lamp at chick level. If chicks are not congregating directly under the lamp and appear content, this is a good starting point. If they are trying to escape, raise it. If they are huddled tightly, lower it.
Week 2
- Target Temperature: 85-90°F (29-32°C) at chick level.
- Adjusting Heat Lamp: Raise the lamp by approximately 2-3 inches, or about 2-3 inches higher than the previous week.
Week 3
- Target Temperature: 80-85°F (27-29°C) at chick level.
- Adjusting Heat Lamp: Raise the lamp another 2-3 inches.
Week 4 and Beyond
- Target Temperature: 75-80°F (24-27°C) at chick level.
- Adjusting Heat Lamp: Continue raising the lamp by 2-3 inches each week.
By the time chicks are 4-6 weeks old, they should be able to tolerate ambient room temperatures and may no longer need supplemental heat, especially if they have developed a good downy coat.
Techniques for Adjusting the Heat Lamp
The key to successful chick heating needs management is making small, incremental adjustments. It’s better to err on the side of slightly too cool initially and adjust upwards than to overheat them from the start.
Using a Thermometer
While observing the chicks is vital, a thermometer is an invaluable tool. Place a reliable thermometer at chick level, near the edge of the heat zone. This gives you a concrete reading to start with.
The Hovering Heat Lamp Method
Some keepers prefer to think of the hovering heat lamp chicks as creating a warm zone. The lamp is suspended by a chain or adjustable fixture, allowing for easy height changes. This is far superior to simply resting the lamp on top of the brooder, which can be unstable and dangerous.
Key considerations for the hovering heat lamp:
- Secure Attachment: Ensure the lamp is securely fastened to prevent it from falling into the brooder, which can cause fires or severe injury to the chicks.
- Adjustable Fixture: Use a pulley system, an adjustable clamp, or a brooder lamp stand for easy and safe height adjustments.
Creating a Temperature Gradient
A well-designed brooder will have a temperature gradient. This means the area directly under the lamp is warmest, and the temperature gradually decreases as you move away from it. This allows chicks to self-regulate their temperature by choosing where they want to be.
- Brooder Size: A larger brooder allows for a more pronounced temperature gradient.
- Lamp Position: Centering the lamp provides even heat distribution, but you still want edges of the brooder to be cooler.
Common Brooder Setup Issues and Solutions
Even with the best intentions, issues can arise. Here are some common problems and how to address them:
Problem: Chicks are Clumped Directly Under the Lamp
Reason: The chicks are too cold.
Solution: Lower the heat lamp by a few inches. Check the wattage. If you’re using a low-wattage bulb, consider a slightly higher wattage bulb or ensure the room isn’t excessively cold.
Problem: Chicks are Spread Out Evenly and Active
Reason: The temperature is just right.
Solution: Maintain the current chicks heat lamp distance. Continue observing them for any changes.
Problem: Chicks are Trying to Get Away from the Lamp, Panting
Reason: The chicks are too hot.
Solution: Raise the heat lamp by a few inches. Ensure there is adequate ventilation in the brooder.
Problem: Chicks are Huddled Together in the Farthest Corner from the Lamp
Reason: The chicks are too hot, and the gradient is too steep or the entire brooder is too warm.
Solution: Raise the lamp further. Ensure the brooder isn’t in direct sunlight or too close to another heat source. A larger brooder might be needed.
Problem: Chicks Appear Lethargic and Uninterested in Food/Water
Reason: This can be a sign of chilling or overheating, or other health issues.
Solution: Immediately assess the heat lamp placement and brooder temperature. If the temperature seems correct, investigate other potential causes like drafts, overcrowding, or water access.
Choosing the Right Heat Lamp and Bulb
Not all heat lamps are created equal. For raising chicks, it’s generally recommended to use a heat lamp specifically designed for poultry or livestock.
Types of Heat Sources
- Incandescent Bulbs: These are the most common and affordable. They produce heat and light. Use bulbs designed for brooding (often red or clear). Red bulbs can help keep chicks calmer by reducing their visibility to each other, thus minimizing pecking.
- Ceramic Heat Emitters (CHEs): These produce radiant heat only (no light). They are more energy-efficient and can last longer than incandescent bulbs. They are excellent for providing consistent warmth without disrupting the chicks’ sleep cycle.
- Brooder Plates: These are flat panels that emit heat from below. They mimic a mother hen’s warmth and are considered very safe. Chicks can move under and out from under the plate as needed.
Bulb Wattage
As mentioned, wattage matters. For a standard brooder that accommodates 10-20 chicks, 150-250 watt bulbs are common. If you are raising a larger flock, you might need multiple lamps or a higher wattage. Always start with a lower wattage bulb and increase if necessary.
Brooder Design and Safety Considerations
Beyond the heat lamp distance, the brooder itself and safety are crucial.
Brooder Material
Cardboard boxes, plastic tubs, or dedicated brooder cages can be used. Ensure the sides are high enough to prevent chicks from escaping and tall enough to contain the radiant heat from the lamp.
Ventilation
While you want to keep the chicks warm, good ventilation is essential to prevent ammonia buildup from droppings and to ensure fresh air. Avoid completely sealed brooders. A few strategically placed air holes near the top of the brooder are usually sufficient.
Fire Safety
This cannot be stressed enough. Heat lamps are a fire hazard.
- Never place a heat lamp directly on flammable bedding or near combustible materials.
- Always suspend the lamp securely.
- Use a bulb guard if your lamp comes with one.
- Never leave a heat lamp unattended when you are not home, especially in the initial stages.
- Consider a thermostat with a safety shut-off for added protection.
Bedding
Use absorbent, easy-to-clean bedding. Pine shavings, straw, or paper are good options. Avoid cedar shavings, as the aromatic oils can be harmful to chicks. Keep the bedding dry.
Adjusting for Different Chick Breeds and Ages
While the core principles remain, specific breeds and ages might have slightly different needs.
Heat Lamp Height Broiler Chicks
Broiler chicks, like Cornish Cross, grow incredibly fast and have high metabolisms. They often require slightly warmer conditions initially and need careful monitoring as they grow. Their rapid feathering can sometimes make them appear less reliant on heat, but don’t be fooled; their growth rate demands efficient energy conversion, which starts with proper warmth. You might find yourself adjusting heat lamp chicks more frequently in the first few weeks to keep pace with their rapid development.
Heat Lamp Height Laying Hens
Chicks destined to become laying hens (e.g., Leghorns, Plymouth Rocks) also need consistent warmth. Their growth is typically steadier than broilers. The general age-based temperature reduction schedule will serve them well. The focus is on providing a stable, warm environment for healthy skeletal and organ development.
Flock Size Considerations
If you have a larger flock, the heat distribution from a single lamp might not be sufficient. Chicks at the outer edges of a large brooder might get too cool. In such cases, consider:
- Multiple Heat Sources: Two lamps positioned at opposite ends of a large brooder can provide more even heating.
- Larger Brooder Area: Allowing chicks more space can help create a better temperature gradient.
Long-Term Temperature Management
As chicks grow, their chick heating needs diminish. The process is one of gradual weaning from intense heat.
- Week 3-4: Chicks should be able to tolerate slightly cooler temperatures and start moving away from the heat source more readily.
- Week 5-6: Many chicks can begin to go without supplemental heat, especially if the ambient temperature is in the mid-70s Fahrenheit. Continue to monitor and provide heat if they seem chilled.
- Transitioning Outdoors: If you are moving young chicks to an outdoor coop, ensure the coop is draft-free and that they still have access to a supplemental heat source if temperatures drop significantly. They will need to gradually adapt to outdoor temperatures.
Frequently Asked Questions About Heat Lamp Placement
Here are some common questions people have about positioning their heat lamps.
Q1: Can I use a regular desk lamp with a regular light bulb for my chicks?
A1: While a regular desk lamp might provide some heat, it’s not ideal. Standard light bulbs are not designed for the sustained heat output and intensity needed for brooding. They can also be a fire hazard due to their construction and lack of safety features. It’s best to use a lamp designed for heat-producing bulbs, often called a brooder lamp or utility clamp lamp.
Q2: How do I know if my heat lamp is too hot?
A2: Observe your chicks. If they are panting, trying to get away from the heat, or huddled in the coolest corners of the brooder, they are likely too hot. You may also see signs of dehydration.
Q3: How do I know if my heat lamp is not hot enough?
A3: Chicks will huddle tightly together directly under the heat lamp, chirping incessantly. They may appear lethargic. This is a critical sign they are cold and need more warmth.
Q4: What happens if my chicks get too cold?
A4: Chicks that are too cold can suffer from chilling, which weakens their immune system and makes them susceptible to diseases. They may also develop “pasty butt” (feces sticking to their vent), which can block their ability to eliminate waste. Severe chilling can be fatal.
Q5: Should I leave the heat lamp on 24/7?
A5: Yes, for the first few weeks, the heat lamp should be on 24/7. Chicks cannot regulate their body temperature, so they need a consistent heat source. As they get older, you will gradually reduce the heat and eventually turn it off completely.
Q6: What is a good wattage for a heat lamp for 20 chicks?
A6: For 20 chicks, a 150-250 watt bulb is typically sufficient. It’s always best to start with the lower end and monitor your chicks’ behavior to determine if more heat is needed.
Q7: Can I use a heat lamp that is designed for reptiles?
A7: Some reptile heat lamps might work, but they are often designed for smaller, more concentrated heat zones and may not provide the broad, even warmth needed for a group of chicks. Check the wattage and heat output to ensure it’s appropriate. Brooder-specific lamps are usually the safest and most effective choice.
Q8: My chicks seem to be okay, but they are making a lot of noise. What does that mean?
A8: Constant, high-pitched chirping can indicate they are too cold or too hot. If they are content and spread out, some chirping is normal as they communicate. However, persistent, distressed chirping usually points to a temperature issue.
Q9: How long do chicks need supplemental heat?
A9: Most chicks will require supplemental heat for about 4 to 6 weeks, depending on the ambient temperature and their breed. By this time, they should have developed enough feathers to regulate their own body temperature.
Q10: What if I have multiple broods of chicks at different ages?
A10: If you have chicks of varying ages, you will need to manage their heat needs separately. You might have different brooder setups or adjust the heat lamp distances in separate areas to cater to the specific temperature requirements of each age group.
By carefully observing your chicks and making consistent, small adjustments to the heat lamp height, you can create the perfect environment for them to grow and thrive. The chick brooder temperature is a dynamic element, and your attentive management is the key to success.