
Determining the correct chick heat lamp height is crucial for the well-being and survival of your baby chicks. The ideal heat lamp distance for chicks is typically between 12 to 18 inches from the chicks themselves, but this distance can vary. If you’re asking, “How far should heat lamp be from chicks?” the answer is that it’s not a fixed measurement but a dynamic one based on chick behavior and the temperature they are receiving. The goal is to create a warm zone where they can comfortably regulate their body temperature, and the chick brooder lamp height needs to be adjusted accordingly. This guide will explore the nuances of setting chick heat lamp height to ensure your flock thrives.
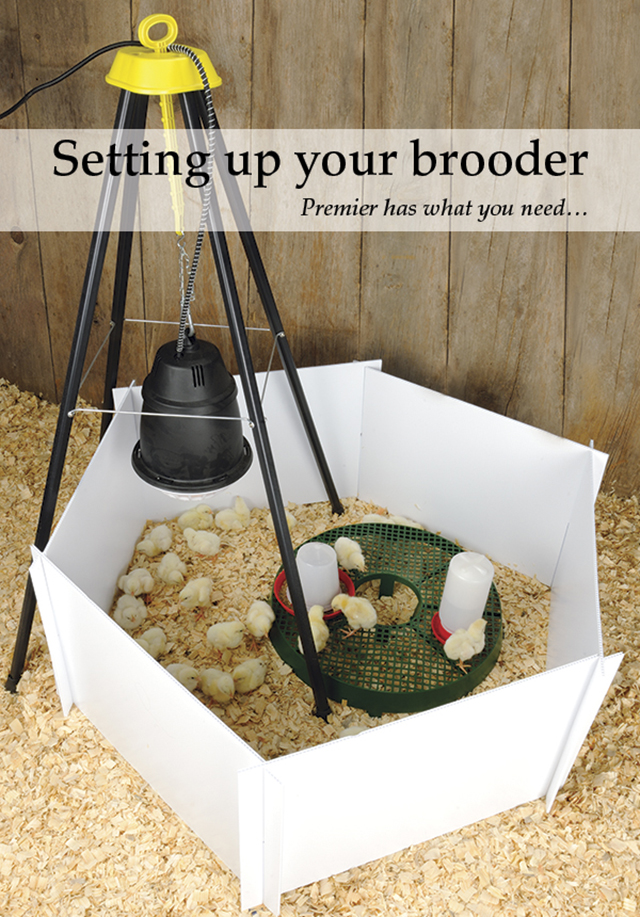
Image Source: www.premier1supplies.com
Creating the Perfect Brooder Environment
Bringing baby chicks into your home or backyard is an exciting time. These tiny fluffballs are completely dependent on you for warmth, food, and water. One of the most critical aspects of chick care is providing the right heat source. A heat lamp is the most common method, but heat lamp placement chicks requires careful consideration to avoid overheating or chilling them.
Why Chick Heat Lamp Height Matters
Chicks are born without the ability to generate their own body heat. They rely on external sources to maintain a stable internal temperature, which is vital for their growth and development. Too little heat can lead to chilling, which can be fatal. Too much heat can cause dehydration, stress, and even heatstroke. The chick temperature heat lamp needs to be just right, and the height of the lamp is the primary way to control this.
Gauging Chick Comfort: The Most Reliable Indicator
While there are general guidelines for heat lamp distance for chicks, the most reliable way to determine if your chick heat lamp height is correct is by observing your chicks’ behavior. They are excellent indicators of their own comfort level.
- Too Close (Too Hot): If the chicks are huddled together in the farthest corners of the brooder, panting, or trying to get away from the heat source, the lamp is likely too low. They are actively avoiding the heat.
- Too Far (Too Cold): If the chicks are all clustered directly under the heat lamp, chirping loudly and seeming restless, the lamp is probably too high. They are desperately seeking warmth.
- Just Right: When the optimal heat lamp height for chicks is achieved, you’ll see them spread out comfortably in the brooder. Some might be closer to the heat source, while others are a little further away. They will be active, eating, drinking, and exploring their environment without obvious signs of distress from temperature.
Initial Heat Lamp Setup: A Starting Point
When you first introduce your chicks to the brooder, start with the heat lamp height guide chicks suggesting a height of approximately 18 to 24 inches above the litter. This is a starting point. You will need to monitor your chicks closely and adjust the height.
Factors Influencing Heat Lamp Height
Several factors can influence the ideal chick heat lamp height:
- Wattage of the Bulb: Higher wattage bulbs produce more heat. A 250-watt bulb will require a greater heat lamp distance for chicks than a 150-watt bulb.
- Type of Bulb: Incandescent bulbs (red or clear) are common. Ceramic heat emitters (CHEs) and deep heat projectors (DHPs) offer different heat distribution and may require different heat lamp placement chicks. CHEs typically produce radiant heat without light, which can be beneficial for sleep cycles.
- Brooder Size and Ventilation: A larger brooder with good ventilation may require a slightly lower lamp to maintain adequate warmth. Poor ventilation can trap heat, making a higher lamp necessary.
- Ambient Room Temperature: The temperature of the room where the brooder is located plays a significant role. A colder room will require the lamp to be closer or a higher wattage bulb.
- Age of the Chicks: As chicks grow, their ability to regulate their own body temperature improves, and they require less supplemental heat. The heat lamp distance for chicks will need to be gradually increased.
Temperature Guidelines for Chicks
The temperature beneath the heat lamp is the most critical element. The ideal temperature will decrease as the chicks get older. Here’s a general guideline for the chick temperature heat lamp:
| Chick Age (Days) | Temperature Under Lamp (°F) | Temperature Under Lamp (°C) | Recommended Lamp Height Adjustment |
|---|---|---|---|
| 1-3 | 95-100 | 35-38 | Start at 18-24 inches |
| 4-7 | 90-95 | 32-35 | Lower lamp slightly if needed |
| 8-14 | 85-90 | 29-32 | Continue lowering gradually |
| 15-21 | 80-85 | 27-29 | Continue lowering gradually |
| 22-28 | 75-80 | 24-27 | Continue lowering gradually |
| Beyond 4 weeks | Room temperature | Room temperature | Remove heat lamp |
Important Note: These are general guidelines. Always observe your chicks’ behavior to fine-tune the optimal heat lamp height for chicks.
Measuring the Temperature
You can use a reliable thermometer to check the temperature directly beneath the heat lamp. Place the thermometer bulb on the litter surface where the chicks would be standing. This measurement will help you verify if your chick brooder lamp height is achieving the desired temperature range.
Adjusting the Chick Heat Lamp Height
Adjusting the heat lamp height is an ongoing process. It’s not a one-time setup.
The First Few Days: Critical Period
During the first few days of life, chicks are most vulnerable to temperature fluctuations. Your primary goal is to maintain that initial 95-100°F (35-38°C) zone directly under the lamp.
- Initial Placement: Hang the heat lamp securely, ensuring it cannot fall into the brooder. A clamp lamp with a ceramic socket is recommended. Start with the bulb about 18-24 inches above the litter.
- Observation: Watch your chicks for at least an hour.
- If they are spreading out evenly and seem content, your chick heat lamp height is likely good.
- If they are all huddled directly under the lamp, it’s too high. Lower it by 1-2 inches.
- If they are avoiding the lamp and trying to get to the edges, it’s too low. Raise it by 1-2 inches.
- Temperature Check: Use your thermometer to confirm the temperature at chick level.
- Daily Adjustments: Check on the chicks and the temperature throughout the day, making small adjustments as needed.
Gradual Reduction of Heat
As your chicks grow, their natural ability to generate heat increases. You will need to gradually reduce the heat provided by the lamp. This is typically done by raising the heat lamp higher each week.
- Week 2: Aim for temperatures in the 90-95°F (32-35°C) range. You might raise the lamp another inch or two.
- Week 3: Target 85-90°F (29-32°C). Continue raising the lamp.
- Week 4 and Beyond: By the time chicks are about 4 weeks old, they should be able to tolerate ambient room temperatures and will no longer need supplemental heat. The chick heat lamp height will be such that the heat source is well above them, or it can be removed entirely.
Troubleshooting Common Issues with Heat Lamp Placement
Even with the best intentions, you might encounter some challenges with heat lamp placement chicks:
- Uneven Heat Distribution: If you notice chicks always crowding to one side, even with the lamp centered, it could be due to drafts or the way heat is radiating. Ensure good ventilation but avoid direct drafts. Sometimes rotating the brooder or slightly repositioning the lamp can help.
- Flickering Lamp: A flickering heat lamp can stress chicks. Ensure the lamp is securely mounted and the bulb is screwed in tightly.
- Overheating: Signs include excessive panting, lethargy, and dehydration. Immediately raise the lamp higher or temporarily turn it off if the situation is severe. Ensure fresh water is always available.
- Chilling: Signs include constant huddling, chirping loudly, and appearing weak. Immediately lower the lamp or ensure the bulb is functioning correctly.
Alternative Heat Sources and Their Placement
While heat lamps are popular, other options exist, each with its own considerations for heat lamp distance for chicks or their equivalent:
- Radiant Brooder Plates: These are flat plates that chicks can snuggle under. The height is usually adjustable to accommodate chick growth. They offer a more natural heat distribution, as chicks can move in and out from under the plate as they feel the need. The baby chick heat source distance is less about a specific inch measurement and more about allowing the chicks to access the warmth comfortably.
- Ceramic Heat Emitters (CHEs): These produce heat without light, which can be beneficial for chicks’ sleep cycles. CHEs often require a guard to prevent chicks from touching the emitter directly. The chick brooder lamp height for a CHE might be similar to an incandescent bulb, but it’s essential to check the manufacturer’s recommendations for the specific fixture and bulb.
- Under-Floor Heating: This involves heating the floor of the brooder. The chick heat lamp height isn’t applicable here, but the floor temperature needs to be carefully monitored to avoid overheating.
Regardless of the heat source, the principle remains the same: provide a safe, adjustable, and appropriate source of warmth.
Safety First: Heat Lamp Precautions
Heat lamps can be a fire hazard if not used correctly. Safety should be your top priority when implementing heat lamp placement chicks.
- Secure Mounting: Always use a heavy-duty clamp lamp with a ceramic socket designed for heat bulbs. Never let the lamp hang by its cord. Secure it to the side of the brooder or a sturdy overhead support.
- Bulb Guard: Use a wire bulb guard to prevent chicks from coming into direct contact with the hot bulb. This is crucial for preventing burns and potential fires.
- No Flammable Materials: Keep the brooder area clear of any flammable materials, such as dry bedding that is too close to the bulb or paper products.
- Proper Ventilation: Ensure the brooder has adequate ventilation to prevent heat buildup.
- Never Leave Unattended (Initially): While you don’t need to hover 24/7, especially after the initial setup, it’s wise to monitor the brooder closely for the first few days and nights to ensure everything is functioning correctly and the chicks are comfortable.
- Backup Plan: It’s a good idea to have a backup heat source or a plan in place in case of a bulb failure or power outage.
The Role of the Brooder Lamp Guard
The brooder lamp guard is an often-overlooked but vital component. It acts as a physical barrier between the hot bulb and the curious chicks. Without it, a chick could perch on the bulb, get too close and burn itself, or even knock the lamp into the bedding, creating a fire risk. When determining chick heat lamp height, always factor in the space needed for the guard.
Transitioning Chicks Out of the Brooder
As the chicks grow, you’ll notice them spending less time directly under the heat source and more time exploring the cooler parts of the brooder. This is a natural progression.
When the ambient temperature of your home or coop is consistently above 70°F (21°C) and the chicks are fully feathered (usually around 4-6 weeks old), you can begin to wean them off the heat lamp. Start by raising it to its highest setting for a few days, then remove it altogether. Monitor them for any signs of being too cold.
Signs Chicks Are Ready to Go Heat-Free
- Fully Feathered: They will have lost their downy fluff and have proper feathers.
- Flocking Together Less: They won’t need to huddle for warmth as much.
- Comfortable at Room Temperature: They are active and content in the current ambient temperature.
FAQ: Your Questions About Chick Heat Lamp Height Answered
Q1: What is the ideal heat lamp height for day-old chicks?
A1: For day-old chicks, the heat lamp should typically be placed about 18 to 24 inches above the litter. However, always observe your chicks’ behavior to adjust the height for optimal comfort.
Q2: Can I use a regular light bulb instead of a heat lamp bulb?
A2: No, a regular incandescent light bulb will not provide sufficient heat. You need a bulb specifically designed for heat output, such as a 250-watt heat lamp bulb (red or clear). Ceramic heat emitters are also an option.
Q3: How do I know if the heat lamp is too high or too low?
A3: If chicks are huddled directly under the lamp and chirping incessantly, it’s too high. If they are all trying to get to the edges of the brooder and seem to be avoiding the heat, it’s too low. The goal is for them to spread out comfortably.
Q4: When can I remove the heat lamp for my chicks?
A4: Chicks generally no longer need supplemental heat when they are fully feathered, typically around 4 to 6 weeks old, and can comfortably tolerate the ambient room temperature (around 70°F or 21°C).
Q5: What is the best way to measure the chick temperature heat lamp provides?
A5: Use a reliable thermometer placed on the litter surface directly under the lamp. This will give you an accurate reading of the temperature at the chicks’ level.
Q6: Do different breeds of chicks have different heat requirements?
A6: While there can be slight variations, the general temperature guidelines and observation methods apply to most common domestic chicken breeds. Always prioritize observing your specific chicks.
Q7: How do I ensure my heat lamp is safely placed?
A7: Securely mount the lamp with a sturdy clamp and ceramic socket. Use a bulb guard to prevent chicks from touching the hot bulb. Keep the area around the brooder free of flammable materials.
By diligently following these guidelines and observing your chicks closely, you can ensure they receive the optimal warmth needed to grow into healthy, robust birds. Mastering the heat lamp distance for chicks is a key skill for any new poultry keeper.