
Can you make a Redstone Lamp in Minecraft? Yes, absolutely! Making a Redstone Lamp in Minecraft is a straightforward process that adds a touch of modern illumination and automation to your builds. This guide will walk you through everything you need to know about the Minecraft redstone lamp, from crafting to advanced activation methods.
The Redstone Lamp is a fantastic block for creating automatic lighting systems, decorative elements, or even warning indicators within your Minecraft world. Unlike torches or glowstone, its light can be switched on and off. This tutorial will cover the basics of Redstone Lamp crafting, how to power a Redstone Lamp, and various ways to incorporate it into your creations. Whether you’re a seasoned Minecraft engineer or just starting with redstone, this redstone lamp tutorial will equip you with the knowledge to build with these versatile blocks.
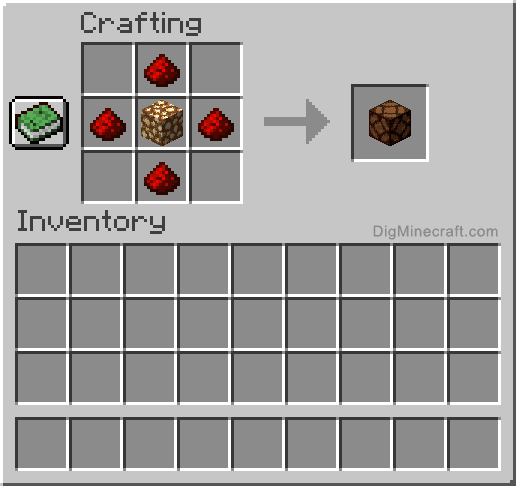
Image Source: www.digminecraft.com
What You Need to Build a Redstone Lamp
Before you can start building, you’ll need a few essential items. The primary components for building a Redstone Lamp are simple and readily available in most Minecraft survival worlds.
Here’s what you’ll need:
- Glowstone Dust: This is the key ingredient that provides the light.
- Redstone Torch: This acts as the power source or switch for the lamp.
Gathering Your Materials
Glowstone Dust:
Glowstone Dust is obtained by mining Glowstone blocks. Glowstone blocks are typically found in the Nether, often hanging from ceilings in large clusters. When you mine a Glowstone block with any pickaxe, it drops Glowstone Dust. Each Glowstone block drops between 2 and 4 units of Glowstone Dust. Be cautious when mining Glowstone, as it often hangs precariously, and falling into the void below in the Nether is a common way to lose your items and respawn.
Redstone Torch:
Redstone Torches are crafted using Redstone Dust and a Stick.
- Redstone Dust: This is mined from Redstone Ore, found deep underground in most Overworld biomes. When you mine Redstone Ore, it drops Redstone Dust.
- Stick: Sticks are crafted from wooden planks, which are made from any type of wood log.
Crafting Your Redstone Lamp
The Redstone Lamp crafting recipe is incredibly simple. With the necessary ingredients gathered, you can easily craft a Redstone Lamp in your crafting table.
Here’s the crafting recipe:
| Ingredient | Output |
|---|---|
| Glowstone Dust | Lamp |
| Redstone Torch | Lamp |
| Glowstone Dust | Lamp |
| Redstone Torch | Lamp |
In a 2×2 crafting grid:
- Place one Glowstone Dust in the top-left slot.
- Place one Redstone Torch in the top-right slot.
- Place one Glowstone Dust in the bottom-left slot.
- Place one Redstone Torch in the bottom-right slot.
This will produce one Redstone Lamp. You can also arrange the ingredients in a 3×3 crafting grid in the same pattern to achieve the same result.
The Minecraft Redstone Lamp
The Redstone Lamp is a decorative and functional block. When unpowered, it appears as a somewhat dull block with a few crystalline growths. However, when powered, it emits a bright light, similar in intensity to a regular torch, and its surface glows with a vibrant yellow hue. This transformation makes it incredibly useful for dynamic lighting.
How to Power a Redstone Lamp
The core functionality of a Minecraft redstone lamp lies in its ability to be activated and deactivated. Knowing how to power a redstone lamp is crucial for its use in any redstone circuit.
A Redstone Lamp requires a redstone signal to turn on. This signal can be provided by various redstone components.
Direct Powering Methods
These methods involve placing a redstone component directly next to or on top of the Redstone Lamp.
-
Placing a Redstone Torch Directly: If you place a Redstone Torch on any side of the Redstone Lamp, the lamp will immediately illuminate. This is a simple way to create a permanently lit lamp or a manually toggled light source by removing or replacing the torch.
-
Placing a Lever or Button:
- Lever: Placing a lever on a block adjacent to the Redstone Lamp, or directly on the lamp itself (though this is less common), will allow you to manually toggle the lamp on and off. When the lever is in the “on” position, it sends a continuous redstone signal.
- Button: Placing a button on a block adjacent to the Redstone Lamp will send a short pulse of redstone signal when pressed. This will cause the lamp to flicker on for a brief moment.
-
Placing a Pressure Plate: Similar to a button, a pressure plate will send a redstone signal when stepped on. This can be used for automatic lighting that activates when a player or mob walks over it.
-
Placing a Tripwire Hook: When linked with string and another tripwire hook, this creates a tripwire. Anything passing through the string triggers a redstone signal, illuminating the Redstone Lamp.
Indirect Powering Methods (Using Redstone Dust)
Often, you won’t want to place the power source directly next to the lamp. This is where redstone dust lamp interactions come in. Redstone dust can transmit signals over distances.
-
Connecting with Redstone Dust: You can place redstone dust on blocks leading from a power source (like a lever, button, or even another powered component) to a block adjacent to the Redstone Lamp. As long as the redstone dust is powered and connected to a block next to the lamp, the lamp will turn on.
-
Powering Adjacent Blocks: Redstone lamps can also be powered indirectly by blocks that are powered. If you place a Redstone Lamp next to a block that is receiving a redstone signal (e.g., a block with a Redstone Torch on it, or a block that is part of a powered redstone line), the lamp will activate. This is a crucial concept for building more complex circuits.
Understanding Redstone Signal Strength
Redstone dust can carry a signal of strength up to 15 blocks. If you have a lever powering a line of redstone dust, the signal will weaken as it travels. A Redstone Lamp only needs a signal of strength 1 to activate. This means that even a weak redstone signal traveling through redstone dust can power a nearby lamp.
Building a Redstone Lamp Circuit
Building a redstone lamp often involves more than just a single lamp. You’ll likely want to create circuits that control multiple lamps, create patterns, or automate lighting. Here are some basic circuit concepts.
Simple On/Off Switch for Multiple Lamps
This is a foundational circuit for controlling several lamps simultaneously.
Materials:
- Several Redstone Lamps
- Redstone Dust
- Levers
- Blocks to place the components on
Steps:
- Place Lamps: Arrange your Redstone Lamps in your desired pattern.
- Place Lever: Place a lever on a block a short distance away from your lamps.
- Connect with Redstone Dust:
- Run redstone dust from the block the lever is on.
- Connect this redstone dust line to blocks adjacent to each of your Redstone Lamps. You can use repeaters if the distance becomes too great (over 15 blocks) to boost the signal, but for a simple setup, direct connection is often sufficient.
- Ensure each lamp is next to a block that is powered by the redstone dust.
When you flip the lever, all the connected Redstone Lamps will turn on or off.
Dusk-to-Dawn Lighting System
This is a classic application of building a redstone lamp for practical use. You can create lighting that automatically turns on when it gets dark and turns off when it gets light.
Materials:
- Redstone Lamp
- Redstone Dust
- Daylight Detector
- Blocks
Steps:
- Place Lamp: Place your Redstone Lamp where you want the light.
- Place Daylight Detector: Place a Daylight Detector on a block adjacent to the Redstone Lamp. The Daylight Detector needs to be able to “see” the sky.
- Connect: The Daylight Detector, when placed correctly, will automatically emit a redstone signal. When it’s dark, it emits a strong signal (up to 15). When it’s light, it emits a weak signal (around 0-1).
- Connect to Lamp:
- Place redstone dust on the block adjacent to the lamp, leading from the Daylight Detector.
- Alternatively, if you have a Daylight Detector directly next to the lamp, it will power it when it’s dark.
How it works: The Daylight Detector is sensitive to sunlight. In darkness, it outputs a strong redstone signal, turning the lamp on. As dawn breaks, the signal weakens, and the lamp turns off. You can invert the signal from the Daylight Detector using a Redstone Repeater set to hold or a few repeaters in a specific configuration to make the lamp turn on during the day and off at night, though the automatic night lighting is more common.
Timed Lighting with Repeaters
For more advanced building a redstone lamp scenarios, you can use Redstone Repeaters to create timed effects.
Materials:
- Redstone Lamp
- Redstone Dust
- Redstone Repeater
- Lever or Button
Steps:
- Set up a basic circuit: Connect a lever or button to a Redstone Lamp using redstone dust.
- Insert Repeaters: Place one or more Redstone Repeaters in the redstone line between the lever/button and the lamp.
- Adjust Repeater Delay: Right-clicking on a Redstone Repeater cycles through its delay settings (1-4 redstone ticks). By adding multiple repeaters with different delays, you can control how long the lamp stays on after the initial activation or create pulsing effects. For example, a repeater placed directly behind a lever will delay the lamp turning on for a short period.
Advanced Activation: Redstone Comparator and Hoppers
For very specific redstone lamp activation scenarios, you can use components like the Redstone Comparator and Hoppers to control lighting based on inventory contents.
Materials:
- Redstone Lamp
- Redstone Dust
- Redstone Comparator
- Hopper
- Chest
Steps:
- Set up: Place a Redstone Lamp on a block. Place a block adjacent to the lamp.
- Place Comparator: Place a Redstone Comparator facing the block adjacent to the lamp.
- Place Hopper: Place a Hopper pointing into the Redstone Comparator.
- Place Chest: Place a Chest above the Hopper.
- Fill Chest: Place items into the chest.
How it works: The Redstone Comparator outputs a signal strength based on the number of items in the inventory of the block it’s pointing at (in this case, the Hopper). When you place items into the chest, they will filter down into the Hopper, and the Hopper will send a signal to the Comparator. The Comparator then sends a signal to the block, which powers the Redstone Lamp. The strength of the signal from the Comparator depends on how full the Hopper is. This allows for lighting systems that activate when specific items are present.
Redstone Lamp Minecraft Guide: Tips and Tricks
This redstone lamp Minecraft guide offers some useful pointers to enhance your building experience.
- Signal Strength: Remember that Redstone Lamps need only a signal strength of 1. This means they are very easy to power and can be integrated into even the most basic redstone circuits.
- Block Interactions: Redstone Lamps can be powered by pistons pushing them, but they don’t emit light when pushed. They only emit light when powered by a redstone signal.
- Aesthetics: Redstone Lamps look good when used in modern builds, futuristic designs, or even simple underground bases. Their clean, uniform light is pleasant.
- Cost-Effectiveness: For automated lighting that you want to turn on and off, Redstone Lamps are often more resource-efficient than constantly running Redstone Torches or manually placing/removing them.
- Combining with other Redstone: Experiment with combining Redstone Lamps with other redstone components like pistons, note blocks, and observers for more complex contraptions. For instance, a simple “doorbell” could be a button that activates a Redstone Lamp and a note block simultaneously.
The Role of Redstone Dust in Lamp Activation
Redstone dust lamp interactions are fundamental. Redstone dust acts as the “wiring” of the redstone world. It carries power from a source to a destination. When you place redstone dust on blocks, it connects them in a circuit.
- Signal Transmission: Redstone dust transmits a signal from a powered block to any adjacent block with redstone dust on it.
- Signal Strength Decay: The signal strength of redstone dust decreases by 1 for every block it travels. A signal starting at strength 15 will reach strength 0 after 15 blocks.
- Repeaters for Boosting: If your redstone line is longer than 15 blocks, you’ll need to use a Redstone Repeater to refresh the signal to its maximum strength (15). Place the repeater facing the direction of the signal flow, and ensure the block it’s placed on is powered.
Fathoming Redstone Lamp Activation Nuances
Redstone lamp activation can sometimes be a bit tricky due to the way redstone signals interact with blocks.
- Powering Blocks vs. Dust: A Redstone Lamp will activate if a block adjacent to it is powered. This means you can power a block with a Redstone Torch, and then place the Redstone Lamp next to that powered block.
- Powering Through Blocks: Redstone dust can power components on blocks above it if the dust is placed on the block directly beneath. This is useful for vertical wiring.
- Redstone Blocks: A Redstone Block itself is a powered component. Placing a Redstone Block next to a Redstone Lamp will activate it.
FAQs About Redstone Lamps
Here are some frequently asked questions about Redstone Lamps in Minecraft:
Q1: What is the best way to power a Redstone Lamp?
A1: The “best” way depends on your goal. For a simple manual switch, a lever is ideal. For automatic lighting that turns on at night, a Daylight Detector is perfect. For more complex timed or conditional lighting, you’ll need to use redstone dust and repeaters.
Q2: Can Redstone Lamps be powered by pistons?
A2: Yes, pistons can push Redstone Lamps. However, a pushed Redstone Lamp does not emit light. It must be powered by a redstone signal to illuminate.
Q3: How bright is a Redstone Lamp?
A3: A Redstone Lamp emits a light level of 15, which is the maximum light level in Minecraft, equivalent to a torch or glowstone block.
Q4: Can I dye a Redstone Lamp a different color?
A4: No, Redstone Lamps cannot be dyed. Their light color is fixed as yellow. For colored lighting, you would need to use colored glass in conjunction with a light source behind it, or use mods.
Q5: What are the uses for Redstone Lamps besides lighting?
A5: Redstone Lamps can be used as indicators in contraptions, visual feedback for button presses, status lights for farms or redstone machines, or as part of decorative light shows.
Q6: How much Redstone Dust do I need to power a Redstone Lamp far away?
A6: A Redstone Lamp needs a signal strength of at least 1. Redstone dust transmits signals up to 15 blocks. If your signal needs to travel further than 15 blocks, you’ll need to use Redstone Repeaters to boost the signal strength every 15 blocks.
Q7: Can I connect multiple Redstone Lamps to one lever?
A7: Yes, you can connect multiple Redstone Lamps to a single lever. Simply run redstone dust from the lever to all the lamps you wish to control, ensuring each lamp is adjacent to a powered block or redstone dust.
Q8: What happens if I place a Redstone Lamp next to a powered block that is moving (e.g., pushed by a piston)?
A8: The Redstone Lamp will receive the redstone signal and light up, even if the block it’s next to is moving. The light emission itself is not affected by the lamp’s position, only its power state.
In conclusion, the Redstone Lamp is a versatile and essential block for any Minecraft player interested in automation and advanced building. With this Redstone Lamp Minecraft guide, you’re well-equipped to craft, power, and integrate these glowing blocks into your creative projects. Happy building!