The modification of the lighting in your home can definitively change the atmosphere and usability of such a space. Thus one of the favorite solutions is to change a recessed can light into a pendant light. This report will guide you through the process of the conversion, giving a comprehensive description of the very necessary steps required of both the preparatory and implementation stages after the proper illumination upgrade.
Understanding the Basic
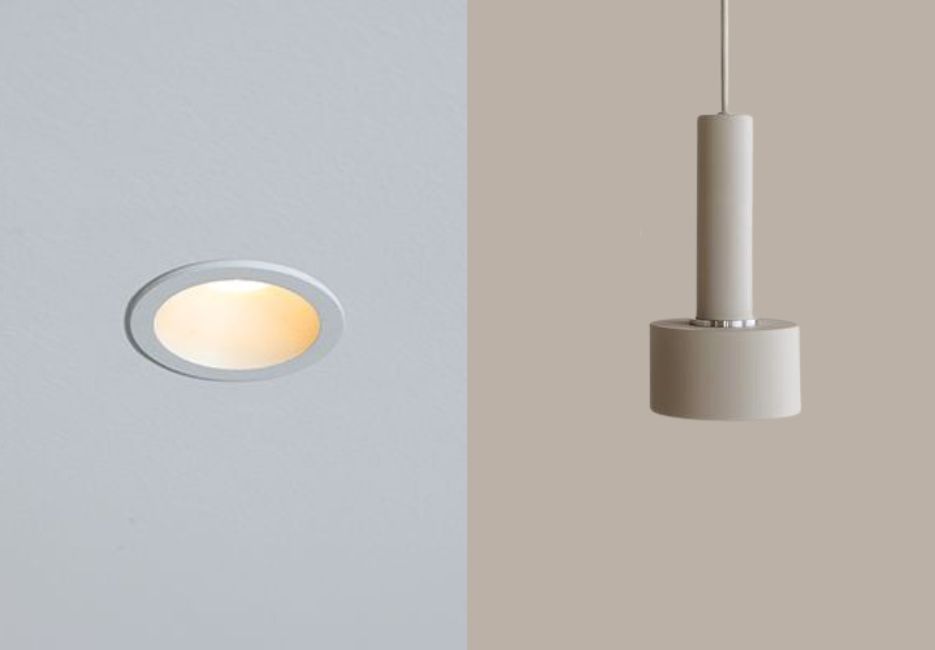
Recessed light fixtures usually provide good quality of light, but they tend to make the spaces they are in look very flat and unattractive. However, a pendant lamp, which is a more versatile lighting approach, may just provide brazen and fashionable space while enlightening the environment where you want it. Altering existing recessed can light to a pendant light may be a fresh start for your space and might help improve its aesthetics mission.
Materials Needed
- Pendant light fixture
- Pendant light conversion kit (if necessary)
- Wire stripper
- Voltage tester
- Screwdriver
- Electrical tape
- Safety goggles
- Ladder or step stool
Preparation Steps
Turn Off Power: Before you are ready to start, your first business is to make sure safety is a part of your conversion plan and disconnect the power supply from the circuit breaker. Use a voltage tester to prove that your recessed can light is no longer positive. Please, be careful not to miss wire them again after you install the kit.
Gather Your Tools: Get all the necessary equipment from the list above, and you are on your way to a smooth sailing of the whole operation.
Steps to Convert Recessed Can Light To Pendant Light
Step 1: Remove the Can Light
Quitely touch the hole in the middle thus breaking plastic spots which you may as well use to reattach your trim. The trims of the light are typically held by metallic clips and fasteners that can be unfastened after pushing the plastic ring.
Step 2: Disconnect the Wiring
Skillfully defuse the switching cover by taking the bulb out of a ceiling light and disconnecting the wires that are attached to the piece of the ceiling. Mark the wires to be sure about how to put them on the new pendant light later.
Step 3: Install the Conversion Kit (if applicable)
Some pendant light fixtures may have a kit that comes with it and has a conversion feature that allows easy connection to an existing recessed can. The kit should be attached to the ceiling wherever it is required as stated in the instructions.
Step 4: Connect the New Pendant Light
Drag the lines from the pendant light attic to the main part of the ceiling where the old wires are located. Remember: The color of wires should be matched according to the standard case (black wire to black wire, white wire to white wire, and ground wire to ground wire). The connections need to be secured and wrapped with wire nuts and then finally, wrapped in electrical tape.
Step 5: Secure the Pendant Fixture
Now check if things are in order by inserting the ground wire back inside to the electrical box/connections. Also, insert the colored wires at the wall side.
Step 6: Replace Trim and Cover
If you have a pendant light, which has not the same design as the one you have chosen, change the trim or use a lid to shut the hole., the cover being the ruler of the design of the fixture.
Step 7: Turn the Power Back On
All installations must be properly finished and the circuit breaker can then be turned on at the end of the procedure. Make sure that it starts working properly.
Final Touches
After you put your new pendant light on and it seems to be fine you should probably step back and consider the lighting of the whole room. Adjust the height of the lamp if necessary and think about how it fits with the style of decoration you are using. You might want to alter the bulb if you see neet do to the color temperature and brightness light of the room, that also depends on your personal taste.
Safety Considerations
Safety should be the priority in the matter of lighting fixtures. If you uncertainly execute any of the steps, it is advisable for you to get the help of a qualified electrician. Additionally, the use of safety goggles and making sure the power is off during the time of installation will avert accidents.
Conclusion
To refurbish a recessed can lamp into a pendant light is a gratifying project that drastically enhances the room’s mood. Apart from improvisation, installed change everything, you can still be successful by being very keen on details and persistence. Yes, let me say: Enjoy your newly illuminated space!
FAQs About Changing a Recessed Can Light into a Pendant Light
1. Can I replace a recessed can light with any pendant light fixture?
Not necessarily, not all pendant lights can be used at every level of the ceiling or in any part of the room. Make sure to pick a space-saving pendant that is small in construction if you have low and original ceiling heights. Your roof’s weight limit must be compared with the light’s weight before fixing it. Moreover, the installation requirements will be needed to be checked as it varies and the weight limitations have also to be taken into account.
2. Do I need an electrician to make the switch?
Other than that, most homeowners can perform the task themselves provided they have the fitting tools and follow the right safety precautions. Even so, getting a professional electrician will be of great help if you are not sure about any part of the action. They will ensure that the connection meets the standard safety regulations and that it’s properly installed.
3. What if I can’t find a conversion kit for my pendant light?
No conversion kits will be available in certain cases in case something gets discontinued for example. In a situation where a specific conversion kit is not available, a pendant light can still be installed by performing a proper electrical connection that involves the removal of the existing recessed fixture. The only thing you need to ensure is that the wiring is stable and fulfills all electrical standards.
4. How do I choose the right height for my pendant light?
Ideally, a pendant light is to be placed at a height of 30 to 36 inches from the countertop or the table. Nevertheless, the proper height could be influenced by certain aspects of your room. For example, your floor-to-ceiling height or your exact personal height will be the factors to affect its leveling. Be sure that the pendant permits walk under the lamp easily.
5. Can I switch back to recessed lighting if I change my mind?
Yes, reverting back into recessed lighting is a part of the possibility spectrum. Through thorough reinstalling of the recessed fixture, reconnecting the wiring and covering of the holes, you can revert to recessed lighting. Moreover, all the rules must be followed when putting the whole thing back in place.
6. What if I experience flickering or no light after installation?
In case there is a flickering condition or the no light situation is faced, at first assure yourself that the connections are in place and secured. Furthermore, make certain that the power to the circuit is restored. However, if the problems persist, an electrician may be required to investigate the matter further.
7. Are there any specific electrical codes I should be aware of?
Electrical codes differ by locale. It is necessary to look through the local building codes to guarantee that your installation is complying with the law. You might be required to use some special wiring methods or fixtures that comply with certain safety standards dictated by the regulatory authority.

Rowena Mitchell is a Lighting Expert at Lamp Insider, known for her innovative approach to lighting design. With a solid foundation built at GE Lighting, Rowena brings a wealth of experience and a keen eye for detail to every project she undertakes.