
Can you wire a fluorescent lamp yourself? Yes, with proper safety precautions and a clear understanding of the components, you can connect a fluorescent lamp safely. This guide will walk you through the process of fluorescent lamp installation guide, from identifying parts to final wiring.
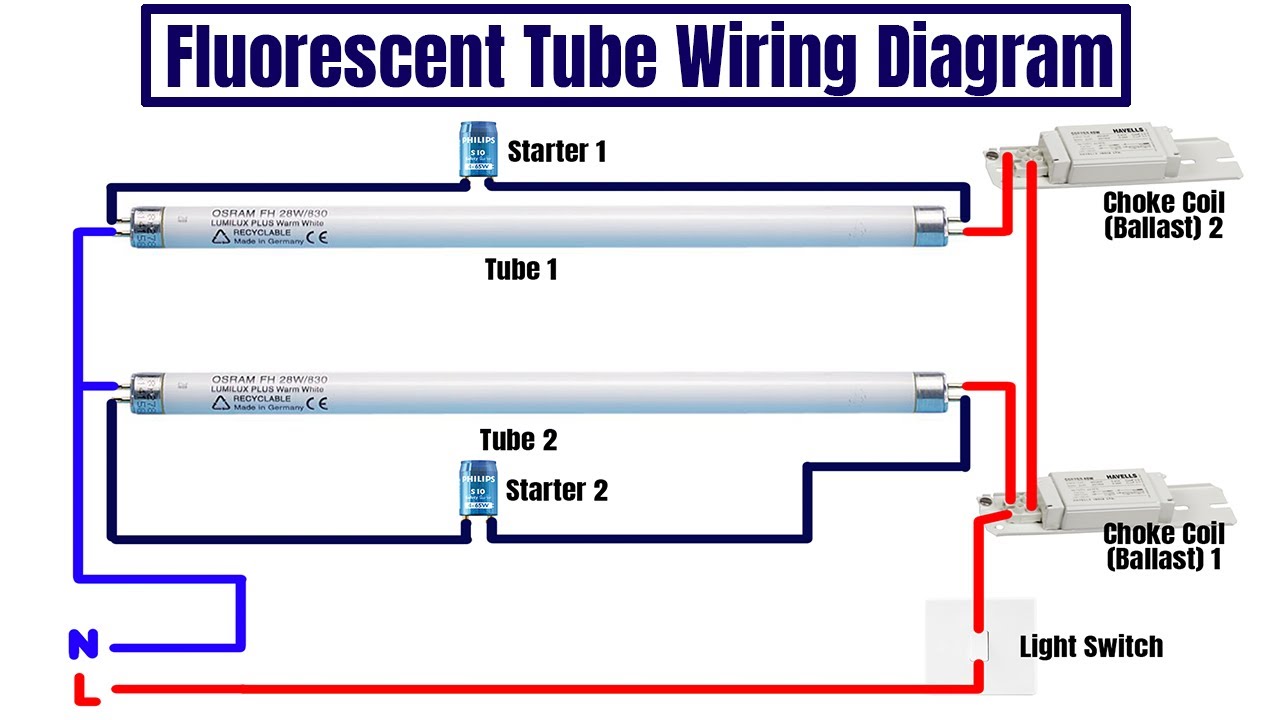
Image Source: i.ytimg.com
Why Connect a Fluorescent Lamp?
Fluorescent lights are popular for their energy efficiency and long lifespan compared to incandescent bulbs. Whether you’re replacing an old fixture, upgrading to a new one, or working on a fluorescent fixture conversion, knowing how to wire it correctly is essential for safety and proper function. This guide focuses on the practical aspects of how to wire a light fixture for fluorescent lamps.
Safety First! Essential Precautions
Before you begin any electrical work, safety is paramount. Electricity can be dangerous, even deadly, if not handled with care.
- Turn Off the Power: Always locate the circuit breaker or fuse box that controls the power to the area where you’ll be working. Flip the breaker to the “OFF” position or remove the fuse.
- Verify Power is Off: Use a non-contact voltage tester to confirm that the power is indeed off at the switch and at the fixture’s wiring connections. Touch the tester to the wires you’ll be working with. If it lights up or beeps, the power is still on.
- Wear Protective Gear: Wear safety glasses to protect your eyes from debris. Insulated gloves can provide an extra layer of protection.
- Use Insulated Tools: Ensure all your screwdrivers, wire strippers, and pliers have insulated handles.
- Never Work in Wet Conditions: Do not attempt any electrical work if you are standing in water or if the area is damp.
- If You’re Unsure, Call a Professional: Electrical work can be complex. If you feel uncomfortable or uncertain at any point, do not hesitate to call a qualified electrician.
Deciphering Fluorescent Lamp Components
To successfully connect a fluorescent lamp, you need to know its key parts and their roles.
1. The Fluorescent Lamp Itself (The Tube)
This is the glass tube filled with a gas (usually argon) and a small amount of mercury. The inside of the tube is coated with a phosphor powder. When electricity passes through the gas, it emits ultraviolet (UV) light, which then excites the phosphor coating, causing it to glow and produce visible light.
There are several fluorescent lamp types, each with different bases and sizes, such as:
- Linear Fluorescent Tubes: The most common, available in T5, T8, and T12 sizes (referring to the diameter of the tube in eighths of an inch).
- Compact Fluorescent Lamps (CFLs): Smaller, often with integrated ballasts, designed to fit standard incandescent sockets. This guide focuses on linear tubes.
2. The Fixture Housing
This is the structure that holds the lamps and the internal electrical components. It can be a simple strip fixture, a recessed troffer, or a decorative unit.
3. The Ballast
The ballast is a crucial component in a fluorescent lighting system. It performs two main functions:
- Provides Starting Voltage: It delivers a high voltage surge to initiate the arc within the fluorescent tube.
- Regulates Current: Once the lamp is lit, it limits the current flowing through the tube, preventing it from burning out.
There are two main fluorescent light ballast types:
- Magnetic Ballasts (Older Technology): These use a heavy iron core and copper windings. They are less energy-efficient, can hum, and may cause flicker.
- Electronic Ballasts (Modern Technology): These use solid-state electronic components. They are more energy-efficient, silent, flicker-free, and often allow for dimming. Many modern fluorescent fixture conversion projects involve replacing magnetic ballasts with electronic ones.
4. The Starter (For Older Fixtures)
Starters are only found in fixtures using magnetic ballasts. The fluorescent starter function is to preheat the lamp electrodes and then act as a switch to initiate the arc. Once the arc is established, the starter is bypassed. Newer fixtures with electronic ballasts do not require separate starters.
5. Sockets/Holders
These are the points where the fluorescent tube connects to the fixture’s electrical supply. They can be simple turn-and-lock mechanisms or spring-loaded types.
Pre-Installation Checks and Preparation
Before you even touch a wire, ensure you have everything you need and that your chosen fixture is suitable for your needs.
Gathering Your Tools and Materials
- New Fluorescent Fixture or Replacement Parts: Ensure you have the correct type of fixture and lamps for your application.
- Screwdrivers: Phillips and flathead, with insulated handles.
- Wire Strippers/Cutters: For preparing wire ends.
- Pliers: Needle-nose and lineman’s pliers, also with insulated handles.
- Non-Contact Voltage Tester: Essential for safety.
- Wire Nuts or Connectors: Appropriate sizes for the wires.
- Electrical Tape: For added insulation if needed.
- Safety Glasses and Gloves: For personal protection.
- Ladder or Step Stool: If working at height.
- A Copy of the Fixture’s Wiring Diagram: This is often found on the fixture itself, in the manual, or online.
Choosing the Right Fixture and Ballast
When selecting a new fixture or parts for fluorescent lamp replacement, consider:
- Lamp Type: Ensure the fixture is designed for the T5, T8, or T12 tubes you intend to use.
- Ballast Type: Electronic ballasts are generally preferred for efficiency and performance. Check if the ballast is compatible with your chosen lamps.
- Voltage: Make sure the fixture and ballast are rated for your home’s electrical voltage (e.g., 120V or 277V).
Reading the Wiring Diagram
The ballast wiring diagram is your roadmap. It shows exactly how the power supply, ballast, sockets, and lamps are connected. Typically, these diagrams are found on the ballast itself or inside the fixture’s housing. Pay close attention to:
- Line (L) and Neutral (N) Connections: These are the incoming power wires.
- Load Connections: Wires going to the lamp sockets.
- Wire Colors: While standard colors exist, always rely on the diagram for specific connections.
Step-by-Step Wiring Guide
This section details the process of connecting a typical fluorescent lamp fixture. We’ll assume you’re working with a new fixture or replacing an existing one.
Step 1: De-Energize the Circuit
As mentioned in the safety section, the absolute first step is to turn off the power at the breaker or fuse box and then verify it’s off with a voltage tester.
Step 2: Access the Fixture’s Wiring Compartment
Most fluorescent fixtures have a cover or panel that needs to be removed to access the ballast and wiring connections. This might involve unscrewing a plate or releasing clips.
Step 3: Disconnect Existing Wiring (If Applicable)
If you are replacing an old fixture, carefully disconnect the wires from the existing fixture. Take a picture or sketch the connections before disconnecting, just in case. You’ll typically find connections for the incoming power (hot, neutral, ground) and wires going to the lamp sockets.
Step 4: Mount the Fixture
Securely mount the new fixture to the ceiling or wall according to the manufacturer’s instructions. Ensure it is firmly attached.
Step 5: Prepare the Fixture Wires
The fixture will have a few wires extending from it. These are usually:
- Black (Hot/Line): Carries the electrical current.
- White (Neutral): Completes the electrical circuit.
- Green or Bare Copper (Ground): Provides a safety path for electricity in case of a fault.
Step 6: Connect Incoming Power Wires to the Fixture
This is where you connect the house wiring to the fixture’s wires.
- Identify House Wires: In your junction box, you should find similar colored wires: a black (hot), a white (neutral), and a bare copper or green (ground).
- Connect Ground First: Twist the bare copper or green ground wire from the house to the green or bare copper ground wire from the fixture. Use a wire nut.
- Connect Neutral: Twist the white neutral wire from the house to the white neutral wire from the fixture. Use a wire nut.
- Connect Hot: Twist the black hot wire from the house to the black hot wire from the fixture. Use a wire nut.
Important Note: Some fixtures may have multiple black wires (for different ballast configurations) or other specific color codes. Always refer to the fixture’s specific wiring diagram.
Step 7: Connect Ballast to Sockets
This is the core of the fluorescent light fixture wiring. The ballast has several wires that connect to the lamp sockets. The ballast wiring diagram is critical here.
- Identify Socket Connections: Each socket will have two connection points.
- Follow the Diagram: The diagram will show which wires from the ballast connect to which terminals on the sockets. Typically, wires will go from the ballast to each end of each socket.
- Preheat and Arc Connections: For fixtures with starters, there are specific connections for preheating the electrodes before the arc is struck. Electronic ballasts simplify this by integrating the starting circuitry.
- Ensure Secure Connections: Strip about 1/2 inch of insulation from the end of each wire and twist them securely into the appropriate terminals or connect them with wire nuts as indicated by the diagram.
Example of a Simplified Electronic Ballast Wiring (Always consult your specific diagram):
| Ballast Wire Color | Connects To | Purpose |
|---|---|---|
| Black | Incoming Hot (Line) | Power Supply In |
| White | Incoming Neutral | Power Supply In |
| Red (or similar) | One terminal of Lamp Socket (e.g., Socket A, terminal 1) | Powers one end of the lamp |
| Blue (or similar) | The other terminal of Lamp Socket (e.g., Socket A, terminal 2) | Powers the other end of the lamp |
| Yellow (or similar) | One terminal of the Second Lamp Socket (e.g., Socket B, terminal 1) | Powers one end of the second lamp |
| Green (or similar) | The other terminal of the Second Lamp Socket (e.g., Socket B, terminal 2) | Powers the other end of the second lamp |
Note: This is a highly generalized example. Actual wire colors and the number of wires will vary significantly between ballast manufacturers and models. The ballast wiring diagram is non-negotiable for correct installation.
Step 8: Install the Fluorescent Tubes
Once all wiring is complete and secure, carefully insert the fluorescent tubes into the sockets.
- Align the Pins: Line up the pins on the end of the tube with the slots in the sockets.
- Twist to Lock: Gently push the tube into the socket and twist it about a quarter turn to lock it in place. Repeat for all tubes.
- Install Starters (If Applicable): If your fixture uses starters, screw them into their designated sockets.
Step 9: Reassemble the Fixture
Replace any covers or panels that you removed to access the wiring. Ensure all screws are tightened properly.
Step 10: Restore Power and Test
Return to the circuit breaker or fuse box and turn the power back on. Flip the light switch to test the new fixture. If everything is wired correctly, the fluorescent lamps should light up.
Troubleshooting Fluorescent Lights
Even with careful installation, you might encounter issues. Here are some common problems and their solutions when troubleshooting fluorescent lights:
- Lamp Not Lighting:
- Check Power: Ensure the breaker is on and power is reaching the fixture.
- Check Bulb Seating: Make sure the tubes are properly seated in the sockets.
- Check Starters (if applicable): A faulty starter is a common cause. Try replacing it.
- Check Ballast: If the tube and starter are good, the ballast may be faulty.
- Check Wiring: Double-check all wire connections against the ballast wiring diagram.
- Flickering:
- Loose Connections: Re-seat tubes and check all wire connections.
- Faulty Starter: Try replacing the starter.
- Aging Ballast: Magnetic ballasts are more prone to flickering as they age. An electronic ballast replacement can solve this.
- Lamp Issue: The tube itself might be nearing the end of its life.
- Humming Noise:
- Magnetic Ballast: This is normal for older magnetic ballasts.
- Loose Mounting: Ensure the ballast is securely mounted within the fixture.
- Faulty Ballast: A loud or irregular hum could indicate a failing ballast.
Fluorescent Fixture Conversion: Upgrading to LED
While this guide focuses on fluorescent lamps, many people are now considering fluorescent fixture conversion to LED technology. LEDs are even more energy-efficient, longer-lasting, and mercury-free.
There are two main ways to convert a fluorescent fixture to LED:
- LED Tube Replacement: Simply remove the old fluorescent tubes and install compatible LED tubes. These LED tubes often have an integrated ballast or can work with existing electronic ballasts. This is the easiest conversion.
- Complete Fixture Replacement: Replace the entire fluorescent fixture with a new LED fixture. This offers the most significant benefits in terms of energy savings and light quality.
If you are considering a fluorescent fixture conversion using LED tubes, ensure the LED tubes you purchase are compatible with your existing ballast or if they require a ballast bypass. The latter involves rewiring the fixture to bypass the ballast entirely and connect the LED tubes directly to the power source. This type of conversion requires a thorough understanding of fluorescent light fixture wiring and electrical safety. Always follow the specific instructions provided with the LED tubes.
Frequently Asked Questions (FAQ)
Q1: Do I need a ballast for a fluorescent lamp?
Yes, all fluorescent lamps (except for some direct-wire LED replacements that bypass the ballast) require a ballast to operate. The ballast provides the necessary starting voltage and regulates the current.
Q2: Can I replace a magnetic ballast with an electronic ballast?
Yes, this is a common practice for fluorescent fixture conversion and an upgrade. Electronic ballasts are more efficient, quieter, and provide better light quality. You’ll need to ensure the electronic ballast is compatible with your specific fluorescent lamp types.
Q3: My fluorescent light flickers a lot. What should I do?
Flickering can be caused by a loose lamp, a faulty starter (if applicable), a failing ballast, or even an aging lamp. Check lamp seating, try replacing the starter, or consider replacing the ballast.
Q4: How long should fluorescent tubes last?
The lifespan of a fluorescent tube varies depending on the type and usage, but they typically last between 10,000 to 20,000 hours. Electronic ballasts can help extend lamp life.
Q5: Is it safe to bypass the ballast for LED tube installation?
If you are installing LED tubes designed to be wired directly (ballast bypass), it is safe to bypass the ballast, provided you follow the specific wiring instructions for those LED tubes precisely. This involves rerouting the power supply directly to the LED tube sockets. Always ensure the power is off and verify your work.
Q6: What is the difference between T5, T8, and T12 fluorescent tubes?
These designations refer to the diameter of the tube. T5 tubes are 5/8 inch in diameter, T8 tubes are 8/8 inch (1 inch), and T12 tubes are 12/8 inch (1.5 inches). T8 and T5 lamps are generally more energy-efficient than T12.
Connecting a fluorescent lamp can be a rewarding DIY project. By prioritizing safety, gathering the right tools, and carefully following the wiring diagram, you can successfully illuminate your space with efficient fluorescent lighting. Remember, if you’re ever in doubt, consult a qualified electrician.