
Connecting a fluorescent lamp can seem daunting, but it’s a straightforward process when you follow safety steps and understand the components involved. Yes, you can connect a fluorescent lamp yourself if you have basic electrical knowledge and adhere strictly to safety precautions. This guide will walk you through every step, from gathering your materials to the final connection, ensuring a safe and functional fluorescent light setup.
Fluorescent lighting has been a popular choice for decades, offering efficient and bright illumination for homes, offices, and workshops. Whether you’re replacing an old fixture, installing new lighting, or troubleshooting a flickering bulb, knowing how to properly connect a fluorescent lamp is essential. This comprehensive guide will cover everything you need to know, from deciphering a fluorescent circuit diagram to the nuances of fluorescent ballast types. We aim to make this process accessible, even for those with limited electrical experience, by breaking down complex steps into simple, manageable actions.
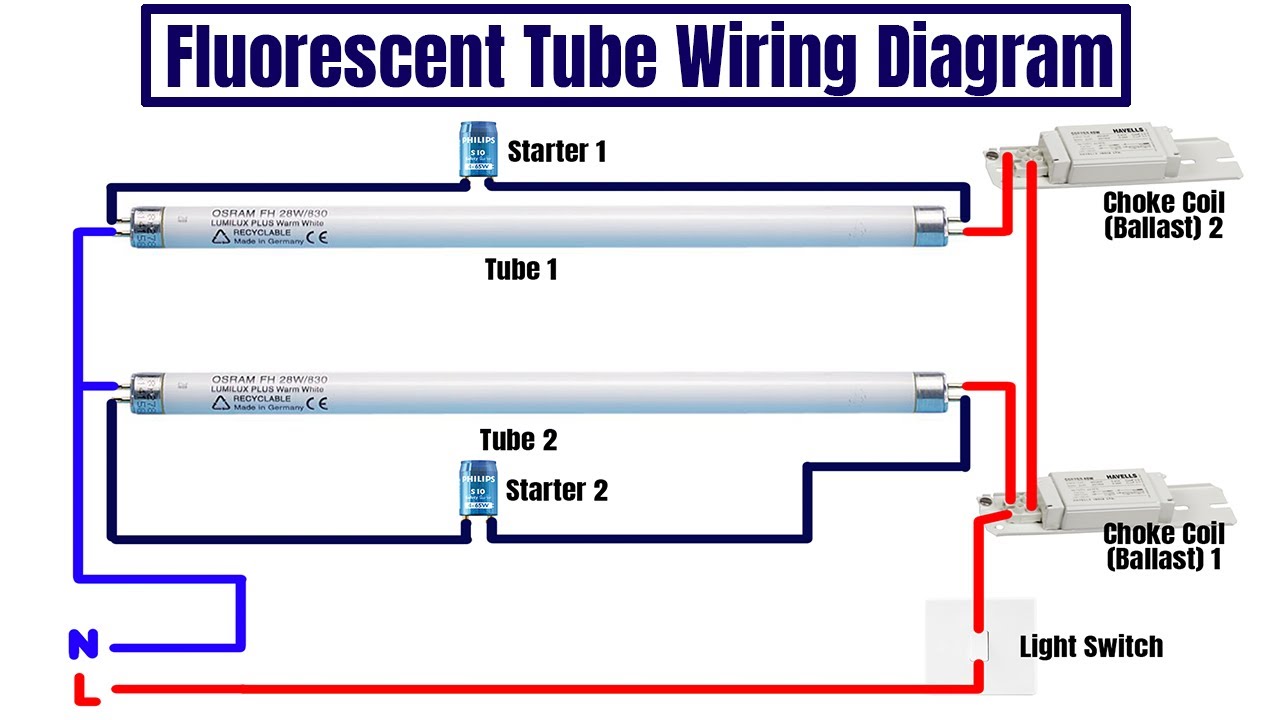
Image Source: i.ytimg.com
Preparing for Fluorescent Lamp Installation
Before you begin any electrical work, safety is paramount. Always ensure the power to the circuit you’ll be working on is completely turned off at the breaker box. Double-check with a non-contact voltage tester to confirm there is no power. Gathering the right tools and understanding the components of a fluorescent fixture are crucial for a successful and safe installation.
Essential Tools and Materials
Having the right tools at hand will make the fluorescent light hookup much smoother. Here’s what you’ll typically need:
- Screwdrivers: Both Phillips and flathead, in various sizes.
- Wire Strippers/Cutters: To safely remove insulation from wires.
- Pliers: Needle-nose and lineman’s pliers are useful for bending and twisting wires.
- Voltage Tester (Non-Contact): Absolutely critical for confirming power is off.
- Ladder or Step Stool: To safely reach the fixture.
- Safety Glasses: To protect your eyes from debris.
- Wire Nuts: For connecting wires securely.
- Electrical Tape: For added insulation and securing connections.
- New Fluorescent Lamp(s): Ensure they match the fixture’s specifications.
- New Fluorescent Starter (if applicable): For older fixtures.
- Fluorescent Ballast (if replacing): Make sure it’s compatible with your lamps.
- Wiring Diagram: Refer to the fixture’s manual or a general fluorescent circuit diagram.
Deconstructing the Fluorescent Fixture
A typical fluorescent fixture consists of several key components that work together to illuminate the lamp. Familiarizing yourself with these parts will aid in the fluorescent fixture wiring process:
- Fixture Housing: The main body of the light, which often contains the ballast and provides mounting for the lamp sockets.
- Lamp Sockets (Sockets/Grip Holders): These hold the fluorescent tube and provide electrical contact points.
- Fluorescent Ballast: The “brain” of the fluorescent light. It regulates the voltage and current supplied to the lamp. There are different fluorescent ballast types, and choosing the correct one is vital.
- Fluorescent Starter (for older fixtures): A small cylinder that initially provides a high voltage surge to ignite the lamp. Many modern fixtures use electronic ballasts that don’t require separate starters.
- Wiring: The electrical conductors that connect the power source, ballast, starter (if used), and sockets.
Safety First: Essential Precautions
Working with electricity carries inherent risks. Always prioritize safety to prevent shocks, burns, or fires.
Turning Off Power and Verifying
This is the most critical step.
1. Locate your home’s electrical panel (breaker box).
2. Identify the breaker or fuse that controls the light fixture you’ll be working on.
3. Flip the breaker to the “OFF” position or remove the fuse.
4. Use a non-contact voltage tester at the fixture itself to confirm the power is indeed off. Touch the tester to the wires or connections where you’ll be working. If it lights up or beeps, the power is still on – do not proceed.
Working with Wire Connections
- Ensure all wire connections are secure and properly insulated. Loose connections can cause arcing, overheating, and fires.
- Use appropriately sized wire nuts. They should be snug but not so tight that they damage the wires.
- Wrap electrical tape around wire nuts for extra security, especially in damp locations.
- Never touch bare wires when the power is on.
Connecting the Fluorescent Lamp: A Step-by-Step Approach
The fluorescent light hookup process can vary slightly depending on whether you have a pre-wired fixture, are replacing a ballast, or are installing a new fixture from scratch. We’ll focus on the core wiring principles.
Deciphering the Fluorescent Circuit Diagram
Most fluorescent fixtures and ballasts come with a wiring diagram. These diagrams are essential for correct fluorescent fixture wiring. They show how the power wires (hot, neutral, ground) connect to the ballast, and how the ballast then connects to the lamp sockets.
A typical diagram will illustrate:
* Input Wires: Usually black (hot), white (neutral), and green or bare copper (ground).
* Output Wires: These come from the ballast and connect to the lamp sockets.
* Connections: Symbols indicating how wires should be joined, often using wire nuts or terminal blocks.
If you don’t have a diagram, you can often find generic ones online for common fluorescent ballast types. However, always try to find the specific diagram for your fixture or ballast.
Wiring a New Fixture (Simplified)
For a completely new installation, you’ll be connecting the fixture to your home’s electrical supply.
h4. Connecting to the Power Source
1. Access the wiring compartment of your fixture. This is usually a junction box or a plate on the fixture.
2. Identify the incoming power wires from your ceiling or wall. These will be your hot (usually black), neutral (usually white), and ground (green or bare copper).
3. Connect the wires according to the fixture’s wiring diagram and standard electrical practices:
* Ground Wire: Connect the fixture’s ground wire (or green wire) to the house’s ground wire.
* Neutral Wire: Connect the fixture’s neutral wire (usually white) to the house’s neutral wire.
* Hot Wire: Connect the fixture’s hot wire (usually black) to the house’s hot wire.
4. Use wire nuts for all connections. Ensure they are twisted on securely.
h4. Connecting the Ballast and Sockets
1. Ballast Wiring: The ballast itself will have input wires (connecting to the power source) and output wires (connecting to the lamp sockets). Follow the diagram meticulously. The input wires of the ballast connect to the house wiring.
2. Socket Wiring: The output wires from the ballast connect to the lamp sockets. Each socket will have two connection points, and the ballast will have corresponding wires for each socket. For a two-lamp fixture, the ballast will have wires that split to connect to both sockets.
3. Fluorescent Tube Connection: Once the ballast and sockets are wired, you can install the fluorescent tubes. Most fluorescent tubes simply twist and lock into the sockets. Ensure they are seated correctly.
Replacing a Fluorescent Ballast
If your fluorescent light isn’t working and you suspect a faulty ballast, replacing it is a common fluorescent fixture troubleshooting step.
h4. Removing the Old Ballast
1. Turn off the power at the breaker and verify with a voltage tester.
2. Remove the fluorescent tubes. Gently twist and pull them out of their sockets.
3. Remove any covering or diffuser to access the ballast.
4. Locate the ballast. It’s typically a metal rectangular box.
5. Carefully note or photograph all the existing wire connections before disconnecting anything. This is your best reference for the new fluorescent ballast installation.
6. Disconnect the wires from the old ballast, using wire strippers and pliers as needed.
7. Unmount the old ballast. It’s usually held in place by screws.
h4. Installing the New Ballast
1. Mount the new ballast in the same location as the old one, securing it with screws.
2. Refer to the wiring diagram for your new ballast. This is crucial as wiring can differ between models and fluorescent ballast types (magnetic vs. electronic).
3. Connect the input wires of the new ballast to the house wiring (hot, neutral, ground) using wire nuts. Match colors and connections precisely.
4. Connect the output wires from the new ballast to the lamp sockets. Again, follow the diagram. Ensure positive connections.
5. If your fixture uses a fluorescent starter, connect its wires according to the diagram. For electronic ballasts, this step is usually bypassed.
6. Double-check all connections for security and proper insulation.
Installing a Fluorescent Starter (When Needed)
Many older fluorescent fixtures use a starter switch. If you’re replacing a starter as part of your fluorescent lamp replacement, it’s usually a simple twist-and-lock mechanism.
- Ensure the power is off.
- Locate the starter socket. It’s typically a small cylinder near one of the lamp sockets.
- Gently twist the old starter counter-clockwise to remove it.
- Insert the new fluorescent starter into the socket and twist it clockwise until it locks into place.
Finalizing the Fluorescent Tube Connection
Once all wiring is complete and secure:
- Reinstall the fluorescent tubes. Align the pins on the ends of the tubes with the slots in the lamp sockets. Gently push and twist the tubes to lock them in.
- Replace any diffusers or covers.
- Turn the power back on at the breaker box.
- Test the light. If it doesn’t turn on, immediately turn the power off again and re-check all your connections.
Types of Fluorescent Ballasts
The ballast is the most critical component in a fluorescent lighting system. Understanding the different fluorescent ballast types can help you choose the right one and troubleshoot issues.
Magnetic Ballasts
These are the older, traditional type of ballast. They use a core and coil design to regulate voltage and current.
- Pros: Simple design, generally lower initial cost.
- Cons: Less energy-efficient, can produce a humming sound, may cause lamps to flicker at the end of their life, and are heavier.
- Wiring: Typically have more wires and a more complex wiring setup compared to electronic ballasts.
Electronic Ballasts
These are more modern and efficient. They use solid-state components to convert the input AC power to a higher frequency, which is more efficient for the fluorescent lamp.
- Pros: More energy-efficient, silent operation, no flickering, lighter weight, can often run multiple lamps.
- Cons: Higher initial cost, more complex internal circuitry.
- Wiring: Generally have fewer wires and a simpler fluorescent fixture wiring process, often color-coded for easy connection.
When choosing a replacement ballast, ensure it is compatible with the wattage, type, and number of fluorescent lamps you are using. The packaging or ballast itself will specify this information.
Fluorescent Fixture Troubleshooting
If your fluorescent light isn’t working after installation or replacement, here are some common fluorescent fixture troubleshooting steps:
Flickering or Unstable Light
- Check the lamp seating: Ensure the fluorescent tubes are properly seated in the sockets.
- Replace the lamp: The tube itself might be at the end of its life.
- Replace the starter (if applicable): A faulty starter is a common cause of flickering.
- Check ballast connections: Loose wires to the ballast can cause issues.
- Consider ballast failure: The ballast might be failing.
Light Doesn’t Turn On at All
- Verify power: Ensure the breaker is on and the fixture is receiving power.
- Check all wire connections: Make sure all connections are secure and correctly made.
- Test the lamp and starter: Replace both with known good ones if possible.
- Test the ballast: If the lamp and starter are good, the ballast is the most likely culprit. You may need to test it with a multimeter or replace it.
Humming Noise
- Magnetic ballasts are known to hum. If the hum is excessively loud or changes pitch significantly, the ballast may be failing.
- Electronic ballasts should be silent. A hum from an electronic ballast indicates a problem.
Fluorescent Lamp Replacement: A Quick Guide
Replacing a burnt-out or dim fluorescent tube is a common maintenance task.
- Turn off power at the breaker and verify with a voltage tester.
- Remove the diffuser/cover if present.
- Grasp the fluorescent tube by its ends.
- Gently twist the tube about a quarter turn counter-clockwise. You should feel it disengage from the socket.
- Carefully pull the tube out of the fixture.
- Insert the new fluorescent tube by aligning its pins with the socket slots.
- Push gently and twist clockwise about a quarter turn until it locks.
- Replace the diffuser/cover.
- Restore power and test the light.
Important Note: If you replace a lamp and the fixture still doesn’t work, or if the new lamp flickers excessively, the problem likely lies with the ballast or starter.
FAQ: Common Questions About Fluorescent Lighting
Here are answers to some frequently asked questions about connecting and maintaining fluorescent lamps:
-
Q: Can I mix different types of fluorescent lamps in the same fixture?
- A: It’s generally not recommended. Different lamps have different wattage and operating requirements. For optimal performance and safety, use lamps of the same type, wattage, and brand as specified for your fixture and ballast.
-
Q: How long do fluorescent ballasts typically last?
- A: The lifespan of a ballast varies significantly based on type, quality, and operating conditions. Magnetic ballasts might last 10-15 years, while electronic ballasts can often last 20-30 years or more.
-
Q: What does it mean when a fluorescent lamp flashes several times before lighting up?
- A: This is often a sign that the ballast is beginning to fail or that the lamp is at the end of its life. It could also indicate a weak starter in older systems.
-
Q: Do I need a special ballast for LED tubes that look like fluorescent lamps?
- A: Yes, absolutely. Many LED tubes are designed to be “plug-and-play” replacements for fluorescent tubes, but they require specific wiring or a special ballast (sometimes called a “driver”). Some LED tubes require you to bypass the ballast entirely and wire directly to the sockets. Always check the LED tube manufacturer’s instructions for fluorescent lamp installation guide.
-
Q: Is it safe to dispose of old fluorescent tubes and ballasts?
- A: Fluorescent tubes contain a small amount of mercury and should be disposed of properly as hazardous waste, not in regular household trash. Many hardware stores and local recycling centers accept them. Ballasts, especially older ones, may contain PCBs (polychlorinated biphenyls) and should also be disposed of responsibly according to local regulations.
By following this comprehensive guide, you should feel confident in safely connecting and maintaining your fluorescent lighting systems. Remember to always prioritize safety, double-check your connections, and consult diagrams for accurate fluorescent fixture wiring. Enjoy your bright and efficient lighting!