
Want to give your lamps a dazzling new look? This guide is packed with DIY glam lamp shade ideas to help you transform plain shades into stunning statement pieces. You can absolutely achieve a luxurious, designer look yourself! We’ll explore various techniques, from simple no-sew projects to more involved fabric transformations, perfect for lamp shade customization. Get ready to discover creative lamp shade designs that will add a touch of sparkle and personality to any room.
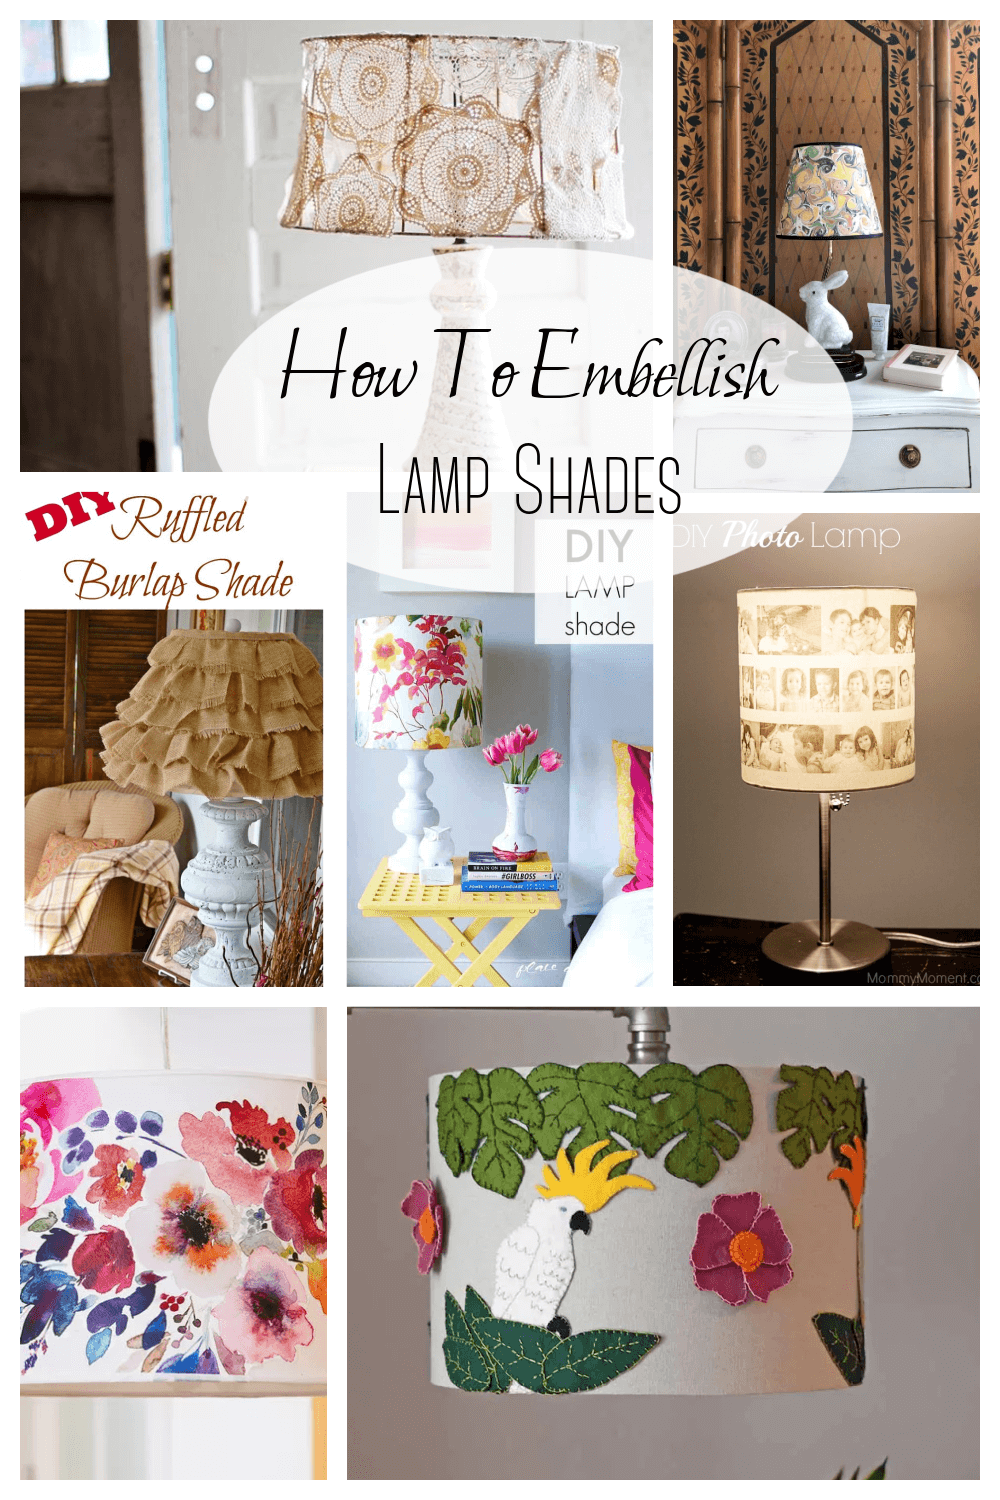
Image Source: cozylittlehouse.com
Why Decorate Your Lamp Shades?
Plain lamp shades are a blank canvas, waiting for a touch of creativity. Decorating lampshades is a fantastic way to:
- Personalize your space: Make your home truly yours with personalized lamp shades that reflect your style.
- Update your decor on a budget: A lamp shade makeover is far more affordable than buying a new designer lamp.
- Repurpose old items: Give new life to forgotten fabrics, trims, or even old lamps by repurposing lamp shades.
- Add unique touches: Create unique lamp shade projects that no one else has.
- Match your existing style: Perfectly coordinate your lighting with your current color palette and aesthetic.
Glam Up Your Lamps: DIY Ideas for Stunning Shades
Let’s dive into some fabulous ways to add that glam factor!
Shimmering Sequin and Bead Embellishments
Sequins and beads are the ultimate shortcut to glam. They catch the light beautifully, casting a warm, inviting glow.
No-Sew Sequin Magic
This is one of the easiest and most effective no-sew lamp shade decoration techniques.
Materials:
- Plain lamp shade (fabric or paper)
- Fabric glue or spray adhesive
- Sequins (various sizes, shapes, and colors)
- Beads (optional)
- Craft glue for individual bead placement
- Tweezers (helpful for small beads)
Steps:
- Prepare your shade: Ensure your lamp shade is clean and dry. If it’s a fabric shade, you might want to iron it smooth.
- Apply adhesive: Work in small sections. You can either spray a light, even coat of adhesive over a section or apply fabric glue with a fine tip.
- Add sequins: Sprinkle sequins generously over the glued area. Gently press them down to ensure they adhere well. You can lay them flat, overlap them, or even create patterns.
- Layering for depth: For extra dimension, once the first layer of sequins is dry, you can apply a little more glue in between and add smaller sequins or beads.
- Complete the shade: Continue working in sections until the entire lamp shade is covered.
- Drying: Allow the glue to dry completely according to the product instructions.
Tip: For a uniform look, use sequins of the same color and size. For a more eclectic glam, mix and match!
Beaded Fringe for a Vintage Touch
Beaded fringe adds a touch of vintage Hollywood glamour and movement.
Materials:
- Lamp shade
- Beaded fringe trim (available at craft stores)
- Fabric glue or hot glue gun
- Scissors
Steps:
- Measure and cut: Measure the circumference of the bottom (or top) edge of your lamp shade. Cut the beaded fringe to this length, adding a little extra for overlap.
- Apply adhesive: Apply a thin, even line of fabric glue or hot glue along the edge of the lamp shade where you want the fringe to sit.
- Attach the fringe: Carefully press the top edge of the beaded fringe into the glue. Work your way around the shade, ensuring the fringe hangs straight down.
- Secure and trim: Once you’ve gone all the way around, overlap the ends slightly and secure them with more glue. Trim any excess fringe.
- Let it dry: Allow the glue to dry thoroughly.
Fabric Fascination: Creative Transformations
Using fabric can create incredibly chic and elegant fabric lamp shade ideas.
Geometric Glam with Fabric Strips
This technique is visually striking and surprisingly simple.
Materials:
- Plain lamp shade
- Contrasting fabric strips (e.g., satin, velvet, metallic, lace)
- Fabric glue or spray adhesive
- Scissors or rotary cutter
- Ruler
Steps:
- Cut strips: Cut your chosen fabrics into strips of uniform width (e.g., 1/2 inch to 1 inch). The length will depend on the size of your shade.
- Plan your design: Decide on a pattern – vertical, horizontal, diagonal, chevron, or even a mix.
- Apply adhesive: You can either apply adhesive to the back of each fabric strip or spray a section of the lamp shade.
- Lay the strips: Carefully lay the fabric strips onto the shade, pressing them down firmly. Ensure they are straight and evenly spaced.
- Trim excess: As you work, you may need to trim excess fabric at the top and bottom edges of the shade.
- Create patterns: For geometric designs, you can change the direction of the strips or use different colored fabrics.
Glitter and Glam with Fabric Paint and Stencils
Add sparkle and pattern with fabric paints and stencils.
Materials:
- Plain lamp shade
- Fabric paints (metallic, glitter, or standard colors)
- Stencils (geometric, floral, abstract)
- Stencil brush or sponge
- Painter’s tape
- Optional: Glitter glue
Steps:
- Secure the stencil: Place your stencil onto the lamp shade and secure it firmly with painter’s tape. Ensure there are no gaps for paint to bleed.
- Apply paint: Load your stencil brush or sponge with a small amount of fabric paint. Dab off excess paint onto a paper towel. Gently dab the paint over the stencil openings, building up color gradually.
- Repeat: Carefully lift the stencil and reposition it to create your desired pattern.
- Add glitter: While the paint is still wet, you can sprinkle fine glitter over the painted areas for extra sparkle. Alternatively, use glitter glue to outline designs or add accents.
- Drying: Allow the paint and glitter to dry completely. You might need to seal fabric painted shades with a clear sealant if they are likely to get a lot of handling.
Metallic Sheen: Foil and Paint Techniques
Metallics instantly convey luxury and glam.
Gold Leaf or Metallic Foil
This technique offers a truly opulent finish.
Materials:
- Plain lamp shade
- Metallic leaf sheets (gold, silver, copper) or metallic foil adhesive sheets
- Adhesive size (for leaf application) or spray adhesive (for foil sheets)
- Soft brush
- Sealer (optional, but recommended)
For Leaf Application:
- Apply adhesive: Paint a thin, even layer of adhesive size onto the areas of the lamp shade where you want the metallic leaf. Let it dry until it becomes tacky (usually 10-20 minutes).
- Apply the leaf: Carefully lay a sheet of metallic leaf over the tacky surface. Gently press it down with a soft brush.
- Brush away excess: Once the leaf is applied, use a soft brush to gently brush away any excess leaf that didn’t adhere.
- Seal: Once fully dry, you can apply a thin coat of sealer to protect the leaf and prevent it from flaking.
For Foil Sheets:
- Apply adhesive: Apply spray adhesive to the lamp shade, working in sections.
- Attach foil: Lay the foil sheet onto the adhesive, shiny side up. Smooth it down with your hand or a roller.
- Peel: Carefully peel away the backing of the foil, leaving the metallic finish adhered to the shade.
- Overlap: Overlap subsequent foil sheets to ensure full coverage.
Metallic Paint Splatter or Drip Effect
A more abstract, modern approach to glam.
Materials:
- Plain lamp shade
- Metallic spray paint or acrylic paint
- Drip catcher (cardboard or old newspaper)
- Optional: Fine paint brush
Steps:
- Protect your workspace: Lay down plenty of newspaper or a drop cloth.
- Spray paint splatter: If using spray paint, hold the can at a distance and flick the trigger quickly to create splatters. You can also spray paint onto a brush and flick the bristles.
- Paint drip: If using acrylic paint, thin it slightly with water. Dip a brush into the paint and let it drip naturally down the shade, or use a fine brush to create controlled drips.
- Build layers: Allow layers to dry before adding more for a textured effect.
Trim and Tassel Treasures
Adding trim is a classic way to elevate a lamp shade.
Tassel Trim Extravaganza
Tassels add a playful yet sophisticated touch.
Materials:
- Lamp shade
- Tassel fringe trim
- Fabric glue or hot glue gun
Steps:
- Measure and cut: Measure the bottom or top edge of your shade and cut the tassel trim to size, allowing for overlap.
- Apply glue: Apply a bead of fabric glue or hot glue along the edge.
- Attach trim: Press the top band of the tassel trim into the glue, ensuring the tassels hang evenly.
- Secure and dry: Overlap and glue the ends. Let dry completely.
Pom-Pom Perfection
Pom-poms add a soft, whimsical glam.
Materials:
- Lamp shade
- Pom-pom trim (various sizes and colors)
- Fabric glue or hot glue gun
Steps:
- Measure and cut: Measure the circumference of the shade.
- Apply glue: Apply glue along the edge where you want the pom-poms.
- Attach pom-poms: Press the pom-poms into the glue, spacing them evenly. You can also cover the entire shade with pom-poms if desired.
- Let it dry: Allow to dry thoroughly.
Embellishing with Ribbon and Lace
Ribbon and lace offer a softer, more romantic kind of glam.
Ribbon Wrap Delight
This is a beautiful way to introduce color and texture.
Materials:
- Lamp shade
- Ribbon (satin, grosgrain, velvet, sheer)
- Fabric glue or hot glue gun
- Scissors
Steps:
- Start at the bottom: Apply a line of glue to the bottom edge of the shade.
- Attach ribbon: Press the end of the ribbon into the glue.
- Wrap and glue: Carefully wrap the ribbon around the shade, keeping it taut and straight. Apply small dots of glue every few inches to secure it.
- Overlap at the top: When you reach the top edge, cut the ribbon and secure the end with glue.
- Layering: You can layer different colors or textures of ribbon for a more intricate design.
Lace Overlay Elegance
Lace adds a delicate, vintage charm.
Materials:
- Lamp shade
- Lace trim or fabric lace
- Fabric glue or spray adhesive
- Scissors
Steps:
- Cut lace: Cut the lace to fit the desired area of the lamp shade. You can cover the entire shade or just add a band around the top or bottom.
- Apply adhesive: Apply fabric glue or spray adhesive to the shade where the lace will go.
- Smooth lace: Carefully lay the lace onto the adhesive, smoothing out any wrinkles.
- Trim edges: Trim any excess lace at the edges of the shade.
- No-sew option: This is a perfect example of no-sew lamp shade decoration.
Repurposing Lamp Shades: Unique Projects
Give old lamps a new lease on life!
Reviving a Drum Shade
Drum shades are versatile and great for many of these techniques.
Ideas:
- Fabric Scrap Collage: Cut up fabric scraps into squares or shapes and glue them in a mosaic pattern onto the shade.
- Yarn Bomb: Wrap the entire shade in colorful yarn for a cozy, bohemian glam.
- Decoupage with Napkins or Paper: Use decorative paper napkins or patterned paper with decoupage medium to create a custom look.
Transforming an Empire Shade
Empire shades (wider at the bottom than the top) can be dramatic with the right embellishments.
Ideas:
- Vertical Ribbons: Wrap vertical ribbons around the shade, creating a paneled effect.
- Beaded Dangles: Hang delicate beaded strands from the bottom rim.
- Painted Geometric Patterns: Use painter’s tape to create sharp geometric lines and then paint in metallic or bold colors.
Frequently Asked Questions (FAQ)
Q1: What is the best glue to use for decorating lamp shades?
A1: For most fabric and trim applications, a good quality fabric glue or a hot glue gun works well. For delicate materials like metallic leaf or fine glitter, a specific craft glue or spray adhesive might be better. Always test a small, inconspicuous area first.
Q2: Can I decorate any type of lamp shade?
A2: Yes, you can decorate most types of lamp shades, including fabric, paper, plastic, and even some metal shades. However, the method you choose might vary. For instance, heat-sensitive plastic shades might require cool-drying glues rather than hot glue.
Q3: How do I make sure my decorations are durable?
A3: Ensure your adhesive is applied evenly and thoroughly. Press down firmly on all embellishments. For painted or foiled shades, using a clear sealant can add an extra layer of protection and longevity.
Q4: How do I clean a decorated lamp shade?
A4: Most decorated lamp shades should be cleaned with a dry or slightly damp cloth. Avoid harsh chemicals or excessive moisture, as this can damage the embellishments or the shade material. For heavily beaded or sequined shades, a gentle dusting with a soft brush is best.
Q5: Where can I find materials for DIY lamp shade projects?
A5: Craft stores, fabric stores, and online retailers are excellent sources for sequins, beads, trims, ribbons, lace, fabric paints, stencils, and adhesives. You can also find unique materials at antique shops or repurpose items from around your home.
Q6: Are there any safety concerns I should be aware of?
A6: Always use adhesives and paints in a well-ventilated area. If using a hot glue gun, be careful to avoid burns. Ensure your lamp base is stable and the decorated shade isn’t excessively heavy, which could unbalance the lamp. Avoid using highly flammable materials near the bulb.
Conclusion
Transforming ordinary lamp shades into glamorous works of art is an achievable and rewarding DIY project. With these DIY glam lamp shade ideas, you can infuse your home with personality, style, and a beautiful, shimmering light. Experiment with different materials, techniques, and creative lamp shade designs to craft personalized lamp shades that truly shine. Happy decorating!