
Can you take apart a lamp? Yes, you can take apart a lamp. Disassembling a lamp can be a necessary step for various reasons, from simple lamp repair and lamp restoration to understanding its internal workings for lamp troubleshooting. Whether you’re a DIY enthusiast looking to give an old lamp new life or need to replace a faulty component, knowing how to safely take a lamp apart is a valuable skill. This guide will walk you through the process, covering essential lamp parts, safety precautions, and the tools you’ll need. We’ll focus on common lamp types like desk lamp disassembly and general floor lamp parts.
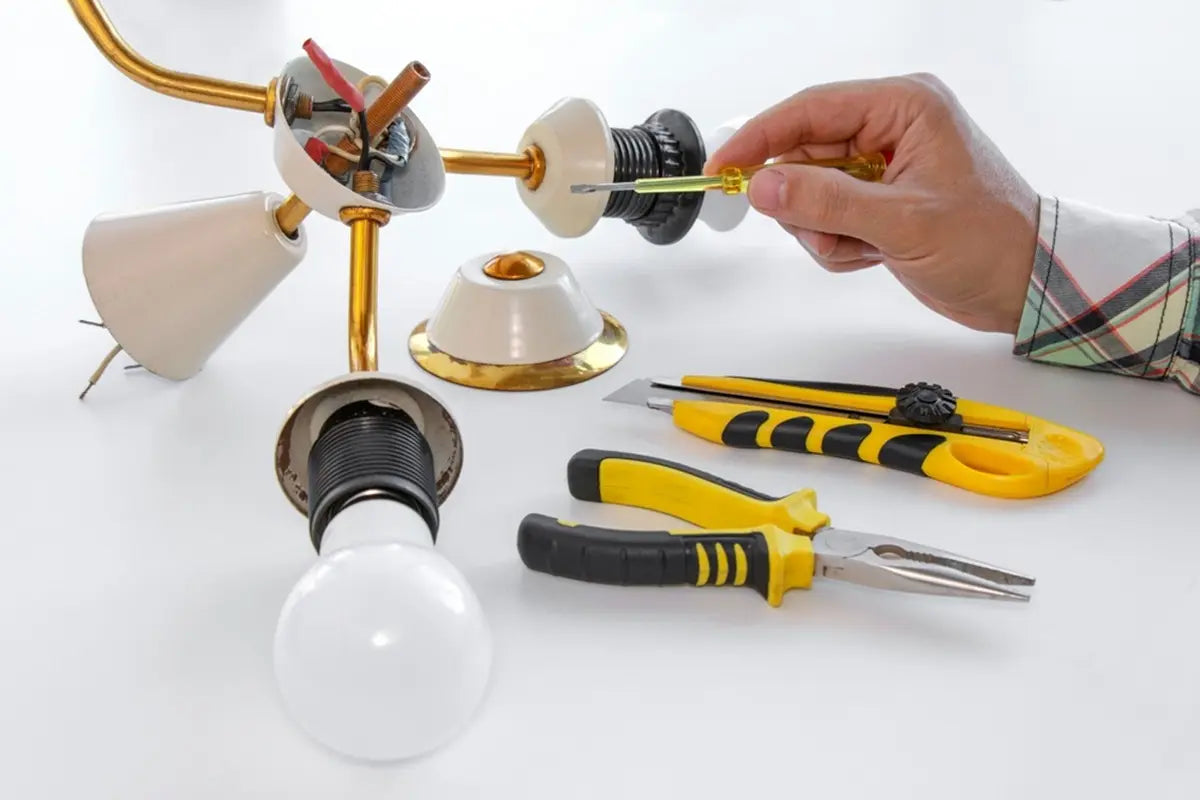
Image Source: www.sunmory.com
Preparing for Disassembly: Safety First!
Before you even think about unscrewing a single bolt, safety is paramount. Working with electrical items, even when unplugged, carries inherent risks.
Essential Safety Precautions
- Unplug the Lamp: This is the golden rule. Always ensure the lamp is completely disconnected from the power source. Do not rely on just switching it off; physically pull the plug from the wall socket.
- Allow Time for Cooling: If the lamp has recently been in use, the bulb and surrounding metal components might be hot. Give it ample time to cool down completely.
- Work in a Well-Lit Area: While you are disassembling a light source, it’s ironic but crucial to have good ambient light so you can see what you are doing and avoid mishaps.
- Use Insulated Tools: While not always strictly necessary for unplugged lamps, using tools with insulated handles adds an extra layer of protection.
- Avoid Water: Never attempt to disassemble a lamp in a damp environment or with wet hands.
- Secure Your Workspace: Make sure the lamp is on a stable surface where it won’t tip over during the process.
- Wear Eye Protection: Small pieces or debris can sometimes become dislodged. Safety glasses are always a good idea.
Gathering Your Tools: The Right Equipment
Having the correct tools makes the disassembly process smoother and safer. You won’t need an extensive toolkit, but a few key items will be very helpful.
Common Tools for Lamp Disassembly
- Screwdrivers: A set of Phillips head and flathead screwdrivers in various sizes is essential. Many lamp screws are small.
- Pliers: Needle-nose pliers are particularly useful for gripping small wires and components.
- Wire Strippers/Cutters: If you’re dealing with lamp wiring and need to disconnect wires, these are indispensable.
- Adjustable Wrench: For hexagonal nuts or bolts that might be present.
- Small Container or Tray: To keep track of screws and small parts. This is crucial for re-assembly or lamp assembly.
- Camera or Smartphone: To take pictures of the disassembly process. This is a lifesaver for remembering how everything goes back together during lamp restoration or lamp maintenance.
- Gloves (Optional): For a better grip or to protect your hands from any grime.
Decoding Lamp Parts: What You’ll Encounter
Before you begin, it’s helpful to know the common components of a lamp. Identifying these parts will make the disassembly process more logical.
Anatomy of a Typical Lamp
| Lamp Part | Description | Function |
|---|---|---|
| Lamp Base | The bottom support of the lamp. Can be decorative or functional, made from various materials. | Provides stability and anchors the lamp. Often houses electrical connections and weight. |
| Lamp Cord | The electrical cable that connects the lamp to the power outlet. | Transmits electricity from the wall socket to the lamp’s internal components. |
| Plug | The part of the cord that inserts into the wall socket. | Connects the lamp to the electrical grid. |
| Switch | A mechanism to turn the lamp on and off. Can be in-line on the cord, on the base, or on the socket. | Controls the flow of electricity to the bulb. |
| Socket (Bulb Holder) | The part where the light bulb screws in. Contains electrical contacts. | Holds the light bulb and provides electrical connection to the bulb’s filament. |
| Harp | A metal frame that attaches to the socket and supports the lampshade. | Holds the lampshade at the correct height and position above the bulb. |
| Finial | A decorative cap that screws onto the top of the harp, securing the lampshade. | Secures the lampshade to the harp and adds a decorative touch. |
| Neck | Connects the base to the upper part of the lamp, often a decorative stem. | Provides height and visual appeal. Can contain wiring. |
| Arm/Stem | The main vertical or angled support of the lamp. | Supports the socket and shade, directing light. Contains the passage for the lamp’s wiring. |
| Shade | The decorative cover that diffuses and directs the light from the bulb. | Softens and directs the light, preventing glare and enhancing the room’s ambiance. |
| Locknut/Washer | Small metal components often found around the socket or where parts connect to secure them. | Tighten and secure components, preventing them from loosening due to vibration or movement. |
| Internal Wiring | The electrical wires that run through the lamp, connecting the plug, switch, and socket. | Carries electrical current safely throughout the lamp. Essential for proper lamp wiring. |
| Toaster (if applicable) | The threaded rod that often runs through the center of the lamp, holding components together. | Acts as a structural element, securing the base, stem, socket, and sometimes the harp. |
Step-by-Step: How to Disassemble Your Lamp
The exact process will vary slightly depending on the type of lamp (e.g., a simple desk lamp disassembly might be quicker than a complex floor lamp parts breakdown). However, the general principles remain the same.
Initial Steps: Exterior Components
Start with the parts that are easiest to access and remove.
-
Remove the Lampshade:
- Carefully unscrew the finial from the top of the harp.
- Gently lift the lampshade off the harp. If it has a spider fitter (a ring that sits on the harp), it will lift off with the shade. If it has a uno fitter (a ring attached to the shade that screws onto the socket), you’ll need to unscrew this ring.
-
Remove the Harp:
- Look at the base of the harp where it attaches to the socket. Most harps have a threaded fitting that screws into a socket adapter, or they might have small screws that hold them in place.
- Unscrew the harp from the socket or remove any securing screws.
-
Inspect the Socket Area:
- You might find a decorative cover or hood around the socket. This can usually be lifted or unscrewed.
- You may also see a locknut or washer securing the socket to the harp or stem. Loosen this nut.
Tackling the Stem and Wiring
This is where you’ll often find the internal lamp wiring.
-
Accessing the Lamp Stem:
- Many lamps have a decorative cover or cap at the top of the main stem, just below the socket. This might unscrew or lift off.
- The lamp cord typically runs up through the stem. You’ll need to follow the cord to see how it enters the stem and how the stem itself is connected to the base.
-
Dealing with the Cord:
- If the cord is a separate piece that plugs into the lamp base, you might be able to disconnect it. However, most cords are permanently attached or pass through the entire lamp.
- The cord will lead to the switch. Switches can be located in several places:
- In-line Switch: On the cord itself.
- Base Switch: Integrated into the lamp’s base.
- Socket Switch: A knob or lever directly on the socket.
- If you need to remove the cord from the socket, you’ll typically find small screws on the side or bottom of the socket that hold the wire connectors in place. Carefully loosen these screws and detach the wires. Remember which wire goes to which terminal if you plan to re-wire.
-
Disassembling the Stem from the Base:
- The stem often screws into the lamp base. Look for a threaded connection.
- You might need to hold the base firmly while unscrewing the stem.
- In some cases, the stem might be secured by a nut on the underside of the base. You’ll need to flip the lamp over to access this.
- As you unscrew or detach the stem, gently guide the lamp cord through it. Be careful not to pull or snag the wires.
Base Disassembly
The base often contains the heaviest parts and sometimes the main electrical connections.
-
Securing the Base:
- Most lamp bases are weighted for stability. They might have a felt or rubber bottom pad that can be peeled off to reveal screws.
- Alternatively, the base might be a solid piece with no visible screws. In such cases, the stem might be epoxied or permanently attached, making further disassembly of the base impossible without potential damage.
-
Accessing Internal Components in the Base:
- If there are screws holding the base together, remove them.
- Carefully separate the base components. You may find wiring connections here, especially if the switch is located in the base.
- Take photos before disconnecting any wires. If the goal is lamp repair, precise documentation is vital.
Handling Potentially Tricky Components
- Switches: Depending on the type of switch, removal might involve unscrewing it from its housing or gently prying it out. For in-line switches, they are often integrated into the cord itself and are not easily removed without cutting the cord.
- Sockets: Sockets are typically held onto the harp or stem by a threaded nipple and secured by a socket cap and a locknut. Loosening the locknut allows the socket to be removed.
- Toasters (Central Rod): If your lamp has a central rod, it often runs from the base to the socket. It might be screwed into the base or held by a nut. This rod is critical for holding the lamp’s structure together.
Re-assembly: Putting It Back Together
If your goal was lamp restoration or simply to fix a minor issue, re-assembly is the reverse of disassembly.
Tips for Successful Re-assembly
- Refer to Your Photos: Your pictures are your best guide to ensure you reconnect wires correctly and place components in their original positions.
- Thread Wires Carefully: As you re-assemble the stem and base, carefully guide the lamp cord back through, ensuring it doesn’t get pinched or snagged.
- Tighten Securely, But Not Excessively: Ensure all screws and nuts are snug to prevent wobbling, but avoid overtightening, which can strip threads or crack components.
- Check Wiring Connections: Double-check that all wires are securely connected to their terminals. Loose connections are a common cause of lamp troubleshooting issues.
- Test Cautiously: Once fully assembled, plug it in and test. If it doesn’t work, or if you notice any odd smells or sounds, unplug it immediately and re-check your work.
Troubleshooting Common Lamp Issues During Disassembly
Sometimes, the reason for disassembly is to fix a problem. Here are common issues and how disassembly can help.
Identifying and Resolving Lamp Problems
- Lamp Won’t Turn On:
- Possible Cause: Faulty bulb, loose wire connection, broken switch, or damaged cord.
- Disassembly Action: Check bulb seating. Inspect wire connections at the socket, switch, and plug. If comfortable, test the switch by bypassing it (only if you are experienced with electrical work and the lamp is unplugged). Check cord integrity.
- Lamp Flickers:
- Possible Cause: Loose bulb, faulty socket, or intermittent connection in the wiring or switch.
- Disassembly Action: Ensure bulb is screwed in tightly. Inspect the socket for any damage or corrosion. Check all wire connections for tightness and good contact.
- Lamp is Wobbly:
- Possible Cause: Loose base, stem, or socket connections.
- Disassembly Action: Tighten nuts and screws securing the stem to the base and the socket to the stem. Ensure the base itself is stable.
- Smell of Burning Plastic:
- Possible Cause: Overheating due to a short circuit, faulty wiring, or a socket that can’t handle the bulb’s wattage.
- Disassembly Action: Immediately unplug the lamp. Carefully inspect the wiring for any signs of melting, scorching, or damage. Check the socket for any signs of overheating or for a wattage rating lower than the bulb you are using. This is a serious safety issue.
Advanced Lamp Restoration and Maintenance
Disassembly is often the first step in more extensive lamp restoration projects or regular lamp maintenance.
Revitalizing Old Lamps
- Cleaning Components: Once disassembled, you can thoroughly clean individual lamp parts. Brass can be polished, ceramic bases cleaned, and glass shades washed.
- Replacing Worn Components: Old, frayed cords or brittle switches are common issues in vintage lamps. Disassembly allows for the safe replacement of these parts, ensuring continued safe operation. You can often find replacement lamp parts online or at specialty lighting stores.
- Rewiring: For older lamps, the original wiring might be outdated and potentially hazardous. A complete re-wiring using modern, safe lamp wiring is a common restoration task. This involves feeding new wire through the lamp’s structure and connecting it to a new socket and plug.
- Structural Repairs: If a part of the lamp is bent or broken, disassembly allows for proper assessment and repair, whether it’s re-soldering a metal component or reinforcing a joint.
Frequently Asked Questions About Lamp Disassembly
Here are answers to some common questions related to taking apart lamps.
Q1: Do I need to be an electrician to disassemble a lamp?
A1: No, you don’t need to be a certified electrician for basic disassembly. However, if you are performing lamp repair involving wiring, it’s crucial to exercise extreme caution, understand basic electrical principles, and always work with the lamp unplugged. If you are unsure about any part of the wiring, it’s best to consult a professional.
Q2: Can I disassemble any type of lamp?
A2: Most lamps, including desk lamp disassembly and floor lamp parts removal, can be disassembled to some extent. However, some modern or designer lamps may have components that are glued or permanently sealed, making them difficult or impossible to take apart without damage.
Q3: What if I can’t get a screw loose?
A3: If a screw is stuck, try applying a small amount of penetrating oil (like WD-40) and let it sit for a few minutes. You can also try gently tapping the screwdriver handle with a hammer while turning. If it still won’t budge, do not force it, as you might strip the screw head or damage the lamp. Consider if that particular part needs to be removed for your lamp repair or if you can work around it.
Q4: Where can I find replacement lamp parts?
A4: You can find replacement lamp parts at hardware stores, home improvement centers, specialty lighting stores, and numerous online retailers. Websites like Amazon, Etsy (for vintage parts), and dedicated lighting supply sites are excellent resources.
Q5: Is it safe to re-wire a lamp myself?
A5: Yes, it is safe to re-wire a lamp yourself if you follow proper procedures. Ensure the lamp is unplugged, use appropriate gauge wire, and make secure connections. Taking pictures during disassembly and consulting wiring diagrams can be very helpful. For any doubts, seeking professional help for lamp wiring is always recommended.
Disassembling a lamp safely is an achievable task with the right approach and tools. Whether for simple lamp maintenance, a complex lamp restoration, or critical lamp troubleshooting, this guide provides the foundational knowledge. By prioritizing safety and working methodically, you can confidently take apart and reassemble your lamps, extending their life and beauty.