
Can you extend LED light strips? Yes, you absolutely can extend LED light strips to fit any space, whether you need them for a small accent or to illuminate an entire room. Extending LED light strips is a common practice that allows for greater flexibility in your lighting design.
LED light strips are fantastic for adding ambiance and functionality to various spaces. From accent lighting under cabinets to dramatic effects in entertainment areas, their versatility is a major plus. However, the standard length of an LED strip might not always perfectly match your desired layout. This is where extending your LED light strips comes into play. Fortunately, with a few simple tools and techniques, you can easily extend your LED light strips to reach anywhere you need them to.
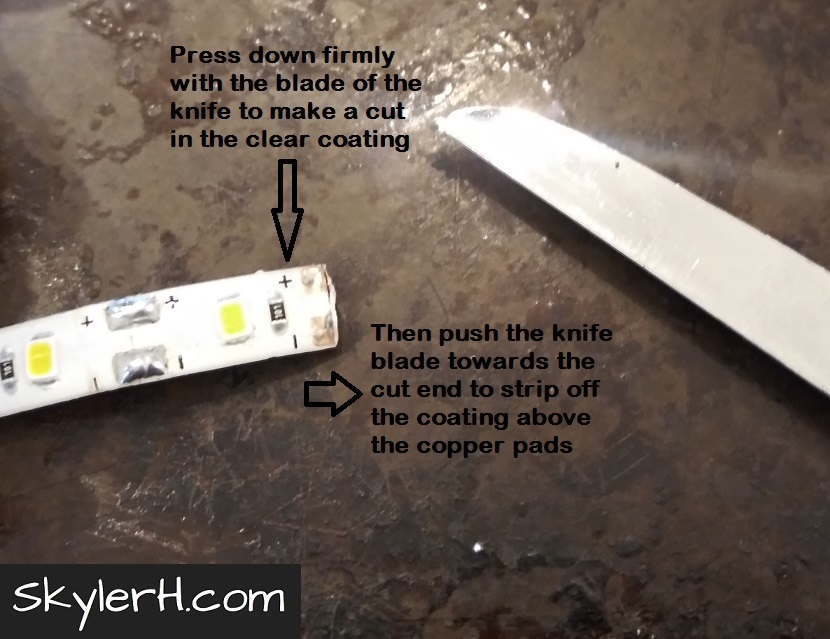
Image Source: skylerh.com
Why Extend Your LED Light Strips?
There are several reasons why you might need to extend your LED light strips:
- Larger Spaces: If you have a large room, long hallway, or a significant architectural feature, a single LED strip might not be long enough to provide continuous illumination.
- Complex Layouts: Corners, angles, and intricate designs often require cutting and rejoining LED strips to navigate around obstacles or follow specific paths.
- Customization: You might have a specific length in mind that isn’t available off the shelf. Extending allows you to create a perfectly tailored lighting solution.
- Connecting Different Sections: You may need to bridge a gap, perhaps around a doorway or a piece of furniture, to maintain a continuous run of light.
Methods for Extending LED Light Strips
There are a few popular and effective ways to extend your LED light strips. Each method has its own advantages and is suitable for different scenarios. We’ll cover the most common and reliable techniques.
1. Using LED Strip Connectors
LED strip connectors are a quick and easy way to join two separate pieces of LED light strip. They are essentially small clips that you press onto the exposed copper pads at the end of each strip.
Types of LED Strip Connectors
- Solderless Clip-on Connectors: These are the most straightforward to use. They typically have a small lever or snap mechanism that secures the strip.
- Solderable Connectors: These have small holes or pads where you would solder wires, offering a more robust connection if done correctly.
- Corner Connectors: These are L-shaped connectors designed to help you turn corners smoothly with your LED strips.
- Cross and T-Connectors: These allow you to branch your LED strip into multiple directions, useful for more complex lighting designs.
How to Use Solderless Clip-on Connectors:
- Prepare Your LED Strips: If your LED strip needs extending, you’ll likely have cut it. Carefully locate the copper pads at the end of the strip. Ensure they are clean and free of debris.
- Open the Connector: Gently open the clip-on connector.
- Position the Strip: Slide the end of the LED strip into the connector, making sure the copper pads align with the metal contacts inside the connector. For single-color strips, ensure the positive (+) terminal of one strip connects to the positive of the other. For RGB or RGBW strips, pay close attention to aligning all the color channels (R, G, B, W) and the common anode/cathode.
- Close the Connector: Firmly close the connector. You should feel or hear a click as it secures the strip.
- Test the Connection: Connect your LED strip to the power supply and test the light.
Advantages:
- Extremely easy and fast to use.
- No special tools required.
- Good for quick installations or temporary setups.
Disadvantages:
- Can sometimes be less secure than soldered connections.
- May add a slight bulk where the connector is placed.
- Not always ideal for very high-current applications where heat might be a concern.
2. Soldering LED Strips
Soldering provides the most secure and professional-looking connection. It involves melting solder to create a permanent bond between wires and the copper pads on your LED strips. This method requires a bit more skill and specific tools.
What You’ll Need for Soldering:
- Soldering Iron: A temperature-controlled soldering iron is recommended.
- Solder: Rosin-core solder is generally suitable for electronics.
- Flux: A small amount of flux can help the solder flow smoothly.
- Wire Strippers: To remove insulation from your connecting wires.
- Heat Shrink Tubing: To insulate and protect your soldered connections.
- Wire Cutters: For precise cutting of wires.
- Second Person (Optional but helpful): To hold the strips or wires steady.
How to Solder LED Strips:
- Prepare the LED Strips: Carefully cut your LED strip at the designated cut lines (usually marked by scissors icons). Ensure the cut is clean and straight. You’ll need to expose the copper pads by gently scraping off any protective coating or a very thin layer of the green solder mask.
- Tin the Pads and Wires: Apply a small amount of flux to the copper pads on the LED strip. Then, apply a tiny bit of solder to each pad, creating a thin, shiny layer. Do the same for the ends of the wires you’ll be using for the extension. This process is called “tinning” and makes it easier for the solder to flow when connecting.
- Prepare the Extension Wires: Cut your extension wire to the desired length. If you are extending with another LED strip, you will need to solder wires to the end of the first strip and the beginning of the second. Remember to identify the correct polarity (+ and – for single color, or R, G, B, W for RGB/RGBW) and the common pad.
- Solder the Wires: Place the tinned wire onto the tinned copper pad of the LED strip. Apply the hot soldering iron to the point where the wire and pad meet. The solder should melt and flow, creating a strong bond. Repeat for all necessary connections. Be quick to avoid overheating the LED strip.
- Insulate the Connection: Once the solder has cooled, slide a piece of heat shrink tubing over the soldered connection. Use a heat gun or the side of your soldering iron (carefully) to shrink the tubing, providing insulation and strain relief.
- Test Your Work: Before you secure everything, connect your extended LED strip to the power supply and check if all lights are working correctly.
Advantages:
- Creates very strong and reliable connections.
- Provides excellent conductivity, minimizing voltage drop over longer runs.
- Looks very neat and professional.
- More durable for permanent installations and high-current applications.
Disadvantages:
- Requires practice and skill.
- Needs specific tools (soldering iron, solder, etc.).
- Can be time-consuming.
- Risk of damaging the strip if overheated.
3. Splicing LED Strips with Wire
This method is similar to soldering but often involves using short lengths of wire to bridge the gap between two LED strips, and then soldering these wires to the strips. This offers more flexibility in placement compared to direct connector methods.
Steps for Splicing with Wire:
- Prepare Strips and Wires: As with soldering, cut your LED strips at the marked lines and expose the copper pads. Cut your extension wires to the desired length. For RGB/RGBW strips, ensure you have the correct number of wires (e.g., 4 for RGB, 5 for RGBW).
- Solder Wires to First Strip: Solder one end of each required wire to the corresponding copper pads of the first LED strip. Ensure correct polarity and color coding.
- Solder Wires to Second Strip: Solder the other end of each wire to the corresponding copper pads of the second LED strip.
- Insulate: Use heat shrink tubing on each soldered connection to protect it.
- Test: Power up your setup to confirm the connection.
Advantages:
- Provides good flexibility in connecting strips that aren’t right next to each other.
- Offers a secure and reliable connection when done properly.
Disadvantages:
- Requires soldering skills and equipment.
- Can be time-consuming.
LED Strip Wiring Essentials
Correct LED strip wiring is crucial for both functionality and safety. This involves understanding polarity, voltage, and how to connect everything to the power source.
Polarity Matters
LEDs are diodes, meaning they only allow current to flow in one direction.
* Single Color LED Strips: Have a positive (+) and a negative (-) terminal. Connecting them incorrectly will prevent the light from turning on.
* RGB/RGBW LED Strips: Have multiple color channels (Red, Green, Blue) and a common terminal. For example, an RGB strip typically has a common anode (+) connection, with separate connections for Red, Green, and Blue. An RGBW strip adds a White channel. It’s vital to connect the correct color wire to the corresponding pad on the strip.
Connecting to the Power Supply
The power supply is the heart of your LED strip setup. It converts AC power from your wall outlet to the DC voltage that the LED strips require.
- Voltage Matching: Ensure your power supply’s voltage (e.g., 12V or 24V) matches the voltage rating of your LED strips. Mismatching can damage the LEDs or prevent them from working.
- Wattage Calculation: This is a critical step. You need a power supply with enough wattage to handle the total length of your LED strip.
LED Strip Length Calculation
To avoid dimming or damaging your strips, you need to calculate the total power consumption.
- Find the Wattage per Meter: This information is usually provided by the manufacturer of your LED strip. For example, a strip might consume 9.6 watts per meter.
- Calculate Total Wattage: Multiply the wattage per meter by the total length of your LED strip in meters.
- Formula: Total Watts = (Watts per Meter) × (Total Length in Meters)
- Add a Safety Margin: It’s recommended to choose a power supply that is at least 10-20% higher than your calculated total wattage. This prevents the power supply from running at its maximum capacity, which can cause it to overheat and shorten its lifespan.
- Formula: Required Power Supply Wattage = Total Watts × 1.2 (for a 20% margin)
Example:
If you have 10 meters of LED strip that consumes 9.6 watts per meter:
* Total Watts = 9.6 W/m × 10 m = 96 Watts
* Required Power Supply Wattage = 96 Watts × 1.2 = 115.2 Watts
In this case, you would look for a power supply rated at least 120 Watts.
Connecting the Power Supply to the Strip
- Direct Connection: Many LED strips have a connector at one end that plugs directly into an AC adapter or a dedicated LED driver.
- Wiring: If you are soldering or using connectors that require wires, you will connect the positive (+) and negative (-) output wires from your power supply to the corresponding input terminals on your LED strip. For RGB/RGBW strips, you’ll connect the appropriate color wires to the corresponding input terminals.
Extending LED Strip Brightness Considerations
When you extend LED light strips, you might encounter issues with brightness uniformity, especially over longer runs. This is due to voltage drop.
What is Voltage Drop?
Voltage drop is the reduction in voltage that occurs as electrical current travels through a conductor (in this case, the copper traces on the LED strip and any extension wires). The longer the run and the thinner the wire, the more significant the voltage drop.
How Voltage Drop Affects Brightness:
As the voltage drops along the length of the LED strip, the LEDs at the far end will receive less power. This results in them appearing dimmer than the LEDs closer to the power supply.
Strategies to Mitigate Voltage Drop:
- Use Thicker Gauge Wires for Extensions: If you are splicing or using wire extensions, opt for thicker gauge wires (lower AWG number) to carry the current with less resistance.
- Consider Higher Voltage Strips: 24V LED strips generally experience less voltage drop over longer distances compared to 12V strips.
- Power Injection: For very long runs, you can “inject” power into the middle of the strip. This involves running a new positive and negative wire from the power supply to a point further down the strip. You can do this by soldering wires to the strip at that midway point.
- You can also use dedicated LED strip accessories like power injection cables or splitters that are designed for this purpose.
- Use LED Strip Extenders with Integrated Power Delivery: Some specialized extenders are designed to help maintain consistent brightness.
- Properly Size Your Power Supply: As discussed in the length calculation, an adequately sized power supply is the first step to ensuring enough power reaches all parts of your strip.
LED Strip Accessories for Extension
Beyond basic connectors and wires, there are various LED strip accessories that can make extending your lights easier and more effective.
- Wire Extensions: Pre-made wire extension cables with compatible connectors on each end are available for quick joins.
- Power Connectors/Adapters: These allow you to connect your LED strip to a different type of power source or adapter.
- Controller Extenders: For smart LED strips (like addressable or RGBW), you might need extenders that are compatible with the controller’s signal to maintain color accuracy and effects.
- Waterproof Connectors/Joints: If your LED strips are installed in damp environments (like bathrooms or kitchens), waterproof connectors and sealing methods are essential.
Troubleshooting Common Extension Issues
Even with the best intentions, you might run into a few snags. Here’s how to troubleshoot:
- Strip Not Turning On:
- Check Polarity: Ensure all positive (+) and negative (-) connections are correct.
- Power Supply: Is the power supply working and plugged in? Is the wattage sufficient?
- Loose Connections: Check all solder joints or connector clips for a secure fit.
- Dimming at the End of the Strip:
- Voltage Drop: This is the most likely culprit. See the section on mitigating voltage drop.
- Power Supply Too Small: Your power supply might not be providing enough current for the entire length.
- Flickering Lights:
- Loose Connection: A poor connection can cause intermittent power flow.
- Faulty Power Supply: The power supply itself might be failing.
- Overheating: Ensure components are not overheating.
- Color Inaccuracy (RGB/RGBW):
- Incorrect Color Wiring: Double-check that each color channel is connected to the correct pad.
- Poor Connection on a Channel: One of the color wires might have a bad connection.
Frequently Asked Questions (FAQ)
How long can I realistically extend an LED strip?
The realistic maximum length depends on the wattage per meter of your LED strip and the gauge of the wire used for extensions. For standard 12V strips that consume around 10-15W per meter, runs exceeding 5-7 meters without power injection or thicker wires can start to show significant dimming. For 24V strips, you can often achieve 10-15 meters or more before needing power injection. Always consult the manufacturer’s specifications for your specific LED strip.
Can I mix and match different brands or types of LED strips?
It’s generally not recommended to mix different brands or types of LED strips, especially if they have different densities, color temperatures, or power requirements. While you might be able to connect them using compatible connectors, the visual consistency and performance can be compromised. Stick to the same type and brand for the most uniform and reliable results.
Do I need a special power supply for extending LED strips?
You need a power supply that has sufficient wattage to power the entire length of your extended LED strip, not just the original section. The power supply must also match the voltage (12V or 24V) of your LED strips. You don’t necessarily need a “special” power supply, just one that is correctly rated for the job.
What is the difference between LED strip extenders and LED strip connectors?
LED strip connectors are typically small devices used to join two pieces of LED strip directly or to connect wires to a strip. They are often for making relatively short connections or changing direction. LED strip extenders can refer to a broader category, including longer wire extensions, power injection cables, or specialized components designed to manage power and signal over longer distances, specifically addressing issues like voltage drop.
How do I ensure extending LED strips doesn’t dim them?
To prevent dimming when extending LED strips, you must manage voltage drop. This involves:
* Calculating Total Wattage: Ensure your power supply is adequately sized.
* Using Thicker Gauge Wire: For any wire extensions, use a lower AWG (thicker) wire.
* Power Injection: For longer runs, run separate power wires from the power supply to the middle or end of the strip to supplement the voltage.
* Using 24V Strips: These naturally have less voltage drop than 12V strips over the same distance.
By carefully following these guidelines, you can successfully extend your LED light strips to perfectly illuminate any space you desire, creating a customized and effective lighting solution.