
Image Source: www.theartofdoingstuff.com
How To Install a Lamp Cord Switch: Easy DIY Steps
Can I install a lamp cord switch myself? Absolutely! Installing a lamp cord switch is a straightforward DIY project that can bring a broken lamp back to life or add convenience to a new one. This guide will walk you through every step, from gathering your tools to testing your new switch.
Why You Might Need a New Lamp Cord Switch
Lamps are fantastic for setting the mood and providing light, but sometimes their switches can fail. A frayed cord, a sticky toggle, or a completely unresponsive switch can render your favorite lamp useless. Fortunately, you don’t need to be an electrician to fix it. Knowing how to rewire lamp cord or perform a lamp cord repair is a valuable skill. This article will serve as your comprehensive lamp switch replacement guide, covering everything from a simple inline switch replacement to installing a dimmer switch on a lamp.
Common Reasons for Lamp Switch Failure
- Wear and Tear: Like any mechanical part, switches can simply wear out over time. Frequent use can lead to loose connections or internal breakage.
- Damage: The cord or switch might have been accidentally damaged, perhaps by being stepped on, pinched, or exposed to moisture.
- Faulty Wiring: Sometimes, the original wiring within the lamp or the switch itself might have been done incorrectly or has degraded.
- Desire for an Upgrade: You might want to replace lamp switch with a more convenient type, like a rotary switch or an installing a dimmer switch on a lamp for better light control.
Tools and Materials You’ll Need
Before you begin, make sure you have the right tools and materials. Having everything ready will make the process smoother and safer.
Essential Tools
- Wire Strippers: These are crucial for safely removing insulation from the electrical wires.
- Wire Cutters: For cutting the electrical cord.
- Screwdriver Set: You’ll likely need a Phillips head and a flathead screwdriver for disassembling the lamp and the switch.
- Pliers: Needle-nose pliers can be helpful for bending wire ends and gripping small parts.
- Lighter or Match: To “tin” the wire ends with solder (optional but recommended for a secure connection).
- Soldering Iron and Solder: For creating a more robust connection to the switch terminals (optional but highly recommended).
- Electrical Tape or Heat Shrink Tubing: For insulating exposed wire connections.
- Multimeter (Optional but Recommended): To test for continuity and ensure power is off.
Necessary Materials
- Replacement Lamp Cord Switch: Ensure it’s rated for the voltage and amperage of your lamp. Inline switches are common for this type of repair.
- New Lamp Cord (If needed): If your cord is severely damaged, you might need to rewire lamp cord entirely.
- Wire Nuts (If splicing): For joining wires together securely.
- Replacement Lamp Socket (If needed): Sometimes the socket is the issue. Knowing how to wire a lamp socket is another useful skill.
Safety First: Before You Start
Working with electricity can be dangerous. Always prioritize safety to avoid shocks or electrical fires.
Crucial Safety Precautions
- Unplug the Lamp: This is the most important step. Always disconnect the lamp from the power outlet before doing any work.
- Test for Power: Use a non-contact voltage tester or a multimeter to confirm that no power is flowing through the cord or within the lamp before touching any wires.
- Work in a Well-Lit Area: Good lighting helps you see what you’re doing and avoid mistakes.
- Use Insulated Tools: Tools with insulated handles provide an extra layer of protection.
- Keep Water Away: Ensure the work area is dry and there’s no risk of water coming into contact with electrical components.
- Know Your Limits: If you’re unsure about any step, it’s always best to consult a qualified electrician or a knowledgeable friend.
Step-by-Step Guide to Installing a Lamp Cord Switch
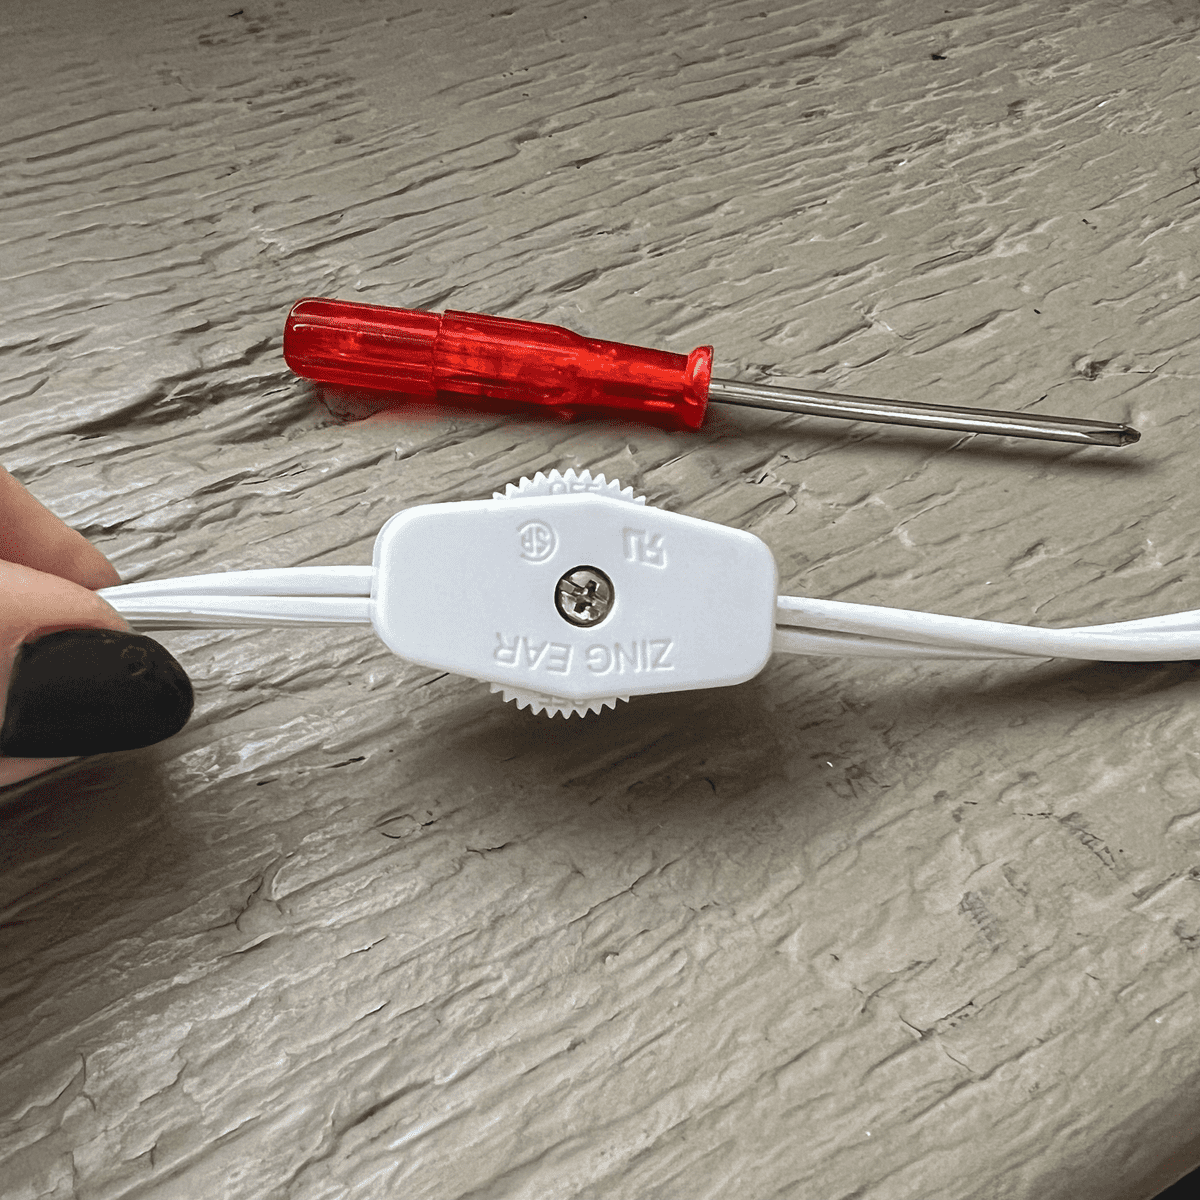
This guide focuses on replacing an inline switch on a lamp cord, a common scenario for lamp cord repair and inline switch replacement.
Step 1: Disassemble the Lamp and Access the Cord
- Unplug the Lamp: Double-check it’s unplugged.
- Inspect the Cord: Examine the entire length of the lamp cord for any signs of damage, fraying, or pinching. If the damage is extensive, you might need to replace the entire cord.
- Locate the Existing Switch: If your lamp has a built-in switch (like a finial knob or a switch on the base), you might be looking to add an inline switch for easier access. If the existing switch is faulty, you’ll be cutting the cord before it.
- Cut the Cord (If necessary): If you are replacing a faulty switch or adding an inline switch, you’ll need to cut the cord. Choose a spot on the cord where you want the new inline switch to be located, typically somewhere accessible along the length of the cord. Use wire cutters to make a clean cut.
Step 2: Prepare the Lamp Cord
- Strip the Outer Jacket: Carefully use wire strippers to remove about 1 to 1.5 inches of the outer protective jacket from both ends of the cut cord. Be careful not to nick or cut the inner wires.
- Identify the Wires: Inside the outer jacket, you’ll find two insulated wires:
- Hot Wire: This is typically the ribbed or stranded wire.
- Neutral Wire: This is usually the smooth or solid wire.
- Ground Wire (if present): This is often a bare copper wire or a green insulated wire.
- Strip the Inner Wires: Using your wire strippers, carefully remove about 0.5 inches of insulation from the end of each inner wire.
Step 3: Connect the Wires to the New Switch
This is where you attach lamp cord to switch. Most inline switches have screw terminals or push-in connectors.
- Examine Your New Switch: Look at the terminals on your replacement switch. They will usually be labeled or have specific slots for the wires.
- For Screw Terminals:
- If the switch has screw terminals, you might need to loop the stripped wire ends around the screws. For a more secure connection, you can “tin” the wire ends first by applying a small amount of solder to them.
- Wrap the stripped end of the hot wire around one terminal screw and tighten it firmly.
- Wrap the stripped end of the neutral wire around the other terminal screw and tighten it firmly.
- If there’s a ground wire, connect it to the designated ground terminal on the switch, if available. If not, you’ll need to splice it with a wire nut to the existing ground wire.
- For Push-In Connectors:
- If the switch has push-in connectors, simply insert the stripped end of each wire into the corresponding slot until it clicks or is firmly seated.
Step 4: Secure and Insulate the Connections
Once the wires are connected to the switch terminals, it’s time to secure and insulate the connections.
- Check Connections: Gently tug on each wire to ensure it’s securely attached to the terminal.
- Close the Switch Housing: Most inline switches have a plastic housing that snaps or screws together. Carefully align the parts and close the housing. Make sure no wires are pinched.
- Add Extra Insulation (Optional but Recommended): For added safety, you can wrap the entire switch assembly with electrical tape or use heat shrink tubing over the connection points.
Step 5: Test the New Switch and Lamp
Before plugging the lamp back into the wall, perform a test.
- Visual Inspection: Double-check all your connections and ensure the switch housing is closed securely.
- Plug it In: Plug the lamp into a power outlet.
- Test the Switch: Turn the switch on and off. The lamp should illuminate when the switch is in the “on” position and turn off when it’s in the “off” position.
- Troubleshooting:
- Lamp Doesn’t Turn On:
- Check that the lamp is plugged in securely.
- Verify that the lamp bulb is good.
- Re-check your wire connections to the switch and ensure they are tight and correctly placed.
- Use a multimeter to check for continuity through the switch and the cord.
- Lamp Flickers:
- Loose wire connections are the most likely culprit. Re-seat or tighten all connections.
- The switch might be faulty.
- The lamp cord might be damaged elsewhere.
- Lamp Doesn’t Turn On:
Advanced Lamp Cord Switch Installations
While an inline switch is common, you might encounter other scenarios.
Installing a Dimmer Switch on a Lamp
For more control over your lighting, you can install a dimmer switch.
- Choose the Right Dimmer: Ensure the dimmer is specifically designed for lamps and is compatible with the type of bulb you are using (incandescent, LED, etc.). Check the wattage rating.
- Follow Dimmer Instructions: Dimmer switches often come with their own detailed instructions, which may involve more complex wiring, sometimes requiring you to rewire lamp cord more extensively or even how to wire a lamp socket if the existing socket is part of the control.
- Wiring: You’ll typically cut the hot wire of the lamp cord and connect it to the dimmer’s input and output terminals, similar to an inline switch, but with potentially more wires to manage for dimming functions.
Replacing a Lamp Socket
Sometimes, the issue isn’t the switch but the socket itself. Knowing how to wire a lamp socket is a useful skill.
- Disassemble the Socket: Carefully remove the socket from its housing. You’ll usually find two screw terminals where the lamp cord wires connect.
- Disconnect Old Wires: Loosen the screws and detach the wires from the old socket.
- Connect New Wires: Strip the ends of the hot and neutral wires from the lamp cord and attach them to the corresponding terminals on the new socket. Secure the wires under the terminal screws.
- Reassemble: Carefully reassemble the socket and its housing, ensuring no wires are exposed or pinched.
Electrical Cord Splice for Repairs
If you need to join two sections of a lamp cord, you’ll perform an electrical cord splice.
- Preparation: Cut both ends of the cord cleanly. Strip the outer jacket and inner wires as described earlier.
- Joining: You can use wire nuts or crimp connectors for this. Twist the corresponding stripped inner wires from each cord section together and secure them with a wire nut or crimp connector.
- Insulation: Cover the splice with electrical tape or heat shrink tubing for insulation and protection. This is a key part of effective lamp cord repair.
Maintaining Your Lamp and Its Switch
Regular checks can prevent future issues.
- Inspect Cords: Periodically examine all your lamp cords for fraying or damage.
- Clean Switches: Keep switches clean and free from dust and debris.
- Avoid Overloading: Don’t exceed the wattage rating of your lamp or its bulb.
Table: Common Lamp Switch Types
| Switch Type | Description | Best For | Installation Complexity |
|---|---|---|---|
| Inline Toggle | A small switch mounted directly on the lamp cord. | Adding convenience to any lamp, replacing broken switches. | Easy |
| Rotary Switch | A knob that turns to cycle through off, low, medium, and high settings. | Lamps where adjustable brightness is desired without a dimmer. | Moderate |
| Push-Button | A button that is pushed to turn the lamp on and off. | Modern lamps, simple on/off functionality. | Easy |
| Dimmer Switch | Allows for gradual adjustment of light brightness. | Creating ambiance, reading lamps, where light control is important. | Moderate to High |
| Turn Knob | A rotating knob, often integrated into the lamp base or socket, that turns the lamp on and off. | Traditional lamps, often part of the lamp’s original design. | Varies (can be complex) |
Frequently Asked Questions (FAQ)
Q: How do I know if my lamp cord switch is bad?
A: If your lamp flickers, doesn’t turn on or off reliably, or feels loose and unstable when you operate the switch, it’s likely faulty.
Q: Can I replace a broken switch with a dimmer switch?
A: Yes, you can, but you must ensure the dimmer switch is designed for lamps and compatible with your bulb type and wattage.
Q: Do I need to solder the wires to the switch?
A: While not always strictly necessary, soldering provides a more secure and reliable connection than just relying on screw terminals or push-in connectors. It’s recommended for a lasting lamp cord repair.
Q: What happens if I connect the hot and neutral wires to the wrong terminals on the switch?
A: If you connect them incorrectly for a simple inline switch, the switch might not work, or it could potentially bypass the switch entirely. For a dimmer switch or other more complex controls, incorrect wiring could damage the switch or the lamp. Always ensure you connect the hot wire to the “hot” side of the switch and the neutral to the “neutral” side.
Q: Is it safe to use wire nuts for electrical cord splices on lamps?
A: Yes, as long as you use wire nuts that are appropriately sized for the wires and ensure they are twisted on securely, they are a safe method for an electrical cord splice. Insulating the splice afterwards with tape or heat shrink tubing is always a good idea.
By following these detailed steps, you can confidently tackle the task of installing a lamp cord switch, ensuring your lamps function safely and efficiently. Whether you’re performing a simple inline switch replacement or a more involved lamp cord repair, this guide provides the knowledge you need.