
Can you power a light bulb with a potato? Yes, you can create a simple circuit that lights up a small LED bulb using a potato. This fascinating science project demonstrates how to generate electricity from potato, turning a common vegetable into a homemade power source.
Creating a potato lamp, also known as a potato battery, is a classic and fun way to explore the principles of electrochemistry. It’s a fantastic science experiment that shows how chemical reactions can produce electrical energy. Think of it like a tiny, edible power plant! You might have seen similar setups with a potato clock, which uses the same concept to power a digital display. This guide will walk you through the steps to build your own DIY lamp powered by a potato.
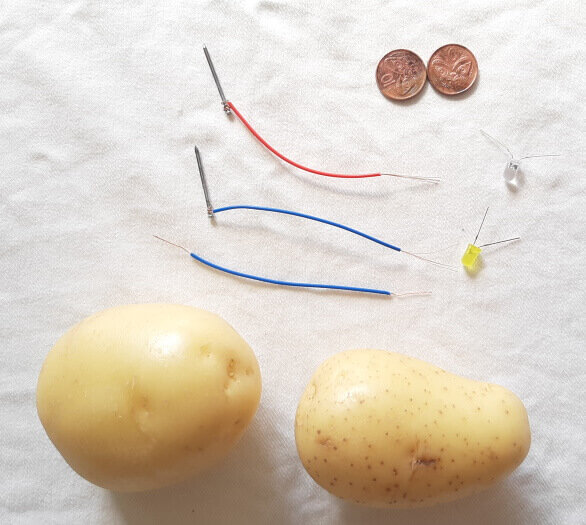
Image Source: images.squarespace-cdn.com
The Science Behind the Potato Battery
So, how does a humble potato become an energy source? It all boils down to chemistry and a bit of physics. A potato acts as an electrolyte, a substance that contains free ions and can conduct electricity. In this case, the potato contains phosphoric acid and salts that allow ions to move.
When you insert two different metals into the potato, you create what’s called a voltaic cell. A voltaic cell is a device that converts chemical energy into electrical energy. The two metals used are typically zinc (like from a galvanized nail) and copper (like from a penny or copper wire).
Here’s a simplified breakdown of what happens:
- The Metals: Zinc and copper have different tendencies to lose electrons. Zinc is more reactive than copper.
- The Reaction: When placed in the acidic electrolyte of the potato, the zinc atoms lose electrons and become positively charged zinc ions. These electrons travel through an external wire.
- The Circuit: The copper acts as a conductor. The electrons flow from the zinc, through the wire, to the copper.
- The Light: When a low-power LED is connected to the copper and zinc, the flow of electrons (which is electricity!) causes the LED to light up. It’s a very basic simple circuit.
The potato itself doesn’t generate the electricity; it acts as the medium that allows the chemical reaction between the two different metals to occur. The acid in the potato facilitates the movement of ions, completing the circuit.
Materials You’ll Need
Gathering your materials is the first step to making your potato lamp. You don’t need anything too fancy, and most items can be found around the house or at a local store.
Here’s a list of what you’ll need:
- Potatoes: One or two medium-sized potatoes work well. Russet or Yukon Gold potatoes are often recommended as they tend to have a good moisture content.
- Zinc-Coated (Galvanized) Nails: You’ll need at least two. The zinc coating is key because zinc is more reactive.
- Copper Items: You can use copper pennies (pre-1982 pennies are mostly copper), copper wire, or copper strips. You’ll need at least two.
- LED Light Bulb: A small, low-voltage LED is essential. Red or green LEDs often require the least voltage to light up, making them ideal for a potato battery. You can find these at electronics stores or online.
- Connecting Wires with Alligator Clips: You’ll need about four of these to connect the components. Alligator clips make it easy to attach and detach wires.
- Wire Stripper: If you are using plain copper wire without clips, you’ll need this to expose the metal ends.
- Optional: A small piece of cardboard or plastic to mount your potato and components.
Step-by-Step Guide to Building Your Potato Lamp
Now, let’s get creative and build your DIY lamp! This is where the science experiment truly comes to life.
Step 1: Prepare the Potatoes
- If you’re using multiple potatoes, you can wire them in series or parallel. For this basic lamp, one potato might be enough, but using two can increase the voltage.
- Gently wash the potatoes to remove any dirt. You don’t need to peel them.
Step 2: Insert the Electrodes
- Take your first potato.
- Push one galvanized nail into one side of the potato. Make sure it goes in deep enough to make good contact with the potato’s interior, but not all the way through.
- Push one copper item (penny, wire, or strip) into the other side of the potato. Again, ensure it’s well-inserted into the potato flesh. Keep the nail and the copper piece a few centimeters apart.
Step 3: Connecting the First Potato
- Use one connecting wire with alligator clips.
- Clip one end of the wire to the galvanized nail.
-
Clip the other end of the wire to one leg of your LED bulb. LEDs have two legs; one is usually longer than the other. The longer leg is typically the positive (+) terminal, and the shorter leg is the negative (-) terminal.
-
Now, take another connecting wire.
- Clip one end to the copper item in the potato.
-
Clip the other end to the other leg of your LED bulb.
-
Important Note: The polarity matters for LEDs. If the LED doesn’t light up, try swapping the wires connected to its legs.
If you’re using only one potato and a single LED, you should see a faint glow. If it’s very dim or not lighting up, you might need more power.
Step 4: Adding More Potatoes (Optional, for More Power)
To increase the voltage and make your LED brighter, you can connect multiple potatoes in series. This is similar to how you’d connect batteries in a flashlight.
- Prepare a second potato with a galvanized nail and a copper item, just like the first one.
- Connecting in Series:
- Use a connecting wire to link the nail of the first potato to the copper item of the second potato.
- Connect the copper item of the first potato to one leg of the LED.
- Connect the nail of the second potato to the other leg of the LED.
This configuration effectively adds the voltage produced by each potato together, allowing you to power a light bulb more effectively.
Step 5: Mounting Your Lamp (Optional)
- You can make your potato lamp more stable and presentable by mounting it on a piece of cardboard or plastic.
- Carefully push the potatoes onto the cardboard.
- Ensure your wires and LED are securely positioned so the light is visible.
Troubleshooting Your Potato Lamp
Sometimes, your potato lamp might not work as expected. Here are some common issues and how to fix them:
-
LED Not Lighting Up:
- Check Connections: Ensure all alligator clips are firmly attached to the metal parts of the nails, copper, and the LED legs.
- LED Polarity: Try reversing the wires connected to the LED legs.
- Potato Health: Is the potato fresh and moist? A dried-out potato won’t conduct electricity well.
- Metal Purity: Ensure your copper penny is old enough to be mostly copper, or use clean copper wire. Make sure the galvanized nail has a good zinc coating.
- Voltage: A single potato might not provide enough voltage to light some LEDs. Try adding another potato in series.
- LED Type: Some LEDs require more voltage than others. Try a different, lower-voltage LED.
-
Dim Light:
- This is normal for a potato battery! It’s a low-power source.
- Adding more potatoes in series will increase the voltage and brightness.
- Ensure the metals are inserted deeply and are not touching each other inside the potato.
Enhancing Your Potato Lamp: Advanced Techniques
Once you’ve mastered the basic potato lamp, you can experiment with ways to improve its performance or explore different aspects of this science experiment.
Wiring Potatoes in Parallel
Instead of series, you can also wire potatoes in parallel. This increases the current but keeps the voltage the same.
- To wire in parallel, you connect all the zinc nails together and all the copper items together.
- Connection Example (Two Potatoes):
- Connect the nail of potato 1 to the nail of potato 2.
- Connect the copper of potato 1 to the copper of potato 2.
- Connect one wire from the joined nails to one LED leg.
- Connect another wire from the joined copper pieces to the other LED leg.
Wiring in parallel is less common for simply lighting an LED from potatoes, as most LEDs benefit more from increased voltage (series connection) to overcome their forward voltage drop. However, it’s a good way to understand different circuit configurations.
Different Fruits and Vegetables
Does the type of fruit or vegetable matter? Absolutely! The acidity and salt content vary, affecting the electrical output.
Table 1: Potential Output of Different Produce
| Produce Item | Approx. Voltage (per item) | Notes |
|---|---|---|
| Potato | 0.5 – 0.9 V | Good all-rounder, readily available. |
| Lemon | 0.9 – 1.1 V | Higher acidity, can produce more voltage. |
| Apple | 0.7 – 0.9 V | Similar to potato. |
| Tomato | 0.5 – 0.8 V | Can work well. |
| Cucumber | 0.4 – 0.6 V | Lower output. |
When experimenting, you might find that lemons produce a stronger current than potatoes. You can try making a “fruit salad” battery by connecting different fruits and vegetables in series to power a device.
Different Electrode Materials
The choice of metals for your electrodes significantly impacts the voltage produced.
- Zinc and Copper: The most common combination, giving a voltage difference of about 1.1 volts.
- Magnesium and Copper: Magnesium is more reactive than zinc, producing a higher voltage. Magnesium strips can be found in hardware stores or online.
- Iron (Steel) and Copper: Steel nails will also work, but they generally produce less voltage than galvanized (zinc-coated) nails.
The key is to use two metals that are far apart in the galvanic series, which ranks metals by their tendency to corrode or lose electrons.
Frequently Asked Questions About Potato Lamps
Here are some common questions people ask when trying to make a potato lamp:
Q1: How many potatoes do I need to power a normal light bulb?
A1: A standard household incandescent light bulb requires much more voltage and current than a potato battery can provide. You would need hundreds, if not thousands, of potatoes wired correctly to power a regular light bulb. For a small LED, a few potatoes wired in series are usually sufficient.
Q2: Can I eat the potatoes after using them for the science project?
A2: It is not recommended. While the potato itself isn’t toxic, the metals (especially zinc and copper) can leach into the potato flesh, making it unsafe for consumption.
Q3: Why is my LED so dim?
A3: This is the most common issue. It could be due to insufficient voltage from the potato, poor connections, or the LED requiring more power. Try adding more potatoes in series, ensure all connections are secure, and use an LED known to work with low voltage.
Q4: What is the best type of potato to use?
A4: Potatoes with higher moisture content and acidity tend to work best. Russet, Yukon Gold, and even red potatoes are good choices. Starchy potatoes are often cited as being good for this experiment.
Q5: Can I use different metals besides nails and pennies?
A5: Yes! You can use any two dissimilar metals. For example, copper wire and aluminum foil, or copper and a steel screw. However, the voltage produced will vary depending on the reactivity of the metals used. Using metals far apart in the galvanic series will yield the most voltage.
Q6: How long will a potato battery last?
A6: The potato battery will continue to produce electricity as long as there is a chemical reaction occurring between the metals and the electrolyte. This typically lasts for a few days to a week, depending on the potato’s moisture content and the setup. Eventually, the metals will corrode, or the potato will dry out, and the output will cease.
Creative Extensions and Future Projects
The potato battery is a gateway to a world of electrochemistry and DIY power. Here are some ideas for extending your learning:
- Powering More Devices: Experiment with powering other low-voltage electronics, like a small buzzer or a tiny digital clock (like the ones sold in science kits).
- Building a Potato Clock: Many science kits include components to build a functional potato clock. This is a great next step, showing how sustained power can be generated.
- Comparing Power Sources: Conduct an experiment comparing the voltage and current produced by different fruits and vegetables.
- Exploring Different Circuit Types: Learn about series and parallel circuits in more depth and build more complex circuits using your potato power.
- Investigating Metal Corrosion: Observe how the metal electrodes change over time as they are used in the voltaic cell.
Making a potato lamp is more than just a fun craft; it’s a hands-on introduction to how electricity is generated through chemical reactions. It’s a testament to how basic scientific principles can be applied using everyday objects, making science accessible and exciting for everyone. So, grab some potatoes, nails, and copper, and start creating your own homemade power source!