
Yes, you absolutely can paint a glass lamp! It’s a fantastic way to update your décor, breathe new life into an old favorite, or simply achieve a custom look for your home. This guide will walk you through the simple steps to transform your glass lamp with paint, making it a rewarding DIY project.
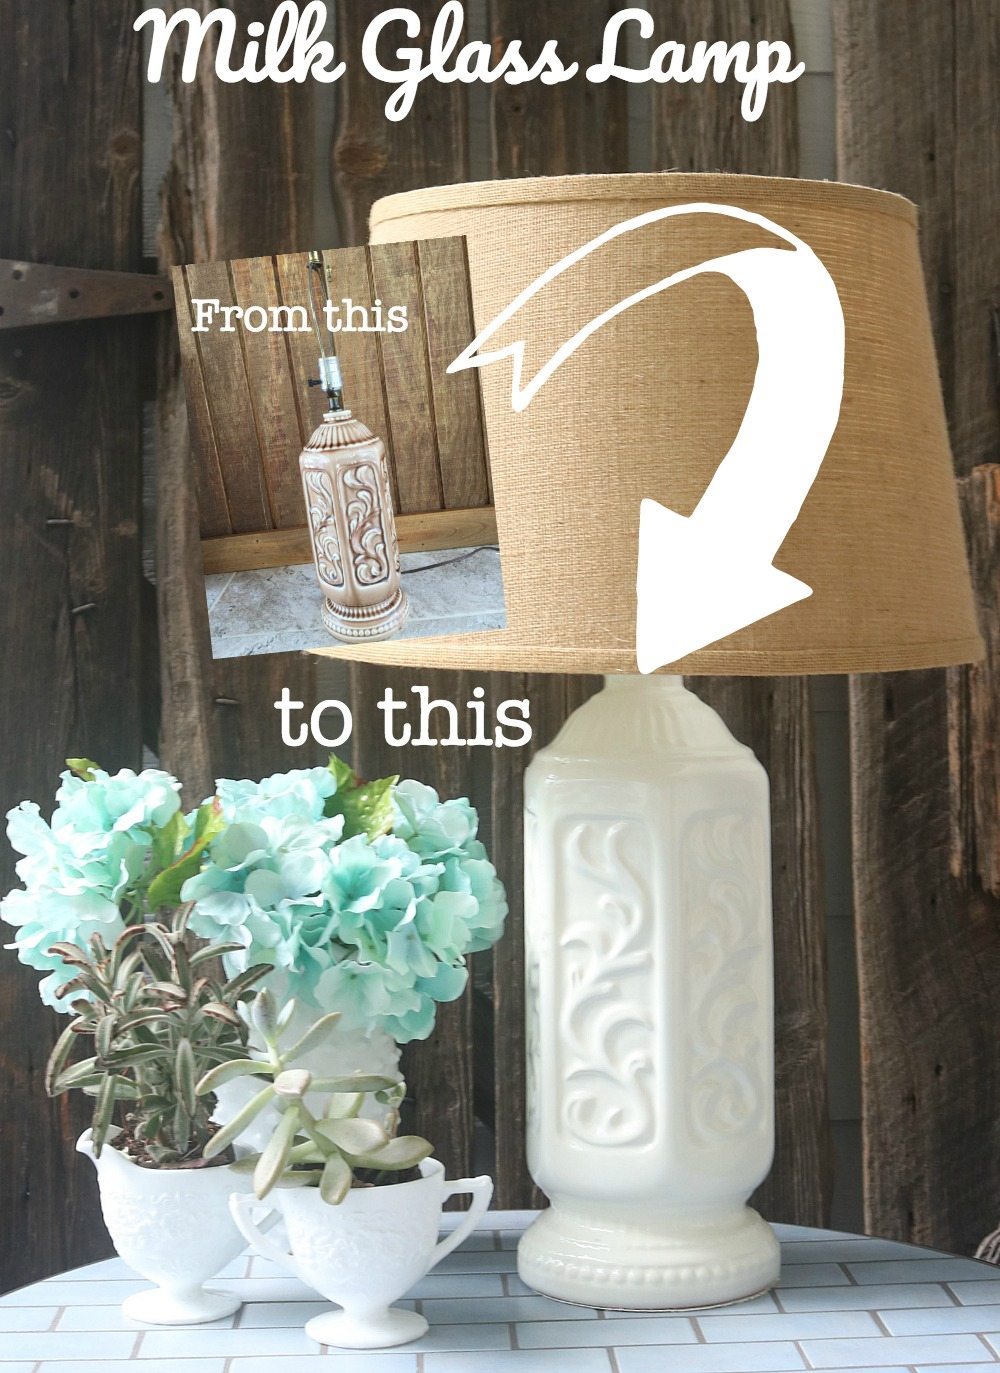
Image Source: refreshrestyle.com
Refreshing Your Home with a DIY Glass Lamp Makeover
Are you tired of that old glass lamp that clashes with your current style? Maybe the color is dated, or the finish has seen better days. Before you consider tossing it, think about the magic of glass lamp painting! A DIY glass lamp makeover is a budget-friendly and creative way to achieve a whole new look. Painting glass lamps is surprisingly straightforward, and with the right approach, you can achieve professional-looking results.
This guide is all about empowering you to tackle this project. We’ll cover everything from choosing the right paint to applying it flawlessly, ensuring your restored glass lamp becomes a stunning focal point. Whether you’re aiming for a subtle update or a bold statement, this tutorial will provide the insights you need.
Why Paint a Glass Lamp?
Glass lamps offer a unique opportunity for customization. Unlike other materials, glass can be a bit tricky to work with when it comes to paint adhesion. However, with the correct preparation and the right materials, you can achieve beautiful, lasting finishes. Painting glass lamps is a popular DIY trend because it allows for:
- Cost-Effectiveness: Buying a new lamp can be expensive. Repainting an existing one saves money.
- Customization: You’re not limited by store colors. You can create any shade or finish you desire.
- Creativity: Experiment with different painting techniques for unique textures and effects.
- Sustainability: Give an old lamp a new purpose, reducing waste.
What You’ll Need for Your Glass Lamp Painting Project
Gathering the right supplies is the first step to success. Having everything on hand will make the process smoother.
Essential Materials:
- Glass Lamp: The star of the show!
- Rubbing Alcohol or Glass Cleaner: For thorough cleaning.
- Paper Towels or Lint-Free Cloths: For wiping and drying.
- Painter’s Tape: To mask off areas you don’t want to paint.
- Primer (specifically for glass or multi-surface): Crucial for paint adhesion.
- Paint (see below for options): The color and finish of your dreams.
- Spray Paint Booth or Well-Ventilated Area: If using spray paint.
- Drop Cloth or Newspaper: To protect your workspace.
- Optional: Fine-grit Sandpaper (220-grit or higher): For light scuffing.
- Optional: Sealant or Clear Coat: For extra durability.
Choosing the Best Paint for Glass Lamps
Selecting the right paint is paramount for a successful and durable finish. Not all paints adhere well to glass. Here are the best options for glass lamp painting:
| Paint Type | Pros | Cons | Best For |
|---|---|---|---|
| Spray Paint for Glass | Easy to apply, provides even coverage, quick drying. | Requires good ventilation, can be messy if not careful, fumes. | Achieving smooth, uniform finishes, intricate designs. |
| Enamel Paint (Oil-Based) | Durable, good adhesion, creates a hard finish. | Longer drying times, requires mineral spirits for cleanup, strong odor. | High-traffic lamps, achieving a very tough, glossy finish. |
| Acrylic Craft Paint | Wide color selection, water-based, easy cleanup. | May require a glass medium or sealant for durability, less durable. | Small details, decorative accents, when using stencils, for indoor lamps. |
| Glass Painting Kits | Specifically formulated for glass, often include sealants and applicators. | Can be more expensive, color options might be limited. | Beginners, ensuring compatibility between paint and glass. |
| Chalk Paint/Mineral Paint | Can adhere to many surfaces with minimal prep, matte finish. | May require a sealant for durability on glass, can chip if not sealed. | Achieving a vintage or distressed look, when a matte finish is desired. |
For most DIY glass lamp painting projects, spray paint specifically formulated for glass or multi-surface spray paint is often the easiest and most effective option.
Preparing Your Glass Lamp for Painting
Proper preparation is the secret to a paint job that lasts. Skipping these steps can lead to peeling or uneven application. This is arguably the most critical stage of glass lamp refinishing.
Step 1: Disassembly and Cleaning
- Unplug the Lamp: Safety first! Ensure the lamp is completely unplugged and cool.
- Remove Shade and Bulb: Take off the lampshade and unscrew the light bulb.
- Clean the Glass Thoroughly: Use rubbing alcohol or a good glass cleaner. Wipe down the entire glass surface with a lint-free cloth. You want to remove all dust, dirt, oils, and any residue from stickers or cleaning agents. Any smudges will show up under the paint.
- Dry Completely: Ensure the glass is totally dry before moving to the next step.
Step 2: Masking Off Areas
- Protect Non-Paintable Parts: Use painter’s tape to cover the lamp socket, the cord, and any decorative hardware or finials that you do not want to paint. Ensure the tape is pressed down firmly to prevent paint from seeping underneath.
- Smooth Edges: Run your fingernail along the edge of the tape to create a tight seal.
Step 3: Lightly Sanding (Optional but Recommended)
For many types of paint, especially spray paints, a light scuffing of the glass surface can significantly improve adhesion.
- Use Fine-Grit Sandpaper: A 220-grit or higher sandpaper is ideal.
- Gentle Abrasion: Lightly and evenly sand the entire glass surface you intend to paint. You’re not trying to remove glass, just create a slightly rough surface for the primer and paint to grip onto.
- Wipe Away Dust: After sanding, clean the glass again with rubbing alcohol or glass cleaner and a lint-free cloth to remove all sanding dust.
Priming Your Glass Lamp: The Foundation for Success
Primer is essential when painting glass lamps. It creates a bonding layer between the glass and your topcoat, preventing chipping and ensuring a smooth, even finish.
Choosing the Right Primer
- Glass Primer: Some brands offer primers specifically designed for glass.
- Multi-Surface Primer: These are formulated to adhere to a variety of surfaces, including glass.
- Spray Primer: For spray painting, a spray primer is usually the easiest to apply evenly.
Applying Primer
- Read Primer Instructions: Always follow the manufacturer’s instructions for application and drying times.
- Apply Thin Coats: Apply a thin, even coat of primer. Avoid applying it too thickly, as this can lead to drips.
- Allow to Dry Completely: Let the primer dry thoroughly according to the product’s recommendations. This usually takes at least 30 minutes to an hour.
- Light Sanding (Optional): If the primer feels rough or uneven, you can very lightly sand it with your fine-grit sandpaper and then wipe clean before applying paint.
Painting Techniques for Glass: Bringing Your Vision to Life
This is where the transformation happens! There are several effective painting techniques for glass lamps, depending on the look you want to achieve.
Technique 1: Spray Painting for a Smooth Finish
Spray painting is a popular choice for painting glass lamps because it offers a consistent, professional-looking finish with minimal brush strokes.
- Choose Your Spray Paint: Opt for spray paint designed for glass or multi-surface use.
- Prepare Your Workspace: Set up in a well-ventilated area (outdoors is best) or use a spray booth. Protect your surroundings with drop cloths or newspaper.
- Shake the Can: Shake the spray paint can vigorously for at least one minute before starting.
- Hold the Can Correctly: Keep the can about 8-12 inches away from the lamp.
- Apply Light, Even Coats: Use a steady back-and-forth motion. Overlap each pass slightly. Avoid holding the spray in one spot for too long, which can cause drips.
- Multiple Thin Coats are Key: It’s better to apply several thin coats than one thick, goopy coat. Allow each coat to dry for the time recommended by the paint manufacturer (usually 10-15 minutes) before applying the next.
- Rotate the Lamp: As you spray, rotate the lamp to ensure all sides are covered evenly. You might need to position the lamp on a turntable or a piece of scrap wood to easily access all angles.
- Drying Time: Allow the final coat to dry completely, typically 24 hours, before removing tape or applying a sealant.
Technique 2: Brush Painting for Detailed Work and Control
If spray paint isn’t your preferred method, or if you want to add details, brush painting is a great alternative.
- Choose Your Paint: Enamel paints or specialized glass acrylics are good choices.
- Use Quality Brushes: Synthetic brushes work well for acrylics, while natural bristles are better for oil-based enamels. Have a variety of brush sizes on hand.
- Apply Thin Coats: Just like with spray paint, thin coats are essential for a smooth finish.
- Brush Strokes: Apply paint in one direction to minimize visible brush strokes. If you are aiming for a textured look, experiment with different brush strokes.
- Build Up Color: Apply multiple thin coats, allowing each coat to dry fully before applying the next.
- Allow Ample Drying Time: Brush-applied paints, especially oil-based enamels, can take longer to dry. Follow product instructions carefully.
Technique 3: Creating Glass Lamp Decorating Ideas with Special Effects
Once you have your base coat down, you can explore various glass lamp decorating ideas to add personality and flair.
- Distressed Finish: After the paint is dry, lightly sand areas of the lamp with fine-grit sandpaper to reveal some of the original glass or primer underneath. This creates a vintage or distressed look.
- Ombre Effect: Apply progressively lighter or darker shades of paint in horizontal bands, blending the colors as you go with a sponge or a dry brush.
- Stenciling: Use stencils to add patterns or designs. Apply paint with a stencil brush or a small roller for clean lines.
- Two-Tone: Paint the top and bottom sections of the lamp in different colors or finishes.
- Crackle Finish: Apply a crackle medium between two coats of paint to create a charming, aged look.
- Metallic Accents: Use metallic spray paints or craft paints to add highlights or decorative elements.
Restoring Glass Lamps: Beyond Just Color
Restoring glass lamps can involve more than just a fresh coat of paint. You might be restoring glass lamps that have a unique texture or are showing signs of age.
Dealing with Textures and Etchings
If your glass lamp has an etched or textured surface, you can either embrace it or try to minimize it.
- Embrace the Texture: Use a primer and paint that will settle into the crevices, highlighting the texture. A slightly thicker coat of spray paint or multiple thin coats can help cover more detail.
- Minimize Texture: If you prefer a smoother look, you might need more coats of primer and paint, or consider a spray filler primer if the texture is quite pronounced. However, be mindful that this can obscure intricate glass details.
Lamp Base Refinishing
Often, the lamp base is made of a different material than the glass shade or body. If your lamp has a separate base (metal, wood, ceramic), you’ll need to prepare and paint it accordingly.
- Metal Bases: Clean thoroughly, lightly sand, prime with a metal primer, and then paint with your chosen paint.
- Wooden Bases: Clean, sand smooth, prime with a wood primer, and then paint.
- Ceramic Bases: Clean, light scuff, prime, and paint.
Ensure you use the correct primer and paint for each material to guarantee adhesion and durability.
Sealing Your Painted Glass Lamp for Longevity
Applying a sealant or clear coat adds an extra layer of protection to your painted glass lamp, making it more durable and resistant to scratches and fading.
- Choose a Sealant: Look for a clear coat or sealant that is compatible with your chosen paint. Many spray paints have matching clear coats. A matte, satin, or glossy finish is available.
- Apply Thin, Even Coats: Similar to the primer and paint, apply the sealant in thin, even coats.
- Allow Proper Drying Time: Let the sealant cure completely according to the product instructions before reassembling and using the lamp. This is crucial for durability.
Final Touches and Reassembly
Once the paint and sealant are completely dry, it’s time for the final steps.
- Remove Painter’s Tape: Carefully peel off the painter’s tape. Do this slowly and at an angle to avoid pulling off any paint. If the paint feels slightly “sticky,” you can gently score the edge with a craft knife before pulling the tape.
- Reassemble: Put the bulb and lampshade back on your beautifully transformed lamp.
- Clean Up: Dispose of used materials properly and clean your tools.
Frequently Asked Questions (FAQ)
Q1: Can I paint a glass lamp with regular house paint?
A1: While some specialty paints like chalk paint might adhere with a good primer, regular latex or acrylic house paint is generally not recommended for direct application on glass. It’s prone to chipping and peeling without proper adhesion promoters. Always use paints specifically designed for glass or multi-surface applications.
Q2: Will the paint scratch off easily?
A2: If you properly prepare the glass, use a good primer, and apply multiple thin coats, the paint should be quite durable. Using a sealant or clear coat will further enhance its scratch resistance. Gentle handling and cleaning will also help prolong the finish.
Q3: How long does it take for painted glass lamps to dry?
A3: Drying times vary greatly depending on the type of paint and environmental conditions (humidity, temperature). Spray paints might feel dry to the touch in 10-15 minutes, but it’s best to wait at least 30 minutes to an hour between coats. For full curing, especially for enamels and sealants, wait at least 24-72 hours, or even longer, before handling or using the lamp. Always check the product packaging for specific drying and curing times.
Q4: Can I paint the inside of a glass lamp?
A4: Yes, you can paint the inside of a glass lamp, and it’s often easier to get a smooth, even finish this way, especially with spray paint. This method also offers a different aesthetic, where the paint is protected on the interior. Ensure good ventilation if spray painting indoors.
Q5: What if I make a mistake while painting?
A5: If you make a mistake, like a drip or a smudge, while the paint is still wet, you can often wipe it away with a lint-free cloth dampened with rubbing alcohol or the recommended solvent for your paint type. If the paint has already started to dry, you might need to carefully scrape it off with a razor blade (used at a very low angle to avoid scratching the glass) or use a paint stripper designed for glass, and then re-prime and repaint that area.
Conclusion: Your Updated Glass Lamp Awaits
Painting a glass lamp is a rewarding DIY project that can dramatically update your home décor. By following these steps, from thorough preparation and priming to careful application of paint and sealant, you can achieve beautiful, lasting results. Embrace the process, experiment with colors and techniques, and enjoy your newly refinished glass lamp! This DIY glass lamp makeover is a testament to how a little creativity and effort can transform the ordinary into something extraordinary.