
Image Source: www.nationalartcraft.com
How To Put A Lamp Back Together: Your DIY Guide
Can you put a lamp back together yourself? Yes, you absolutely can! With a few simple tools and a bit of patience, you can successfully reassemble a lamp. This guide will walk you through the process, making lamp repair and assembly straightforward, even if you’ve never done it before. We’ll cover everything from identifying parts to lamp wiring and making sure everything is secure.
Getting Started: Preparing for Lamp Assembly
Before you begin reassembling a lamp, it’s crucial to have a clear plan and all your tools ready. This will prevent frustration and ensure a smoother process. Think of it like putting together furniture; having all the pieces and instructions makes it much easier.
Essential Tools for Lamp Repair
Having the right tools makes all the difference. Here’s a list of what you’ll likely need for basic lamp repair:
- Screwdrivers: A set with various sizes, including flathead and Phillips head, is essential. Many lamps use Phillips head screws.
- Pliers: Needle-nose pliers are particularly useful for gripping small wires and components.
- Wire Strippers/Cutters: You’ll need these if you’re dealing with the lamp cord repair or need to strip insulation from wires.
- Adjustable Wrench: Handy for tightening nuts and bolts, especially on the lamp base.
- Voltage Tester (Non-contact): Crucial for safety to ensure the lamp is unplugged and there’s no power running through the wires.
- Duct Tape or Electrical Tape: For temporarily securing wires or insulating connections.
- Small Bowl or Container: To keep screws and small parts organized so you don’t lose them.
- Clean Cloth: For wiping down parts and keeping your workspace tidy.
Safety First: Always Prioritize Safety
Electricity can be dangerous. Before you touch any part of the lamp that involves wiring, ensure it is completely unplugged from the wall outlet. Double-check that no one can accidentally plug it in while you’re working. If you’re unsure about any step, especially concerning the lamp wiring, it’s always best to consult a professional electrician.
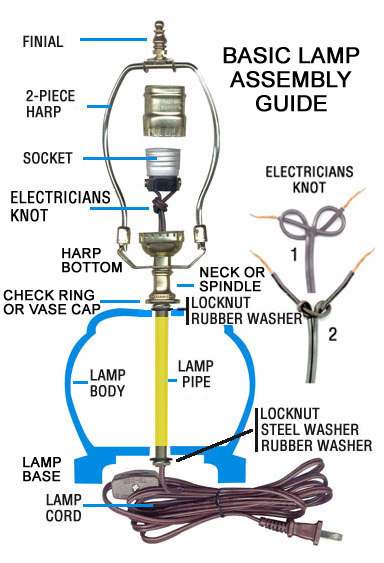
Identifying Lamp Parts: What Goes Where?
A key part of reassembling a lamp is knowing the different components and how they fit together. Most lamps share similar basic parts.
Common Lamp Components
Let’s break down the typical parts you’ll encounter:
- Lamp Base: The foundation of the lamp, providing stability. This might be heavy to keep the lamp from tipping over.
- Riser/Nipples: These are the threaded rods that connect different sections of the lamp, often holding the shade support in place and allowing the cord to pass through.
- Switch: This controls the flow of electricity to the bulb. It can be a rotary switch, a push-button switch, a pull chain, or a touch-sensitive control.
- Lamp Cord: The electrical cord that connects the lamp to the power outlet. It has two wires inside: one for the hot side and one for the neutral side.
- Plug: The part of the cord that goes into the wall socket.
- Lamp Bulb Socket (Socket Assembly): This is where the light bulb screws in. It contains terminals for connecting the electrical wires.
- Socket Housing/Cap: The decorative cover that encloses the lamp bulb socket.
- Harps: Metal arms that hold the lampshade. They usually attach to the socket assembly.
- Finial: A decorative knob that screws onto the top of the harp to secure the lampshade.
- Shade: The decorative cover that diffuses the light.
- Other Decorative Elements: These can include decorative caps, sleeves, or other ornamental pieces.
Disassembly Record: Documenting the Process
If you’ve taken a lamp apart, it’s a good idea to have taken pictures as you went. If not, don’t worry. As you begin reassembling a lamp, take a moment to look at how the parts fit together. Lay out all the components you have and try to group similar items. This helps in lamp parts identification.
Step-by-Step: Reassembling Your Lamp
Now, let’s get down to the actual process of putting your lamp back together. This is where a systematic approach is best.
Step 1: Building the Base and Riser Assembly
- Fixing the Lamp Base: If your lamp base came apart, start here. Often, the riser nipple screws into the bottom of the base. Make sure it’s screwed in tightly. If there’s a weighted insert inside the base, ensure it’s seated correctly.
- Threading the Cord: The electrical cord usually runs up through the lamp base and the riser. Gently feed the cord through the base and then up through the riser nipple. Make sure not to twist or pinch the cord.
- Adding Sections: If your lamp has multiple riser sections, screw them together, ensuring the cord passes smoothly through each one.
Step 2: Connecting the Socket and Switch
This is often the most intricate part of lamp assembly, particularly regarding lamp wiring.
- Attaching the Socket to the Riser: The lamp bulb socket assembly typically screws onto the top of the riser nipple. Make sure it’s secure but don’t overtighten, as you might strip the threads.
-
Wiring the Socket: This is a critical step in lamp wiring.
- Identify the Wires: The lamp cord has two wires. One is usually ribbed or has a stripe (the “hot” wire), and the other is smooth (the “neutral” wire).
- Prepare the Wires: If the ends of the wires are not already stripped, use your wire strippers to remove about half an inch of the insulation from each wire.
- Connect to Terminals: The lamp bulb socket will have two screw terminals. The smooth wire usually connects to the terminal that is silver-colored (or connected to the shell of the socket), and the ribbed wire connects to the terminal that is brass-colored (or connected to the center contact of the socket). If your socket has a third wire (ground), it’s typically green and connects to a green screw.
- Secure the Connections: Wrap the stripped wire around the screw terminal in a clockwise direction so that the screw tightens the wire when you turn it. Make sure no stray strands of wire are sticking out.
- Secure the Socket Housing: Place the socket housing or cap over the socket assembly. It usually screws or snaps into place. Ensure the wire is tucked neatly inside and not pinched.
-
Integrating the Switch: The switch is usually wired in line with the “hot” wire.
- Locate the Hot Wire: Identify which wire from the cord is the “hot” one (usually the ribbed one).
- Cut and Connect: You’ll need to cut the hot wire and connect the switch. Your switch will have two terminals. Connect one end of the hot wire to one terminal and the other end of the hot wire to the other terminal of the switch. Follow the specific instructions that came with your replacement switch if you are replacing lamp parts.
- Test the Switch: Ensure the switch operates smoothly and clicks into place.
Step 3: Adding the Harp and Shade
This part of lamp assembly is generally straightforward.
- Attaching the Harp: The harp usually has threaded feet that screw into fittings on the lamp bulb socket assembly. Make sure the harp is securely attached.
- Placing the Shade: Set the lampshade onto the harp. Ensure it sits level.
- Securing with the Finial: Screw the finial onto the top of the harp. Tighten it just enough to hold the shade firmly in place.
Step 4: Final Checks and Testing
Once everything is assembled, it’s time for the crucial final checks.
- Inspect Wiring: Visually inspect all your lamp wiring connections. Make sure no wires are exposed or frayed. Ensure all connections are secure.
- Cord Management: Make sure the lamp cord is not kinked or pinched anywhere.
- Stability Test: Gently try to rock the lamp. It should be stable and not wobble.
- Bulb Installation: Screw in the correct wattage light bulb.
- The Moment of Truth: Plug the lamp into a wall outlet and turn it on using the switch. If it doesn’t work, immediately unplug it and go back to lamp troubleshooting.
Lamp Troubleshooting: When Things Don’t Work
Even with careful assembly, sometimes a lamp might not work correctly. Here are some common issues and how to address them, which is vital for effective lamp troubleshooting.
Common Issues and Solutions
| Problem | Possible Cause | Solution |
|---|---|---|
| Lamp doesn’t turn on | 1. Bulb is burned out. | 1. Replace the light bulb. |
| 2. Lamp is not plugged in. | 2. Ensure the plug is firmly in the wall socket. | |
| 3. Faulty switch. | 3. Check the switch connections. If it’s a pull chain, ensure it’s fully pulled. Consider replacing lamp parts like the switch if it’s damaged. | |
| 4. Loose wire connection at the socket or switch. | 4. Unplug the lamp. Re-check and tighten all wire connections at the socket and switch. | |
| 5. Faulty lamp cord. | 5. Inspect the cord for damage. If damaged, perform lamp cord repair or replace the entire cord. | |
| 6. Problem with the outlet. | 6. Test the outlet with another device. If the outlet is the issue, you may need to consult an electrician. | |
| Lamp flickers | 1. Loose bulb in the socket. | 1. Tighten the bulb firmly. |
| 2. Loose wire connection. | 2. Unplug the lamp and check wire connections at the socket and switch. | |
| 3. Incompatible dimmer or bulb. | 3. If using a dimmer, ensure it’s compatible with your bulb type. Use the correct wattage bulb. | |
| Lamp base is wobbly | 1. Riser nipple not fully screwed in. | 1. Tighten the riser nipple into the base and any connecting sections. |
| 2. Loose screws or connections within the base. | 2. Inspect the base for any loose fasteners. Tighten them securely. | |
| 3. Uneven floor. | 3. Try placing a shim under the base to level it. | |
| Socket won’t hold bulb | 1. Damaged socket threads. | 1. You may need to replace the lamp bulb socket. |
| 2. Bulb not screwed in straight. | 2. Ensure the bulb is screwed in straight and snug. | |
| Pull chain is stuck or broke | 1. Internal mechanism damage. | 1. This usually requires replacing lamp parts, specifically the pull chain switch assembly. |
Replacing Lamp Parts: When a Component Fails
Sometimes, lamp repair involves more than just putting things back together; it means replacing lamp parts. This is common if a component is damaged or worn out.
Common Parts to Replace
- Lamp Cord: If the cord is frayed, cut, or damaged, it needs replacement. This involves safely disconnecting the old cord and wiring in a new one. This is a crucial aspect of lamp cord repair.
- Lamp Bulb Socket: If the socket is cracked, the threads are stripped, or the connections are faulty, it’s best to replace it.
- Switch: Switches can wear out or break. Replacing a switch is a common lamp repair task.
- Harp: If the harp is bent or broken, you can usually buy a new one to fit your lamp.
How to Replace a Lamp Cord
Replacing a lamp cord is a common lamp repair that involves lamp wiring.
- Safety First: Unplug the lamp.
- Access the Cord: You’ll typically need to access where the cord enters the lamp base. This might involve unscrewing the base or removing a cover.
- Disconnect Old Cord: Carefully note how the old cord wires are connected to the switch and socket. Disconnect them. For lamp cord repair, you’ll be making new connections.
- Thread New Cord: Feed the new lamp cord through the lamp base and up to the socket, just like you did during initial assembly.
- Wire New Cord: Connect the new cord to the switch and the lamp bulb socket according to the lamp wiring diagram or by referencing how the old one was connected. Ensure smooth wire connects to the neutral side and ribbed wire connects to the hot side.
- Secure and Test: Secure the cord to prevent it from being pulled out. Test the lamp.
Advanced Lamp Repair and Customization
Beyond basic assembly, you might want to tackle more complex lamp repair or even customize your lamp.
Upgrading Components
- New Switch: You can upgrade a basic rotary switch to a dimmer switch or a three-way switch for more lighting control.
- New Socket: If you’re replacing lamp parts, consider upgrading to a socket with a built-in USB port or a more decorative style.
- Decorative Cord: You can even use fabric-covered or colored cords to add a stylistic touch.
Restoring an Antique Lamp
Antique lamps often require delicate handling. You might need to:
- Clean Components: Carefully clean metal parts with appropriate polishes.
- Rewire: Old wiring can be brittle and unsafe. Full lamp wiring replacement is often necessary.
- Find Replacement Parts: Lamp parts identification can be challenging for vintage lamps. You might need to search specialty stores or online marketplaces.
Frequently Asked Questions (FAQ)
Q1: Is it safe to repair my own lamp?
A1: Yes, for most common repairs, it is safe as long as you always unplug the lamp before working on it and follow safety precautions, especially when dealing with lamp wiring. If you are unsure, seek professional help.
Q2: Where can I buy replacement lamp parts?
A2: You can find replacement parts at hardware stores, lighting stores, craft stores, and online retailers like Amazon, eBay, and specialty lamp supply websites. Knowing your lamp parts identification is helpful when shopping.
Q3: My lamp still doesn’t work after reassembling it. What else could be wrong?
A3: Double-check all your lamp wiring connections to ensure they are secure and correctly placed. Make sure the bulb is good and the outlet is working. If the problem persists, you may have a break in the lamp cord or a faulty internal component requiring further lamp troubleshooting.
Q4: How do I know if I need to do lamp cord repair or replace the whole cord?
A4: If the cord is cut, frayed, or has exposed wires, it’s safer to replace the entire cord. Minor nicks might be repairable with electrical tape, but it’s generally best practice to replace a damaged cord for safety.
Q5: What is the most common mistake people make when reassembling a lamp?
A5: The most common mistakes involve incorrect lamp wiring, leading to the lamp not working or, in rare cases, a safety hazard. Not ensuring secure connections or mixing up the hot and neutral wires are frequent errors. Another is pinching or damaging the cord during assembly.
Putting a lamp back together might seem daunting, but with this guide, you have the knowledge to tackle it. Remember to work carefully, prioritize safety, and enjoy your successfully repaired or reassembled lamp!