
Image Source: www.myprojectorlamps.com
How To Replace Projector Lamp: Step-by-Step
Can you replace a projector lamp yourself? Yes, most projector lamp replacement tasks are straightforward and can be done by the user with basic tools and careful attention to the steps. This guide will walk you through the entire process of projector bulb replacement, from identifying the need for a new lamp to safely installing it and ensuring your projector is ready for action.
A dim or flickering picture, or a message on your projector screen indicating the lamp is nearing the end of its life, are common signs that it’s time for a changing projector bulb. Projector lamps have a finite projector lamp lifespan, typically ranging from 2,000 to 6,000 hours, depending on the model and usage settings. Ignoring these signs can lead to a complete lamp failure and potentially damage other projector components.
Why Replace Your Projector Lamp?
Over time, the gas inside a projector lamp degrades, causing its light output to diminish. This affects the clarity and vibrancy of your projected images. A new lamp restores the projector’s optimal performance, ensuring bright, crisp visuals for presentations, movies, or gaming.
Key reasons to replace your projector lamp include:
- Dimming Picture: The most obvious sign is a noticeable decrease in image brightness.
- Color Shifts: Colors may appear washed out or inaccurate.
- Flickering Image: The light output can become inconsistent, causing the image to flicker.
- Lamp Warning Indicator: Most projectors have an on-screen message or an indicator light signaling the lamp’s approaching end-of-life.
- Complete Lamp Failure: The projector may refuse to turn on or display an error message indicating a blown lamp.
Getting Ready for the Projector Lamp Installation
Before you begin the projector lamp installation, proper preparation is crucial. This ensures safety and prevents damage to your projector.
1. Identify Your Projector Model and Lamp Type
This is the most critical first step. You need to know the exact make and model of your projector. This information is usually found on a label on the bottom or back of the projector. Once you have this, you can search for the specific replacement lamp.
Projector Lamp Types:
There are several common types of projector lamps, each with its own characteristics and applications:
- UHP (Ultra High Performance) Lamps: These are the most common type, offering a good balance of brightness, lifespan, and cost. They are found in a wide range of home and business projectors.
- Metal Halide Lamps: Less common in modern projectors, these were used in older models and offer high brightness but shorter lifespans and higher heat output.
- Xenon Lamps: Primarily used in high-end cinema projectors, these provide exceptional brightness and color accuracy but are very expensive and have shorter lifespans.
- LED Lamps: While not a “lamp” in the traditional sense, many modern projectors use LED light sources, which have extremely long lifespans (20,000+ hours) and are maintenance-free. This guide focuses on the traditional bulb replacement.
Determining Projector Lamp Compatibility:
- Consult Your Projector Manual: The user manual is the definitive source for compatible lamp part numbers.
- Search Online: Use your projector’s make and model to search reputable projector lamp retailers.
- Examine the Old Lamp: If you’ve already removed the old lamp, it often has the part number printed on it.
2. Purchase the Correct Replacement Lamp
Once you know the required lamp part number, you can shop for a replacement. Consider the following factors when purchasing:
-
Genuine vs. Aftermarket:
- Genuine Lamps: These are manufactured by the projector’s original equipment manufacturer (OEM). They typically offer the best performance, reliability, and warranty, but they come with a higher projector lamp cost.
- Aftermarket Lamps: These are made by third-party manufacturers. They can be significantly cheaper, but quality can vary widely. Some offer comparable performance, while others may have lower brightness, shorter lifespans, or poorer color accuracy. Always buy from reputable aftermarket suppliers with good reviews and return policies.
-
Projector Lamp Wattage: The replacement lamp must match the projector lamp wattage of the original. Using a lamp with a different wattage can damage your projector or result in poor image quality.
-
Projector Lamp Brightness: Lamps are often rated in lumens. While you’re replacing the lamp, it’s unlikely you’ll significantly alter the brightness unless you specifically seek a higher-lumen compatible lamp (which can sometimes impact lifespan or require adjustments). Stick to the original specifications for optimal performance.
3. Gather Your Tools
You’ll typically need only a few simple tools:
- Screwdriver: Most projector lamp covers are secured with a Phillips head screw.
- Soft Cloth or Gloves: To avoid leaving fingerprints on the new lamp.
- Your Projector’s Manual: For specific instructions related to your model.
4. Safety First: Power Down and Unplug
This is non-negotiable.
- Turn Off the Projector: Use the power button on the projector itself, not just the remote.
- Unplug the Power Cord: Disconnect the projector from the electrical outlet.
- Allow for Cooling: Projector lamps generate significant heat. Wait at least 15-30 minutes for the projector to cool down completely before attempting to open it. Touching a hot lamp can cause burns and potentially damage the lamp or your projector.
Step-by-Step Projector Lamp Replacement Procedure
This section details the actual projector lamp replacement process. Always refer to your specific projector’s manual if you encounter any deviations.
Step 1: Locate and Open the Lamp Housing
Projectors have a dedicated compartment for the lamp, usually accessed via a removable cover.
- Find the Lamp Cover: Look for a panel on the top, side, or bottom of your projector. It’s often secured by a single screw.
- Remove the Screw: Use your Phillips head screwdriver to carefully remove the screw holding the lamp cover in place. Keep the screw in a safe place so you don’t lose it.
- Open the Cover: Gently lift or slide the cover off. Some covers may require you to press a release tab.
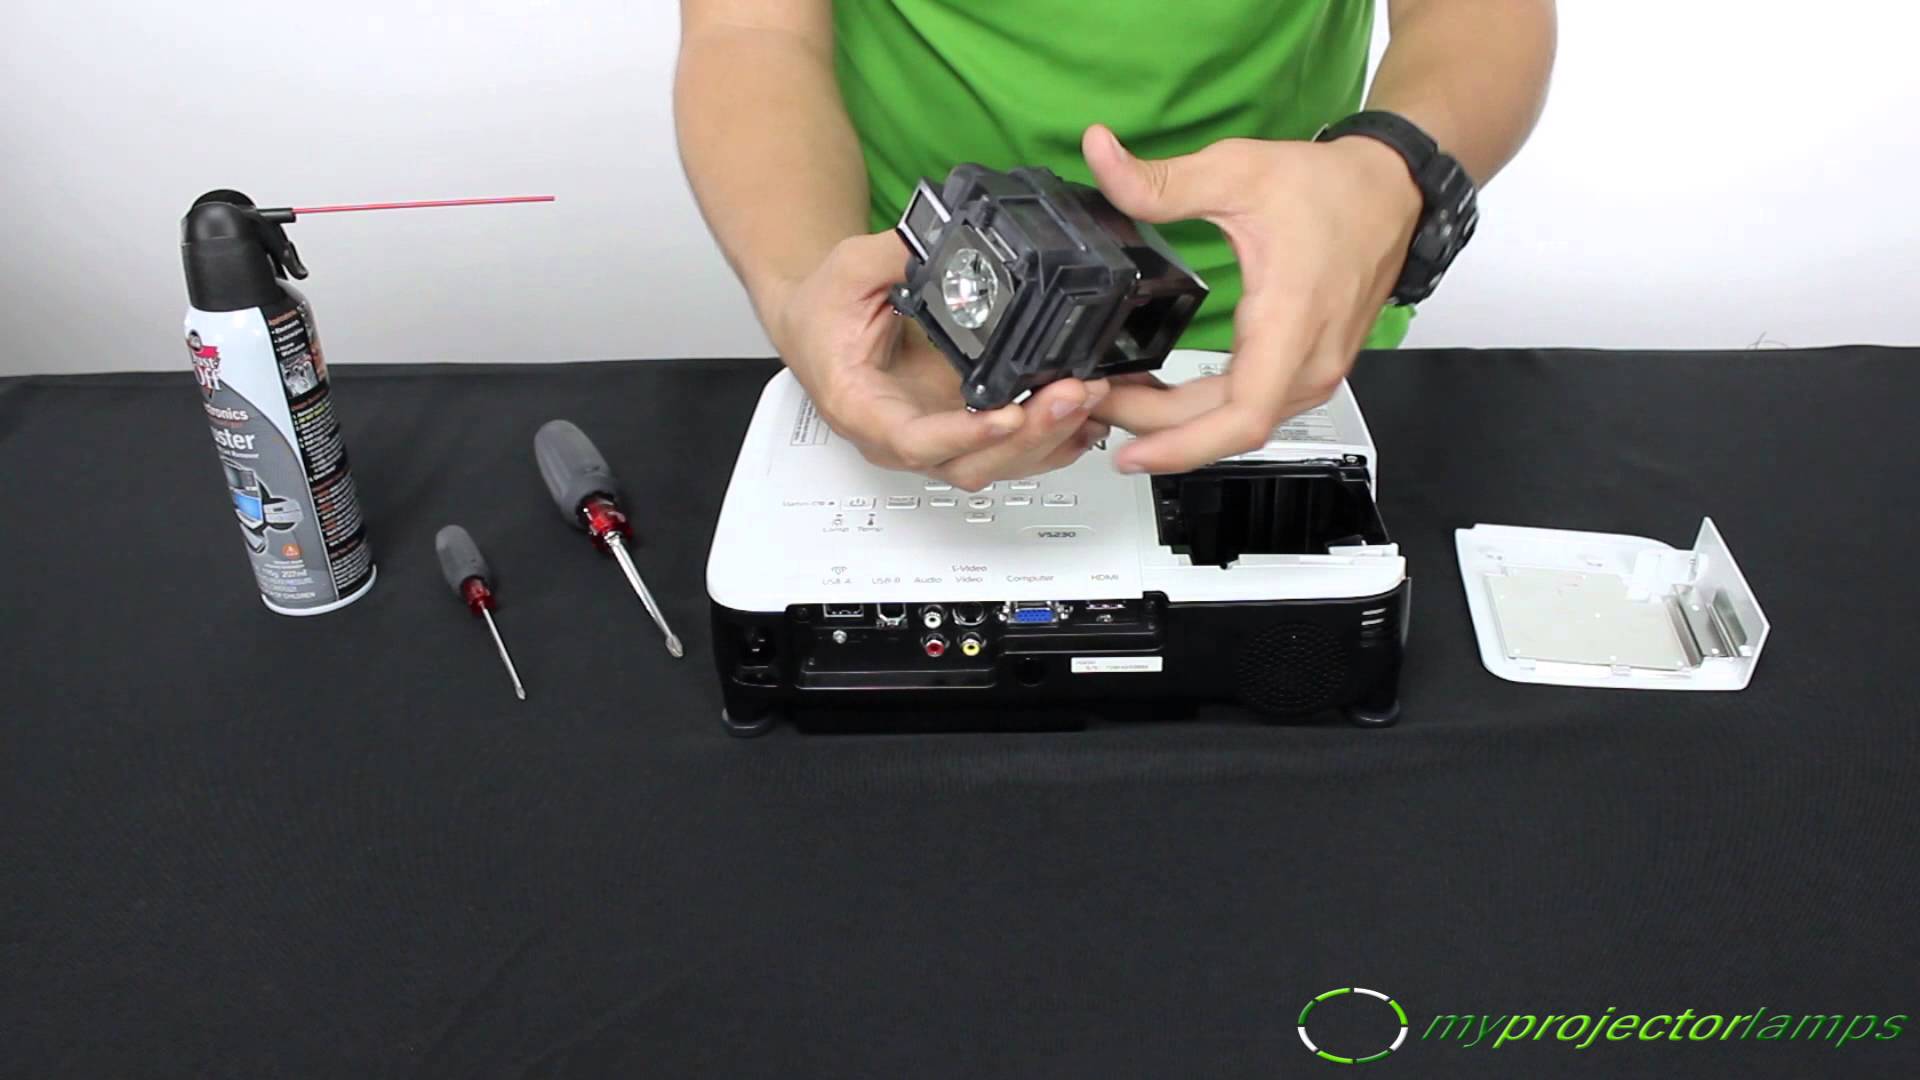
Step 2: Remove the Old Projector Lamp
The lamp is typically housed within a module or cage.
- Locate Securing Clips or Screws: The lamp module itself might be held in place by clips or a couple of small screws. Some projectors have a handle or lever to release the lamp module.
- Release the Lamp Module: If there are clips, gently push them away from the lamp module to release it. If there are screws, carefully unscrew them.
- Lift Out the Lamp Module: Once released, the lamp module should slide out or lift out of the projector. Handle it carefully. Do not touch the glass part of the old bulb with bare fingers.
Step 3: Install the New Projector Lamp
This is where the new projector lamp installation takes place.
- Handle the New Lamp Carefully: Remove the new lamp from its protective packaging. Avoid touching the glass bulb with your bare hands. Fingerprints can leave oils that, when heated, can cause the bulb to overheat and potentially shatter. Use the soft cloth or gloves provided, or hold it by the plastic or metal housing.
- Align the New Lamp Module: Carefully insert the new lamp module into the projector, aligning it with the connectors or mounting points. It should fit snugly and only go in one way. Do not force it.
- Secure the New Lamp Module: If the module was secured by screws or clips, re-fasten them now. Ensure the lamp module is seated correctly.
Step 4: Close the Lamp Housing
- Replace the Lamp Cover: Position the lamp cover back onto the projector.
- Re-insert the Screw: Secure the cover by re-inserting and tightening the screw you removed earlier.
Step 5: Power On and Reset the Lamp Timer
After the new lamp is installed and the housing is closed, it’s time to test.
- Plug In the Projector: Reconnect the power cord.
- Turn On the Projector: Press the power button. The projector should boot up normally, and the image should be bright and clear.
- Reset the Lamp Timer: Most projectors have an internal timer that tracks lamp usage. This timer needs to be reset to inform the projector that a new lamp has been installed. The method for resetting the timer varies significantly by projector model.
- Check Your Manual: Your projector’s manual will provide the exact procedure.
- Common Reset Methods: This often involves navigating through the projector’s on-screen menu system (usually under “Setup,” “Maintenance,” or “Lamp Settings”) and selecting an option like “Reset Lamp Timer” or “Replace Lamp.” Sometimes, it involves holding down a specific button on the projector for a set duration while it’s powering on or off.
Why is resetting the lamp timer important?
The timer is linked to the projector’s internal fan and cooling systems. When the timer reaches its limit, the projector will often prevent itself from turning on to protect itself from overheating or lamp failure. Resetting it tells the projector that a new lamp is installed, allowing the cooling systems to operate based on the new lamp’s expected lifespan.
Projector Lamp Maintenance and Care
Proper projector lamp maintenance can help prolong its life and ensure optimal performance.
- Avoid Frequent On/Off Cycles: Turning the projector on and off repeatedly can stress the lamp. Allow it to cool down completely between uses if possible.
- Use Eco Mode: Many projectors have an “Eco Mode” or “Economy Mode” that reduces lamp brightness. This not only saves energy but also extends the projector lamp lifespan. The trade-off is slightly reduced brightness.
- Ensure Proper Ventilation: Keep the projector’s air vents clear of dust and obstructions. Proper airflow is crucial for cooling the lamp and other internal components. Regularly clean the projector’s air filters according to the manufacturer’s instructions.
- Avoid Moving While Hot: Never move a projector while it’s on or has just been turned off. The lamp is hot and delicate, and movement can cause damage.
- Store Properly: If you need to store the projector for an extended period, allow it to cool down completely before packing it.
Troubleshooting Common Issues
Sometimes, even after a successful projector lamp replacement, you might encounter problems.
- Projector Won’t Turn On:
- Double-check that the power cord is securely plugged in.
- Ensure the lamp cover is properly closed and secured, as many projectors have a safety switch that prevents operation if the cover is open.
- Verify that the new lamp module is seated correctly.
- Confirm the lamp timer has been reset.
- Try a different power outlet.
- No Image or Dim Image:
- Make sure the correct input source is selected on the projector.
- Ensure the new lamp is the correct type and wattage.
- The new lamp itself might be faulty (though rare with reputable suppliers).
- Lamp Warning Light Still On:
- The lamp timer may not have been reset correctly. Try the reset procedure again.
- If the warning persists, there might be another issue with the projector, or the new lamp may be incompatible or defective.
Projector Lamp Cost Considerations
The projector lamp cost can vary significantly.
- Genuine OEM Lamps: Typically range from $150 to $400 or more, depending on the projector model.
- Aftermarket Lamps: Can range from $50 to $200. Cheaper options are often tempting but carry higher risks of poor quality and reduced lifespan.
When comparing prices, always factor in the warranty offered by the seller and the reputation of the manufacturer or supplier. A slightly higher initial cost for a genuine or reputable aftermarket lamp can save you money and headaches in the long run.
Projector Lamp Brightness and Lumens
Projector lamp brightness is measured in lumens. When replacing a lamp, aim to match the original lumen output. If you choose a lamp with a significantly different lumen rating (even if compatible), it can affect:
- Image Quality: Too bright a lamp in a projector designed for lower lumens can cause overheating or premature failure.
- Color Accuracy: Some projectors calibrate their color settings based on a specific lamp’s lumen output.
- Fan Speed: The projector’s fan speed is often tied to the expected heat output of the lamp.
Frequently Asked Questions (FAQ)
Q1: How long does a projector lamp typically last?
A1: The projector lamp lifespan varies. Standard lamps usually last between 2,000 and 6,000 hours in normal mode. In eco-mode, this can extend to 8,000 hours or more. LED or laser projectors have much longer lifespans, often 20,000 hours or more.
Q2: Can I use a different wattage lamp than the original?
A2: It is strongly advised against using a lamp with a different projector lamp wattage. Using a higher wattage can damage your projector’s electronics or cause overheating, while a lower wattage will result in a dimmer picture and potentially not work at all. Always match the original wattage.
Q3: What is the difference between a bare lamp and a lamp module?
A3: A “bare lamp” is just the glass bulb itself, without any housing. A “lamp module” includes the bulb mounted in a protective cage with connectors, making it easier to install. Most users opt for lamp modules for simpler projector lamp installation.
Q4: How do I know if my projector lamp needs replacing?
A4: Signs include a dimming picture, noticeable color shifts, flickering, or a warning message or light on the projector indicating the lamp is at the end of its projector lamp lifespan.
Q5: Is it safe to touch the new projector bulb?
A5: No, it is not safe to touch the glass part of a new projector bulb with bare fingers. The oils from your skin can cause hot spots on the bulb, leading to premature failure or even shattering. Always use gloves or a soft cloth.
Q6: Do I need to reset the lamp timer after replacing the bulb?
A6: Yes, for most projectors, you must reset the lamp timer after changing projector bulb. This tells the projector that a new lamp has been installed and allows the cooling system and other functions to operate correctly. Refer to your projector’s manual for the specific reset procedure.
By following these steps carefully, you can successfully replace your projector lamp and enjoy bright, clear images from your projector once again. Remember to prioritize safety, consult your manual, and purchase the correct replacement parts.