
Can you rewire a floor lamp yourself? Yes, you absolutely can rewire a floor lamp yourself with a few basic tools, some patience, and by following safety guidelines closely. This guide will walk you through the process of rewiring a lamp from start to finish, addressing common issues like lamp cord replacement, lamp socket repair, and plug replacement. By the end, you’ll be able to bring your favorite floor lamp back to life, ensuring it’s safe and functional.
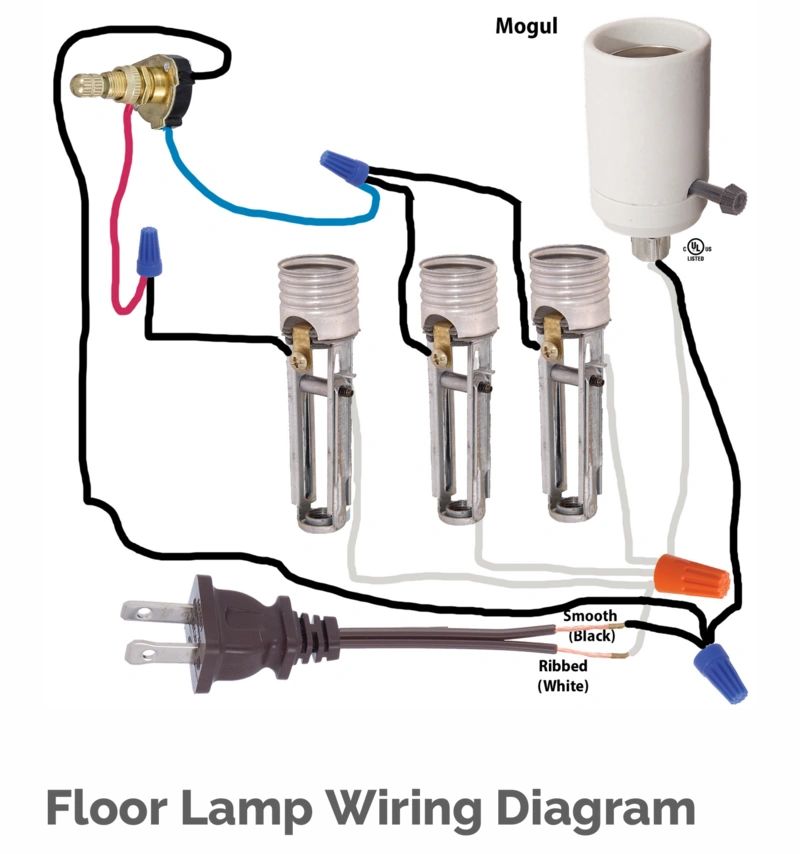
Image Source: img1.wsimg.com
Why Rewire Your Floor Lamp?
Over time, electrical cords can become frayed, brittle, or damaged. This poses a serious fire hazard and an electrocution risk. Fixing a faulty lamp by replacing its internal wiring is often more cost-effective and rewarding than buying a new one. It’s a great way to extend the life of a beloved heirloom or a stylish piece of decor. Common reasons to consider replacing lamp parts, specifically the cord and socket, include:
- Visible Damage: Frayed, cracked, or exposed wires are a clear sign the cord needs immediate replacement.
- Old or Brittle Cord: Older lamps, especially those from the mid-20th century, often have outdated and degraded wiring.
- Intermittent Power: If the lamp flickers or only works when the cord is wiggled, the internal connections are likely failing.
- Malfunctioning Switch: A worn-out or broken lamp switch repair might involve rewiring the entire lamp to ensure proper function.
- Socket Issues: A loose or corroded socket can prevent the bulb from working or create a fire risk.
Safety First! Essential Precautions
Before you begin, prioritize electrical cord safety. Electricity can be dangerous if not handled with respect. Always follow these precautions:
- Unplug the Lamp: This is the most crucial step. Ensure the lamp is completely disconnected from the power outlet.
- Work in a Dry Area: Avoid working in damp or wet conditions. Ensure your hands and the workspace are dry.
- Use Insulated Tools: Tools with rubber or plastic grips help prevent accidental contact with live wires.
- Turn Off Power at the Breaker: For extra safety, you can turn off the circuit breaker that controls the outlet you’ll be using.
- Inspect New Parts: Ensure your replacement cord, plug, and any other components are in good condition and rated for the lamp’s wattage.
- If Unsure, Seek Professional Help: If you’re uncomfortable at any point, it’s always best to consult a qualified electrician.
Gathering Your Tools and Materials
To successfully rewire your floor lamp, you’ll need a few essential items. Having everything ready before you start will make the process smoother.
Tools:
- Wire strippers/cutters
- Screwdriver set (Phillips and flathead)
- Pliers (needle-nose are often helpful)
- Voltage tester (non-contact is easiest)
- Lightweight lubricant (optional, for tight screws)
- Small container or magnetic tray for screws
Materials:
- Replacement lamp cord (choose a cord with a gauge appropriate for your lamp’s wattage – typically 18-gauge for most floor lamps)
- New plug (if the old one is damaged or you’re replacing the entire cord)
- Replacement socket (if your current one is damaged or corroded)
- Wire nuts or terminal connectors
- Electrical tape
- New light bulb (rated for your lamp)
Deciphering the Lamp Wiring Diagram
While every lamp is slightly different, most floor lamps follow a basic lamp wiring diagram. Understanding this can demystify the process. The diagram shows how electricity flows from the plug, through the cord, to the switch, then to the socket, and finally to the bulb.
Here’s a simplified breakdown:
- Plug: The power enters through the plug.
- Cord: Two wires run from the plug.
- Hot Wire (usually black or red): Carries the electrical current.
- Neutral Wire (usually white or gray): Completes the circuit, returning the current.
- Switch: The hot wire typically connects to the switch. The switch acts as a gate, interrupting the flow of current when turned off.
- Socket: The hot wire, after passing through the switch, connects to one terminal of the socket. The neutral wire connects to the other terminal.
- Bulb: When a bulb is inserted, it bridges the gap between the two socket terminals, allowing electricity to flow and the bulb to light up.
You can often find a lamp wiring diagram specific to your lamp model online, or you can sketch one out by carefully observing how the current wires are connected before you remove them.
Understanding Cord Types
When choosing a replacement lamp cord, you’ll encounter different types. For most floor lamps, a 18/2 SJT cord is suitable. The “18” refers to the gauge (thickness) of the wire, and the “2” indicates two conductors (hot and neutral). “SJT” denotes the type of insulation and jacketing, suitable for general use. Ensure the cord is rated for the lamp’s wattage to prevent overheating.
Step-by-Step Guide to Rewiring Your Floor Lamp
Let’s get started! Follow these steps carefully to rewire your floor lamp safely and effectively.
Step 1: Disassembly and Inspection
- Unplug the Lamp: Double-check it’s unplugged.
- Remove the Lampshade and Bulb: Set them aside safely.
- Access the Wiring: This usually involves unscrewing the base, stem, or a decorative cover to expose the internal wiring and the socket. The exact location will depend on your lamp’s design.
- Document Existing Connections: Before disconnecting anything, take clear photos or sketch a lamp wiring diagram of how the wires are currently connected to the switch, socket, and plug. This is your blueprint.
- Inspect Components: Examine the socket for cracks or corrosion. Check the switch for loose parts or burnt contacts. Note any damage to the lamp’s internal stem or housing where the cord passes through.
Step 2: Removing the Old Cord
- Disconnect the Old Cord:
- At the Plug: If you’re replacing the plug, carefully unscrew the old plug’s cover. You’ll see the hot and neutral wires attached to two prongs. Note which wire goes to which prong (the wider prong usually corresponds to the neutral wire, and the narrower prong to the hot wire). Loosen the terminal screws and remove the wires.
- At the Socket: Unscrew the socket shell to expose the terminals. You’ll see where the hot and neutral wires are connected. Loosen the terminal screws and detach the wires.
- At the Switch (if applicable): If the switch is integrated into the socket assembly or accessible, disconnect the wires from the switch terminals as well.
- Feed the Old Cord Out: Carefully pull the old cord out of the lamp’s base, stem, and any guides or strain reliefs.
Step 3: Preparing the New Cord and Plug
- Attach the New Plug (if replacing):
- Strip the Cord: Using wire strippers, carefully remove about 1 to 1.5 inches of the outer jacket from the end of the new cord.
- Separate Wires: Gently separate the two insulated wires (hot and neutral) about an inch from the jacket’s edge.
- Strip Individual Wires: Using wire strippers, remove about 1/2 inch of insulation from the end of each individual wire. Twist the exposed strands together tightly.
- Connect to the New Plug:
- Identify the correct terminals on the new plug. Often, there’s a brass screw for the hot wire and a silver screw for the neutral wire. The neutral wire is typically connected to the wider blade of the plug.
- Loop the stripped end of the hot wire around the brass screw and tighten securely.
- Loop the stripped end of the neutral wire around the silver screw and tighten securely.
- Ensure no stray wire strands are sticking out.
- Reassemble the plug cover.
- Prepare the Other End of the Cord:
- Feed the Cord: Thread the new cord through the lamp’s base, stem, and any guides, just like the old one.
- Strip the Wires: At the socket end, carefully remove the outer jacket as you did for the plug. Then, strip about 1/2 inch of insulation from the ends of the hot and neutral wires. Twist the strands together tightly.
Step 4: Connecting to the Socket
This is where your lamp socket repair or replacement comes into play.
- If Replacing the Socket:
- Identify the terminal screws on the new socket. Usually, there’s a terminal for the hot wire and one for the neutral. The hot wire typically connects to the center terminal of the socket (where the bulb’s center contact touches). The neutral wire connects to the side terminal (where the bulb’s threaded base touches).
- Loosen the terminal screws.
- Loop the stripped hot wire around the appropriate terminal screw and tighten.
- Loop the stripped neutral wire around the other terminal screw and tighten.
- Ensure no bare wire is exposed beyond the screw terminal.
- Carefully reassemble the socket shell.
- If Reusing the Socket:
- Locate the terminal screws where the old wires were connected.
- Ensure the terminals are clean and free of corrosion. If corroded, you can use a small wire brush or fine-grit sandpaper to clean them.
- Connect the new hot wire to the appropriate terminal and the neutral wire to the other, mirroring the original connections. Tighten the screws securely.
Step 5: Connecting to the Switch (if separate)
If your lamp has a separate inline switch or a switch located in the base, you’ll need to connect the cord wires to it.
- Identify Switch Terminals: Switches usually have two terminals where wires connect.
- Connect Hot Wire: The hot wire from the plug typically goes into the switch first. Connect it to one of the switch terminals.
- Connect Switched Wire: A wire then runs from the other switch terminal to the hot terminal of the socket.
- Connect Neutral Wire: The neutral wire from the plug usually bypasses the switch and goes directly to the neutral terminal of the socket.
- Use Wire Nuts: If you’re splicing wires (e.g., if the cord connects to internal wiring), use appropriately sized wire nuts to secure the connections. Twist the wire nut clockwise onto the joined wires. Ensure no bare wire is exposed below the wire nut.
Step 6: Reassembly and Testing
- Secure the Cord: Ensure the cord is properly seated and not pinched. Some lamps have a cord clamp or strain relief at the base to prevent the cord from being pulled out. Secure this if present.
- Tidy Up Wiring: Neatly arrange the wires within the lamp’s base or housing, ensuring they don’t rub against sharp edges.
- Reassemble the Lamp: Carefully put all the pieces back together in reverse order of disassembly. Screw the base back on, reattach any decorative elements, and place the socket back into its housing.
- Install New Bulb: Screw in a new light bulb of the correct wattage.
- Test the Lamp:
- Plug the lamp into a working outlet.
- Turn on the switch.
- If the lamp works, congratulations!
- If it doesn’t, immediately unplug it and recheck all your connections, referring to your photos or diagram. A loose connection is the most common culprit.
Troubleshooting Common Issues
Even with careful work, sometimes things don’t go as planned. Here are common problems and how to address them:
- Lamp Doesn’t Turn On:
- Check the Plug: Is it firmly seated in the outlet?
- Check the Bulb: Is it screwed in tightly? Is it a working bulb?
- Check All Connections: Revisit your wiring at the plug, switch, and socket. Ensure wires are securely attached to terminals and wire nuts are tight.
- Check the Switch: Is it functioning correctly? You might need to test it with a voltage tester if you have one.
- Lamp Flickers:
- Loose Connection: This is the most likely cause. Recheck all terminal screws and wire nut connections.
- Damaged Cord: Inspect the entire length of the new cord for any nicks or damage.
- Lamp Smells Like Burning Plastic:
- Improper Wire Gauge: The cord wires might be too thin for the lamp’s wattage, causing them to overheat. Ensure you used the correct gauge cord.
- Loose Connection: Overheating can occur at loose connections.
- Faulty Socket or Switch: The socket or switch itself might be internally faulty.
Advanced DIY Lamp Repair
Beyond basic rewiring, you might encounter other issues requiring replacing lamp parts or more intricate diy lamp repair.
Lamp Socket Repair and Replacement
If your socket is cracked, corroded, or the screws are stripped, replacement is usually the best course of action. Modern lamp sockets are readily available and inexpensive at hardware stores or online. The process involves carefully detaching the wires from the old socket and connecting them to the new one, as described in Step 4. Always ensure you match the hot and neutral connections correctly.
Lamp Switch Repair and Replacement
There are several types of switches used in floor lamps:
- Rotary Switches: Often found near the socket.
- Inline Cords Switches: These are typically located partway down the cord.
- Foot Switches/Pedal Switches: Used for convenience.
- 3-Way Switches: For lamps with multiple brightness settings.
If a switch fails, you can usually replace it. For inline switches, you’ll cut the cord and wire in the new switch, using wire nuts to connect the cord wires to the switch terminals. For other types, you’ll typically access them via the lamp’s base or stem and reconnect the wires accordingly.
Plug Replacement
If the original plug is damaged, broken, or has faulty internal connections, replacing it is straightforward. This is covered in Step 3. Always ensure the new plug is rated for the lamp’s use and that the connections are secure. This is crucial for electrical cord safety.
Maintaining Your Rewired Lamp
Once your lamp is safely rewired and functioning beautifully, a little maintenance can go a long way:
- Regular Inspection: Periodically check the cord and plug for any signs of wear or damage.
- Avoid Harsh Bending: Don’t bend the cord sharply, especially near the plug and socket.
- Keep it Clean: Dust and debris can accumulate and potentially interfere with electrical components.
Frequently Asked Questions (FAQ)
Q1: How do I know what gauge wire to use for my lamp cord replacement?
A1: For most floor lamps, 18-gauge wire is sufficient. However, if your lamp has a high wattage bulb or a powerful motor (like a fan lamp), you might need thicker wire, such as 16-gauge. Check the lamp’s original specifications or consult an electrician if you’re unsure.
Q2: My lamp has a three-prong plug. Can I replace it with a two-prong plug?
A2: It’s generally not recommended to replace a three-prong plug with a two-prong plug unless you are absolutely certain the lamp is double-insulated and does not require grounding. A three-prong plug indicates a grounding wire, which provides an important safety feature. If the original plug had three prongs, try to find a replacement three-prong plug.
Q3: What’s the difference between the hot and neutral wires?
A3: The hot wire carries the electrical current from the power source to the lamp. The neutral wire completes the circuit by carrying the current back to the power source. It’s crucial to connect them correctly to the corresponding terminals in the socket and plug for the lamp to function and for safety.
Q4: My lamp still doesn’t work after rewiring. What should I do?
A4: Unplug the lamp immediately. Double-check all your connections. Ensure wires are stripped properly, securely attached to terminals, and wire nuts are tight. Verify the switch is functioning and correctly wired. If you’ve checked everything and it still doesn’t work, there might be a hidden fault within the lamp’s internal structure or a faulty component you haven’t identified. At this point, it’s best to seek assistance from a qualified electrician.
Q5: How often should I check my lamp’s wiring?
A5: It’s a good practice to visually inspect your lamp’s cord and plug every 6-12 months. Look for any signs of fraying, cracking, or damage. If you notice any issues, it’s time to consider rewiring or replacing the cord.
By following this comprehensive guide, you can confidently tackle the task of rewiring a floor lamp and ensure your lighting fixtures are both beautiful and safe. Happy DIYing!