
Image Source: laineandlayne.com
How To Turn A Vase Into A Lamp: DIY Guide
Can you turn a vase into a lamp? Yes, you absolutely can transform a beautiful vase into a stylish and functional lamp! This DIY lamp conversion project allows you to repurpose an existing piece, adding a personal touch to your home decor. Whether you have a vintage ceramic piece, a modern glass vessel, or even a unique bottle, this guide will walk you through the process of creating your very own vase to table lamp.
Turning a vase into a lamp is a rewarding DIY project that allows you to showcase a favorite decorative item while adding ambient lighting to your space. This is a fantastic way to create a unique vase lighting project and a truly bespoke repurpose vase lamp. We’ll cover everything from selecting the right vase and lamp kit to the step-by-step assembly for a successful DIY lamp conversion. This guide is designed to be accessible, even if you’re new to DIY projects, ensuring you can confidently complete your upcycled vase lighting creation.
Choosing the Perfect Vase for Your Lamp
The foundation of your new lamp is the vase itself. Not all vases are created equal when it comes to lamp conversion. Here’s what to consider:
-
Material: Vases come in various materials like ceramic, glass, porcelain, metal, and even wood.
- Ceramic Lamp Conversion: Ceramic vases are excellent choices. They are sturdy, often have beautiful glazes, and are relatively easy to drill through if needed.
- Glass Vase Lamp Tutorial: Glass vases offer a different aesthetic, allowing light to diffuse through them, creating a soft glow. Be cautious when drilling glass, as it can be more fragile.
- Bottle Lamp Conversion: Bottles, especially vintage ones, can make unique lamps. This often involves different methods for wiring due to the narrow opening.
-
Stability: The vase must be stable enough to support a lampshade and bulb. A wide base is generally more stable than a narrow one. Test its balance before you begin.
-
Opening Size: Consider the size of the opening at the top. This will influence the type of lamp harp and finial you can use, and how easily you can access the inside for wiring.
-
Design and Aesthetics: Does the vase’s shape, color, and pattern complement your existing decor? Think about the overall look you want to achieve.
-
Weight: A heavier vase will be more stable, especially if you plan on using a larger or heavier lampshade.
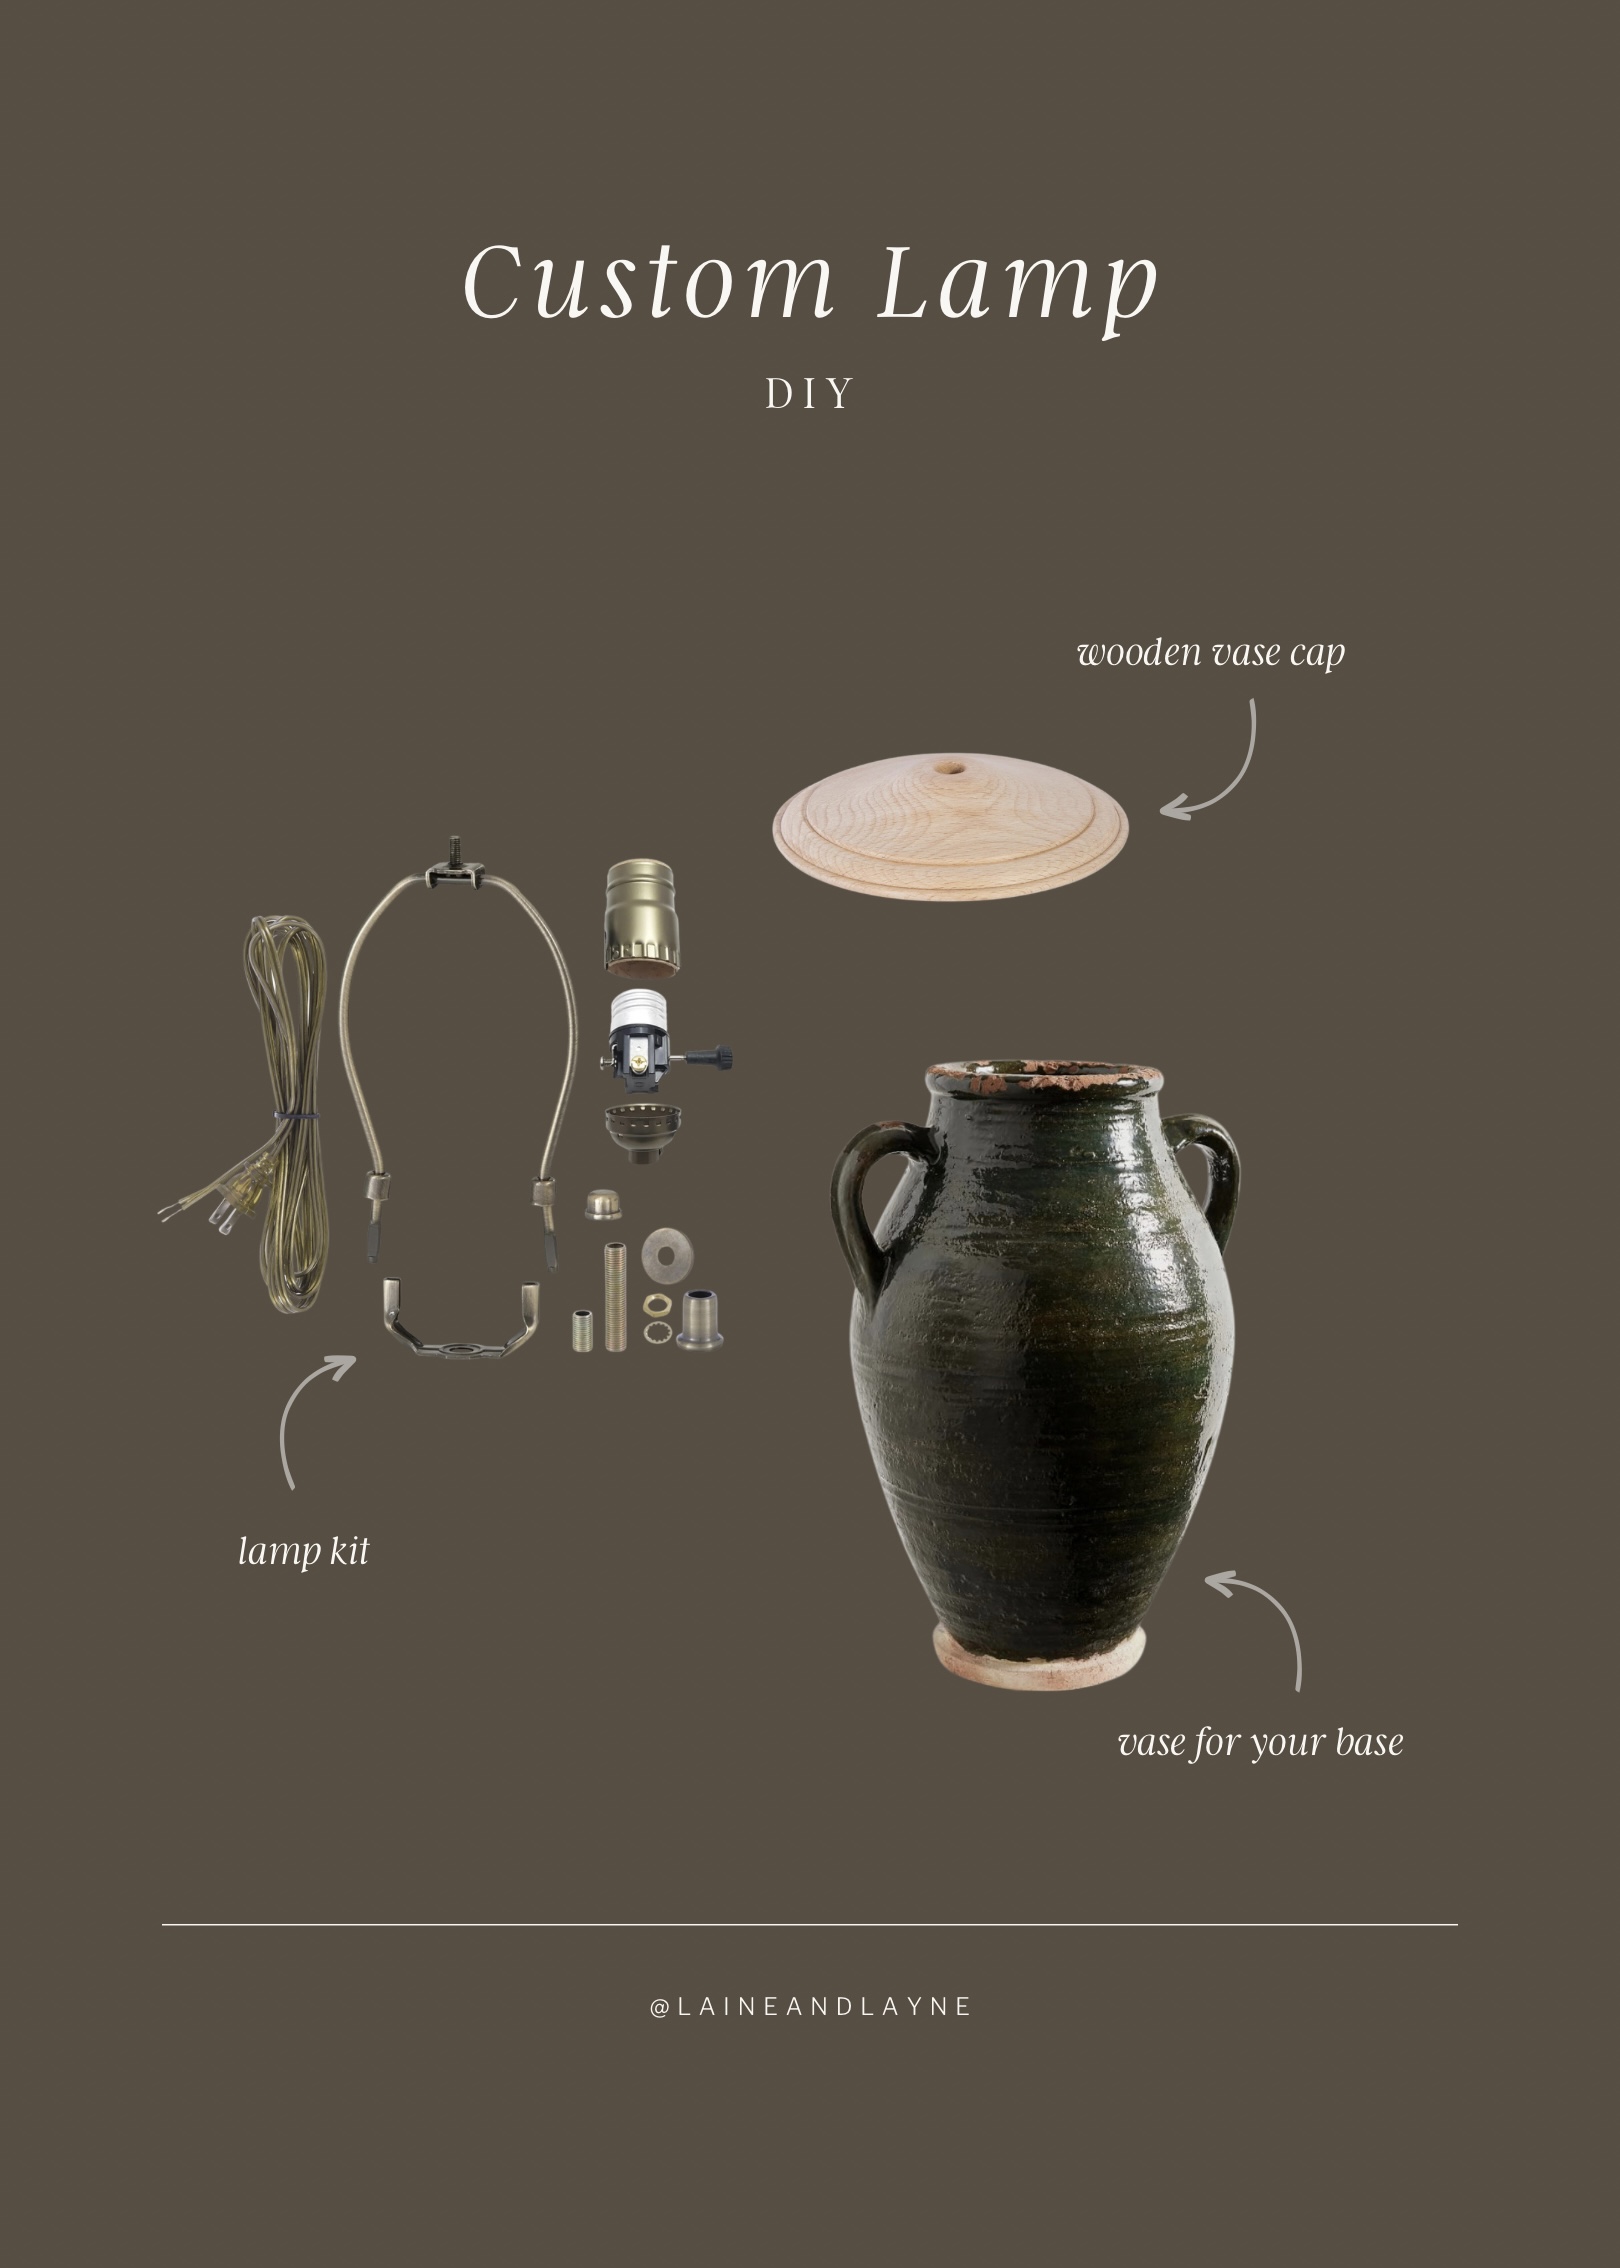
Essential Components: What You’ll Need
To successfully turn your vase into a lamp, you’ll need a few key components. Most of these can be found at hardware stores or online craft supply shops. The most crucial element is a lamp kit for vase which typically includes the necessary electrical parts.
The Lamp Kit
A good lamp kit for vase will usually contain:
- Lamp Socket: This is where the light bulb screws in.
- Lamp Cord with Plug: The power cord to connect to your wall outlet.
- In-line On/Off Switch: For easy control of your lamp.
- Threaded Pipe Nipple: This connects the socket to the base of the lamp and passes through the vase.
- Wire Connectors: To safely join the wires.
- Strain Relief Bushing: Protects the cord where it enters the vase.
Additional Supplies
Beyond the kit, you’ll need:
- Drill and Drill Bits: Diamond-tipped drill bits are recommended for drilling glass or ceramic. Use a slow speed and water for lubrication to prevent cracking.
- Safety Glasses: Absolutely essential when drilling.
- Gloves: To protect your hands and keep the vase clean.
- Measuring Tape: For accurate measurements.
- Wire Strippers/Cutters: For preparing the electrical wires.
- Screwdriver: For assembling the lamp socket.
- Adhesive (Optional): Strong adhesive like E6000 might be useful for securing certain parts.
- Lamp Harp: This metal frame attaches to the socket and supports the lampshade. The size of the harp needs to match your lampshade.
- Finial: The decorative knob that screws onto the top of the harp to hold the lampshade in place.
- Lampshade: The final touch that directs and diffuses the light. Choose a lampshade for vase that complements the vase’s style and size.
- Light Bulb: Choose an appropriate wattage and type for your needs.
Step-by-Step: Crafting Your Vase Lamp
This guide focuses on a common method for converting a vase with a sufficiently large opening. For bottles or vases with very narrow openings, you might need specialized adapters or a different approach to wiring.
Step 1: Preparing the Vase
- Clean the Vase: Thoroughly wash and dry your vase. Any dust or residue can interfere with the wiring or make the finished product look untidy.
- Drill the Hole (If Necessary): Most lamp kits are designed to pass through the vase opening and potentially exit through a pre-drilled hole near the base.
- For Vases with Large Openings: If your vase has a wide mouth, you might be able to simply feed the wiring through the top and secure it internally. However, many prefer to drill a small hole near the base for a cleaner look and cord management.
- Drilling Glass: Place masking tape over the spot where you want to drill. Use a diamond-tipped drill bit. Start at a slow speed and apply gentle, consistent pressure. Keep the area wet with water to cool the bit and the glass, reducing the risk of cracking. Drill from the outside inwards.
- Drilling Ceramic: Similar to glass, use a diamond-tipped bit. Ceramic can be brittle, so a steady hand and slow speed are key. You might want to start with a smaller bit and gradually enlarge the hole.
Step 2: Assembling the Lamp Kit
This is where the DIY lamp conversion truly takes shape.
- Disassemble the Socket: Most lamp sockets come apart easily. You’ll usually unscrew a retaining ring and lift off the outer casing.
- Feed the Cord: Take the end of the lamp cord without the plug. If you drilled a hole in the vase, feed the cord through this hole from the outside of the vase to the inside. If you’re using the vase opening, feed it from the top opening down.
- Attach the Cord to the Socket:
- Strip the Wires: Using wire strippers, carefully remove about 1/2 to 3/4 inch of the plastic insulation from the end of the cord. You’ll see two wires inside – one usually has ribs or a different color, indicating the “hot” wire, and the other is smooth, the “neutral” wire.
- Connect to Terminals: Most lamp sockets have two screw terminals. Wrap the smooth wire around the screw terminal designated for the neutral wire (often silver or marked “N”) and tighten the screw securely. Do the same for the ribbed wire, connecting it to the hot terminal (often brass or marked “L”). Ensure no stray wire strands are exposed.
- Reassemble the Socket: Place the socket back together, ensuring the cord is properly seated and secured by any internal clamps within the socket assembly. Screw the retaining ring back on to hold everything in place.
- Install the Threaded Nipple: The threaded nipple usually screws into the base of the socket assembly. If your socket has a threaded base, screw the nipple into it.
- Feed Through the Vase: Now, carefully guide the nipple (with the socket and cord attached) through the hole you drilled in the vase, or down through the vase opening. The cord should now be coming out of the base of the vase.
- Secure the Nipple: The nipple will typically have a threaded end and a nut or washer. From the inside of the vase, place a washer (if provided) and then the nut onto the threaded end of the nipple. Tighten it snugly to hold the socket assembly securely in place. Be careful not to overtighten, which could crack the vase. A small amount of adhesive can also be used here for extra security if desired.
- Add Strain Relief: If your kit includes a strain relief bushing, thread the cord through it before attaching it to the socket. This prevents the cord from being pulled too hard on the connections.
Step 3: Wiring the Plug (If Necessary)
Some lamp kits come with a plug already attached. If yours doesn’t, or if you’re working with a bottle lamp conversion where the cord might enter from the bottom:
- Strip the Cord End: Strip the end of the lamp cord that will attach to the plug.
- Attach to Plug: Most plugs have slots for the wires. Connect the neutral wire (smooth) to the wider prong on the plug, and the hot wire (ribbed) to the narrower prong. Secure them with the screws provided in the plug. Ensure no bare wire is showing outside the connection points.
Step 4: Adding the Lamp Harp and Lampshade
- Attach the Lamp Harp: Most sockets have a threaded “flange” or screw. The lamp harp usually has a U-shaped end that fits around this flange and a hook or clip that attaches to the threaded area. Screw the harp onto the socket assembly.
- Choose and Place the Lampshade: Select a lampshade for vase that fits your aesthetic and is the right size for your vase lamp. The lampshade will rest on the top of the harp.
- Secure with Finial: Place the lampshade onto the harp. Screw the finial onto the threaded rod at the top of the harp to hold the lampshade firmly in place.
Step 5: Final Touches and Testing
- Insert the Light Bulb: Screw in your chosen light bulb.
- Test the Lamp: Plug the lamp cord into a power outlet and use the in-line switch to turn it on.
- Check Stability: Ensure the lamp is stable and doesn’t wobble.
Considerations for Different Vase Types
Glass Vase Lamp Tutorial Specifics
- Drilling: As mentioned, glass requires special care. Use a diamond-tipped bit, water for cooling, and slow, steady pressure. Practice on a scrap piece of glass if possible.
- Cord Exit: For a clean look, drilling a small hole near the base is preferred. If you cannot drill, consider passing the cord through the vase opening and using decorative elements to hide or secure it.
- Light Diffusion: Glass vases can create beautiful lighting effects. Consider frosted or colored glass for a softer glow.
Ceramic Lamp Conversion Specifics
- Drilling: Ceramic is generally easier to drill than glass, but still requires caution. Use diamond-tipped bits and keep them cool.
- Weight: Ceramic vases are often heavier, providing good stability.
- Aesthetics: Ceramic offers a wide range of colors, textures, and finishes for a truly unique lamp.
Bottle Lamp Conversion Specifics
- Cord Entry: Bottles typically have narrow necks, making it difficult to feed standard lamp kits through.
- Method 1: Cord Exit from the Top: Feed the cord through the neck, attach the socket, and let it hang. The lampshade will cover this.
- Method 2: Side-Mounted Cord Grip: Some kits or specialized adapters allow you to create a hole in the side of the bottle near the base and feed the cord through a sealed grommet. This is more complex.
- Method 3: Bottle Lamp Adapters: Specialized adapters are available that fit into the neck of the bottle, allowing the lamp socket and wiring to be secured. This is often the easiest and safest method for bottles.
Frequently Asked Questions (FAQ)
-
Q: Do I need to drill a hole in the vase?
- A: Not always. If your vase has a wide opening and you can secure the wiring and socket internally, you might not need to drill. However, drilling a small hole near the base provides a cleaner cord exit.
-
Q: Is it safe to drill glass or ceramic?
- A: Yes, it is safe if done correctly. Always wear safety glasses, use the right drill bits (diamond-tipped), keep the area lubricated with water, and work slowly and patiently.
-
Q: What kind of drill bit should I use?
- A: For glass and ceramic, diamond-tipped drill bits are essential. They are designed to cut through hard, brittle materials without shattering them.
-
Q: How do I choose the right size lamp harp and lampshade?
- A: The harp size is determined by the socket type and the desired height of the lampshade. Lampshades have a fitting (spider, uno, or clip-on) that determines how they attach to the harp. Measure your vase and consider the overall proportion.
-
Q: Can I use a dimmer switch?
- A: Yes, if your lamp kit and light bulb are compatible with a dimmer switch. Ensure all components are rated for dimming.
-
Q: What if my vase is too tall or too narrow?
- A: For very tall vases, you might need a longer threaded pipe. For narrow openings, look for specialized bottle lamp kits or adapters. The stability of the vase is paramount.
Upcycled Vase Lighting: The Environmental and Aesthetic Benefits
Creating an upcycled vase lighting piece is not only a creative endeavor but also an environmentally conscious one. By repurposing items destined for landfills, you contribute to reducing waste and embracing a more sustainable lifestyle. Furthermore, the unique character of a salvaged vase or bottle adds a personal narrative and a distinct aesthetic that mass-produced lamps often lack. Your vase to table lamp will be a conversation starter, a testament to your creativity, and a beautiful addition to your home.
This DIY lamp conversion project offers a fantastic opportunity to personalize your living space. Whether you are undertaking a ceramic lamp conversion or a glass vase lamp tutorial, the process is rewarding. With the right lamp kit for vase and a little patience, you can transform almost any decorative vase into a beautiful and functional repurpose vase lamp. Enjoy the process and the glowing result!