
Yes, you can absolutely turn a vase into a lamp! This DIY guide will walk you through the exciting process of giving an ordinary vase a new life as a stunning decorative lamp. It’s a fantastic way to repurpose old treasures, create unique lighting for your home, and personalize your decor. We’ll cover everything you need to know to achieve a professional-looking vase lamp conversion, making it easier than you might think to make a lamp from a vase.
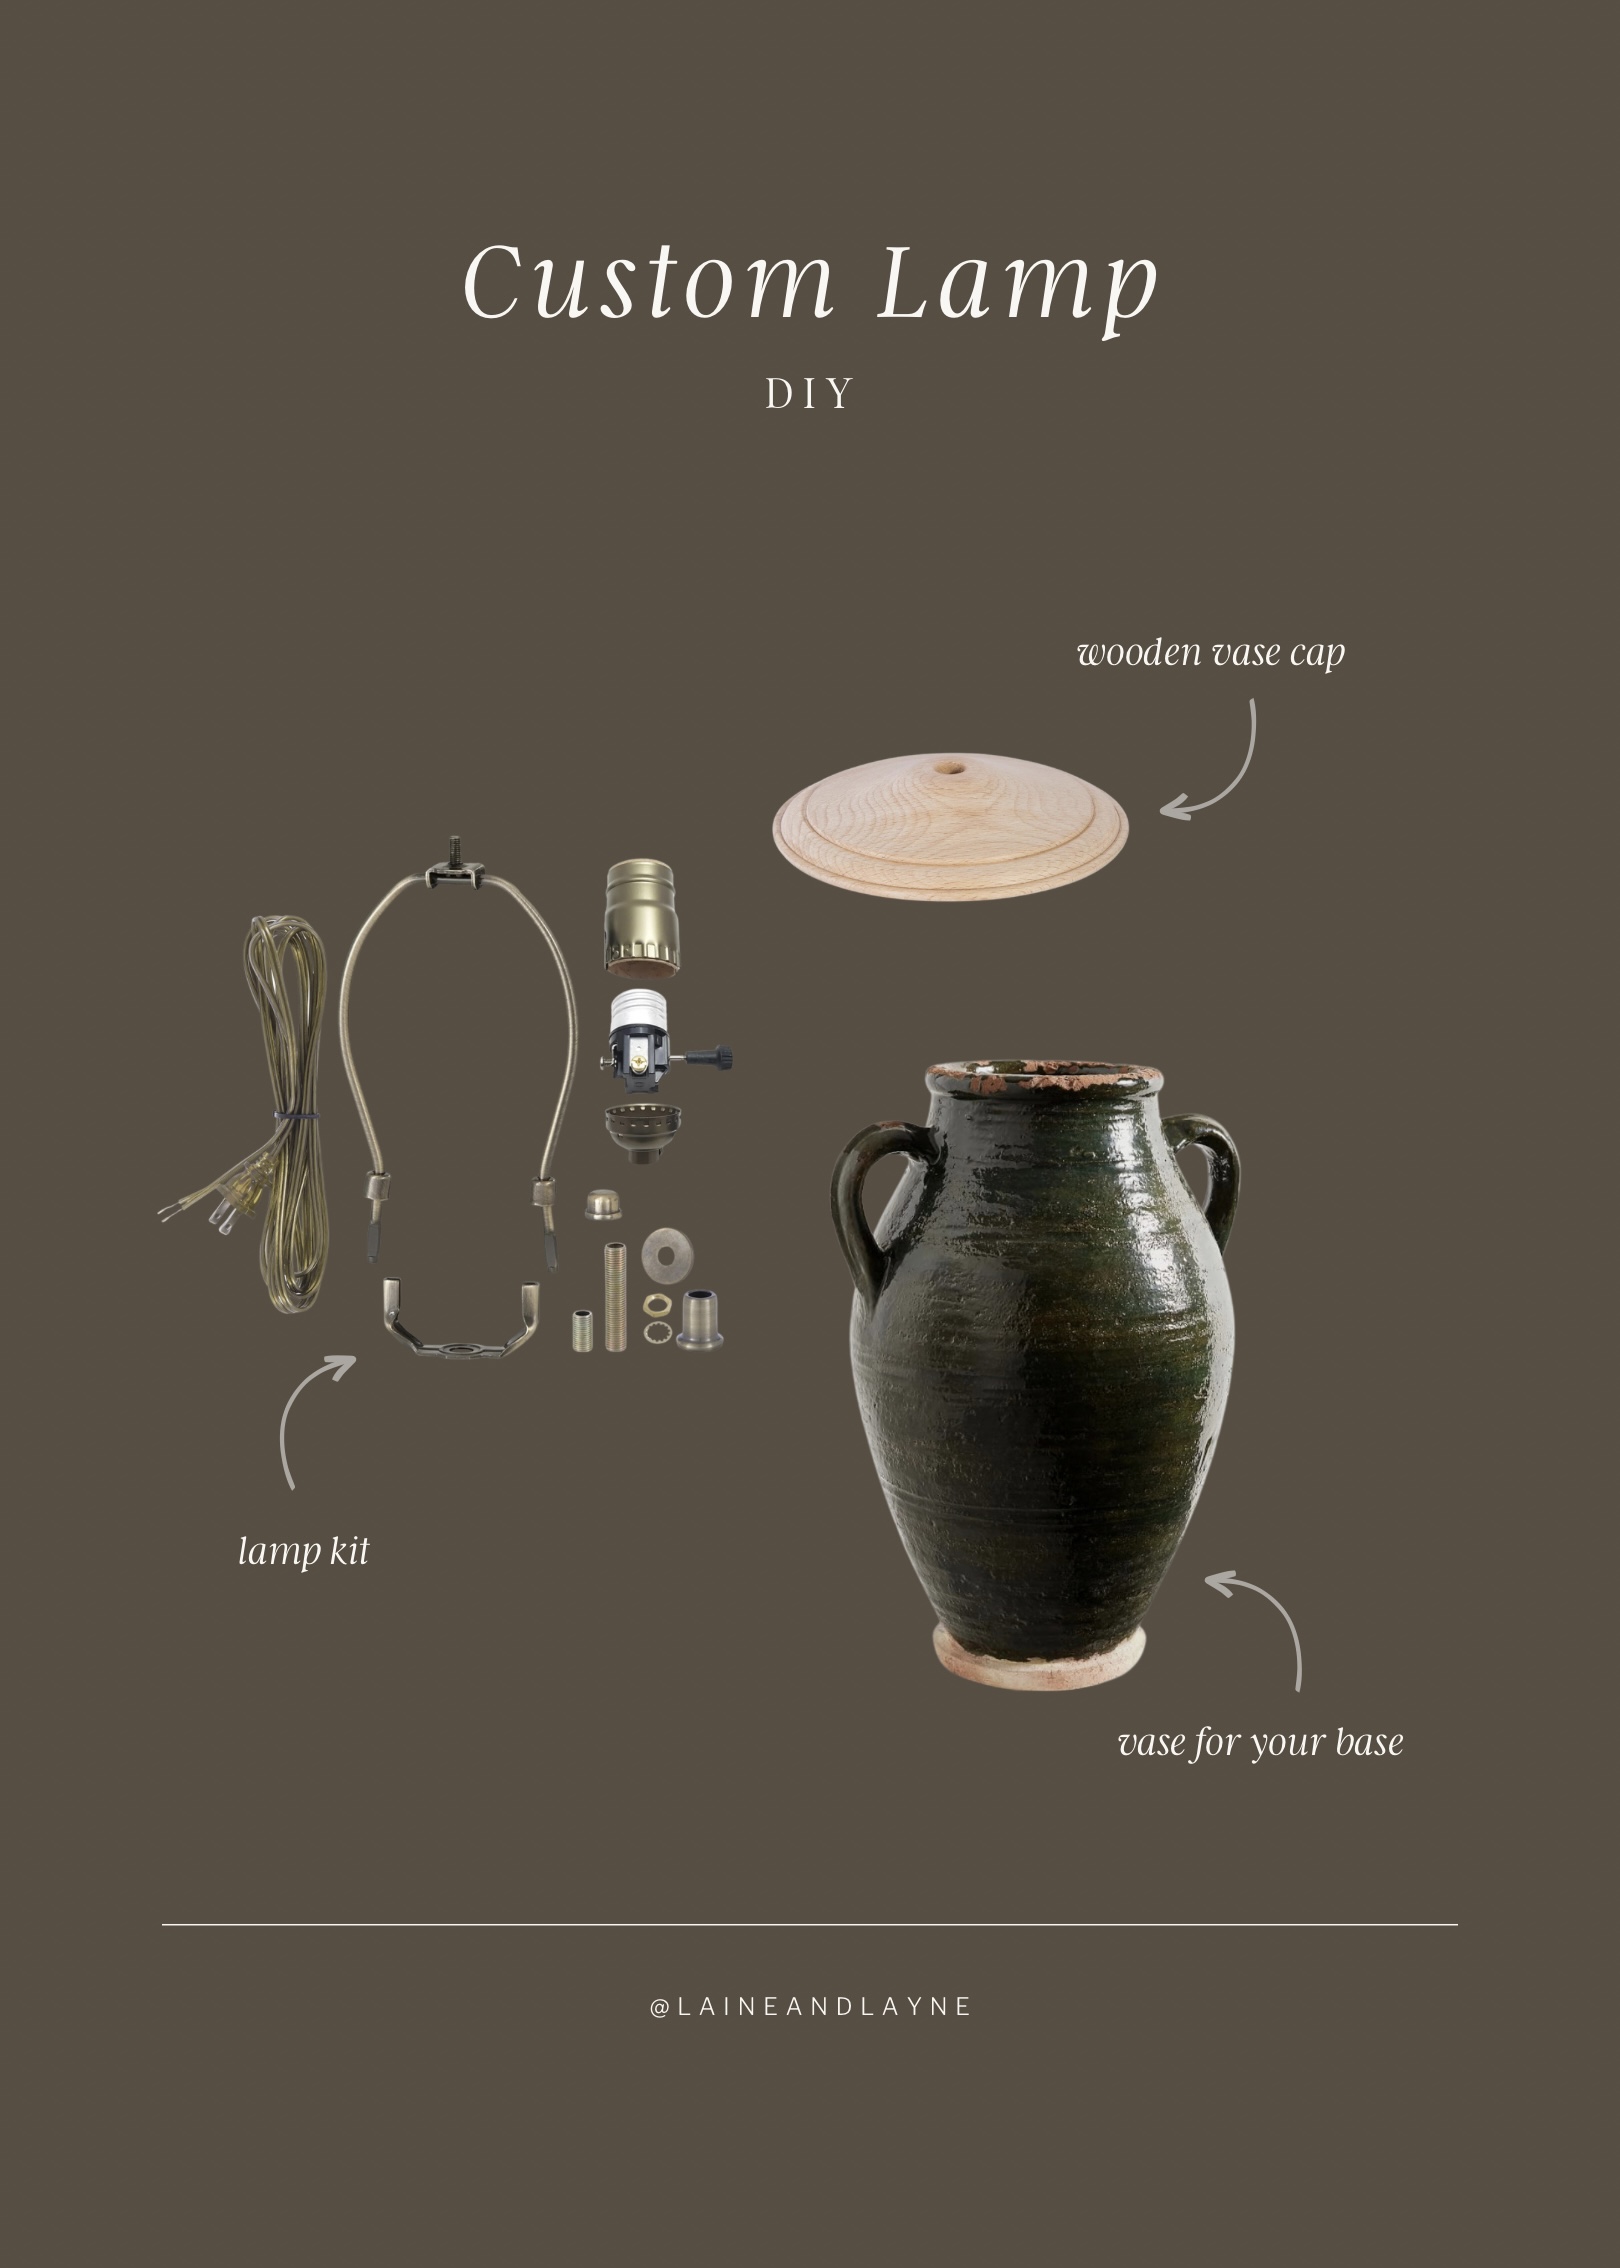
Image Source: laineandlayne.com
Why Transform a Vase into a Lamp?
Repurposing items is not just a trend; it’s a smart and creative way to furnish your living space. Turning a vase into a lamp offers numerous benefits:
- Unique Aesthetic: Forget mass-produced lamps. A vase lamp is inherently unique, reflecting your personal style and the history of the vase itself. Whether it’s vintage ceramic, sleek glass, or rustic pottery, your decorative vase lamp will stand out.
- Cost-Effective: Often, beautiful vases can be found at thrift stores, antique shops, or even in your own attic for a fraction of the cost of a new lamp. This makes DIY vase lamp projects incredibly budget-friendly.
- Customization: You control every aspect of the lamp – from the type of bulb to the lampshade. This allows for perfect integration with your existing decor.
- Environmental Friendliness: Upcycling is a cornerstone of sustainability. By giving a vase a new purpose, you reduce waste and contribute to a greener planet. You’re essentially upcycling a vase into a lamp instead of buying new.
- Creative Outlet: Lamp making with vase projects is a rewarding craft. It’s a chance to get hands-on, solve practical challenges, and enjoy the satisfaction of creating something beautiful and functional. This type of lighting a vase project is incredibly satisfying.
What You’ll Need: Your Vase Lamp Toolkit
Before you begin your vase to table lamp transformation, gather all the necessary supplies. Having everything ready will make the process smoother.
Core Components:
- The Vase: Choose a sturdy vase that is stable and large enough to house the electrical components. Consider its opening size and how it will accommodate the lamp kit.
- Lamp Kit: This is the heart of your vase lamp conversion. Lamp kits typically include:
- Lamp Harp and Finial: These hold the lampshade.
- Socket: Where the light bulb screws in.
- Threaded Rod/Pipe: This goes through the vase to hold the socket assembly.
- Cord with Plug: Powers the lamp.
- Wire Connectors: To safely join wires.
- Light Bulb: Choose one appropriate for the socket and your desired brightness and style. LED bulbs are energy-efficient and long-lasting.
- Lampshade: Select a shade that complements your vase and the overall style of the room.
Tools and Miscellaneous Items:
- Drill with Masonry/Glass Drill Bit: If your vase doesn’t have a pre-drilled hole for the cord, you’ll need a specialized bit. Crucially, ensure the bit is designed for the material of your vase (glass, ceramic, etc.).
- Safety Glasses: Essential for protecting your eyes, especially when drilling.
- Gloves: For handling tools and potentially sharp edges.
- Measuring Tape or Ruler: For precise measurements.
- Pliers: Useful for tightening connections and manipulating wire.
- Wire Strippers/Cutters: For preparing electrical wires.
- Screwdriver: For securing components.
- Adhesive (Optional): For securing the lamp kit components or the vase base.
- Sandpaper (Fine Grit): To smooth any rough edges after drilling.
- Cleaning Supplies: To ensure the vase is clean before you start.
- Funnel (Optional): To help feed the cord through narrow openings.
- Lamp Pipe Couplings/Nuts (if needed): To adjust the height or secure the threaded rod.
- Silicone Washers or Grommets (Optional): To protect the cord where it enters and exits the vase.
Step-by-Step Guide to Making a Lamp from a Vase
This guide assumes your vase does not have a pre-drilled hole for the cord. If it does, you can skip the drilling step.
Step 1: Prepare Your Vase
Cleaning: Thoroughly wash and dry your vase. Remove any dust, dirt, or labels. A clean workspace and a clean vase lead to a cleaner finished product.
Assessing Stability: Ensure the vase is stable and won’t tip over easily when a lampshade and bulb are added. If the base is narrow, consider adding a wider, weighted base or using a stabilizing adhesive.
Step 2: Drilling the Hole (If Necessary)
This is the most delicate step. If your vase does not have a hole for the power cord, you’ll need to drill one. Safety first!
Drilling Techniques for Different Materials:
- Glass Vases:
- Specialized Drill Bit: Use a diamond-tipped drill bit specifically designed for glass.
- Lubrication: Water is your best friend here. Create a small dam of plumber’s putty or modeling clay around the drilling area to hold a pool of water. This keeps the bit and glass cool, preventing cracks and extending the bit’s life.
- Speed: Start with a low drill speed. Gradually increase if needed, but never force the drill.
- Pressure: Apply gentle, consistent pressure. Let the drill bit do the work.
- Angle: Start drilling at a slight angle (around 45 degrees) until the bit creates a small divot. Then, gradually straighten the drill to a 90-degree angle.
- Patience: This process takes time. Stop frequently to add more water and check your progress.
- Ceramic or Pottery Vases:
- Bit Type: Use a carbide-tipped masonry bit or a specialized ceramic bit.
- Cooling: Similar to glass, water can help cool the bit and prevent dust. You can either submerge the area in water or use a spray bottle to keep it moist.
- Speed and Pressure: Begin with a lower speed and moderate pressure. As you get through the material, you might need slightly more pressure, but avoid excessive force, which can chip or crack the vase.
- Dust: Ceramic dust can be harmful. Ensure good ventilation and wear a mask if drilling dry.
Where to Drill:
- Base: The most common and usually the most discreet location is a hole in the bottom of the vase. This allows the cord to exit cleanly and sit flat on a surface.
- Side (Near Base): If the base is too narrow or you prefer a different exit point, a hole on the side, close to the bottom, is an option.
Post-Drilling:
- Smooth Edges: Once the hole is drilled, use fine-grit sandpaper to smooth any rough edges around the opening, both inside and out. This protects the electrical cord from damage.
- Clean Up: Thoroughly clean the vase to remove any dust or debris from drilling.
Step 3: Assembling the Lamp Kit
Now it’s time to put the vase lamp kit together. The specific order might vary slightly depending on your kit, but the general process is as follows:
Feeding the Cord:
- Thread the Cord: Feed the electrical cord from the lamp kit through the hole you drilled in the vase (or any existing hole). Pull enough cord through to comfortably reach your electrical outlet, plus a little extra for slack.
- Secure the Cord (Optional but Recommended): If the hole is larger than the cord, consider using a rubber grommet or a small silicone washer to cushion the cord where it passes through the vase. This prevents fraying and adds a professional finish.
Installing the Rod and Socket:
- Insert the Threaded Rod: Most lamp kits come with a threaded rod that screws into the socket base or a separate threaded pipe. If you have a separate pipe, you might need to screw the socket onto it first.
- Feed the Rod: Guide the threaded rod (with the cord attached) up through the vase.
- Attach the Socket Assembly: Once the rod is at the top of the vase, screw the socket assembly onto the rod. You might need to adjust the length of the rod using coupling nuts to ensure the socket is at the desired height above the vase rim.
- Secure the Socket: Some kits have a locking nut or a retaining ring to secure the socket assembly to the vase rim or a flange. Ensure it’s snug but doesn’t overtighten and crack the vase.
Wiring the Socket:
Important Safety Note: If you are not comfortable working with electrical wiring, it’s best to consult an electrician or have someone experienced assist you. Ensure the lamp is unplugged throughout this process.
- Strip Wires: Using wire strippers, carefully remove about ½ to ¾ inch of the insulation from the ends of the power cord wires. You’ll typically see a ribbed or smoother wire (neutral) and a smooth wire (hot).
- Connect Wires to Socket:
- The ribbed wire (neutral) usually connects to the silver terminal screw on the socket.
- The smooth wire (hot) usually connects to the brass or gold-colored terminal screw on the socket.
- Loosen the terminal screws, wrap the stripped wire clockwise around the screws, and tighten them securely. Ensure no stray wire strands are exposed.
- Secure the Socket: Most sockets have a cover or cap that screws or snaps into place to enclose the wiring.
Step 4: Adding the Harp and Finial
- Attach the Harp: The lamp harp usually has a U-shaped bracket that fits into clips on the side of the socket. Slide the harp’s U-shaped end into these clips and secure it by tightening a screw at the base of the harp if your kit includes one.
- Attach the Finial: The finial is a decorative knob that screws onto the threaded stud at the top of the harp. This holds the lampshade in place. Screw it on loosely for now.
Step 5: Final Touches and Testing
- Add the Lampshade: Place your chosen lampshade onto the harp.
- Secure with Finial: Screw the finial onto the harp’s stud to hold the lampshade firmly.
- Insert the Light Bulb: Screw in your selected light bulb.
- Test: Plug the lamp into an electrical outlet and turn it on. If it doesn’t light up, immediately unplug it and recheck your wiring connections and bulb.
Tips for a Professional Finish: Making Your Vase Lamp Shine
- Height Balance: Consider the height of your vase and the size of your lampshade. A general rule of thumb is that the lampshade should be about two-thirds the height of the vase itself, and the width of the shade should be about the same as the widest part of the vase.
- Weight Distribution: If your vase is very tall and narrow, you might need to add weight to the bottom of the vase to prevent tipping. You can use small stones, sand, or even concrete. Ensure any added weight doesn’t interfere with the electrical cord.
- Cord Management: Try to route the cord discreetly. If the cord comes out the back, you can use cord clips to run it along the wall or furniture leg.
- Socket Height Adjustment: If your lamp kit has a threaded pipe, you can use additional coupling nuts and a longer threaded rod to adjust the socket height for the perfect look.
- Cord Color: Some kits come with white or black cords. If these clash with your vase, you can sometimes find fabric-covered cords in various colors for a more decorative look.
Frequently Asked Questions (FAQ) about Turning a Vase into a Lamp
Here are some common questions people have when undertaking this project:
- Q1: Can I use any vase to make a lamp?
- A1: While you can use many vases, it’s crucial to choose one that is sturdy, stable, and made of a material that can be safely drilled (if needed). Very thin or delicate vases might not be suitable. Always prioritize safety and stability.
- Q2: Is it safe to drill into glass or ceramic?
- A2: Yes, with the correct tools, techniques, and safety precautions (like safety glasses and proper cooling), it is safe to drill into glass and ceramic. Patience is key to avoid breakage.
- Q3: What if my vase already has a hole?
- A3: If your vase has a hole suitable for the cord, you’re in luck! You can skip the drilling step. Just ensure the hole is smooth and large enough for the cord and potentially a grommet.
- Q4: Where can I buy a vase lamp kit?
- A4: Lamp kits are readily available at hardware stores, home improvement centers, craft stores, and online retailers like Amazon. Look for “DIY lamp kit” or “lamp making kit.”
- Q5: Do I need to be an electrician to wire a lamp?
- A5: Basic wiring for a lamp is generally straightforward, but it’s important to follow instructions carefully and prioritize safety. If you have any doubts or feel uncomfortable, it’s always best to seek assistance from someone experienced or a qualified electrician. Always ensure the lamp is unplugged when working on wiring.
- Q6: How do I ensure the lamp is stable?
- A6: Choose a vase with a wide base. If the vase is tall and narrow, consider adding weight to the bottom inside the vase, using a stabilizing adhesive to secure the vase to a heavier base, or using a larger, more stable lampshade.
- Q7: What kind of light bulb should I use?
- A7: Most standard lamps use an E26 (medium base) bulb. Check the socket type in your kit. LED bulbs are highly recommended for their energy efficiency, long lifespan, and lower heat output, which is safer for lampshades.
Embracing the Art of Repurposed Lighting
Turning a vase into a lamp is a rewarding project that blends creativity, practicality, and a touch of artistry. It’s a fantastic way to repurpose vase lighting, creating a unique piece that adds character and warmth to any room. Whether you’re aiming for a vintage charm, a modern aesthetic, or something entirely your own, this DIY guide provides the roadmap to successfully transform your chosen vase into a beautiful, functional vase to table lamp. Enjoy the process of bringing your vision to light!