
Can you wire a ceiling lamp yourself? Yes, if you have basic electrical knowledge and follow safety precautions, you can wire a ceiling lamp yourself. This guide will walk you through how to install a ceiling light, connect a light fixture, and provide a comprehensive light wiring guide for your DIY electrical wiring for lights project. We’ll cover everything from basic wiring to specific types like chandelier wiring, pendant light installation, flush mount ceiling light wiring, and even recessed lighting installation.
Working with electricity can be dangerous if not done correctly. Always prioritize safety. If you ever feel unsure or uncomfortable at any point, it’s best to call a qualified electrician. This guide is for informational purposes only.
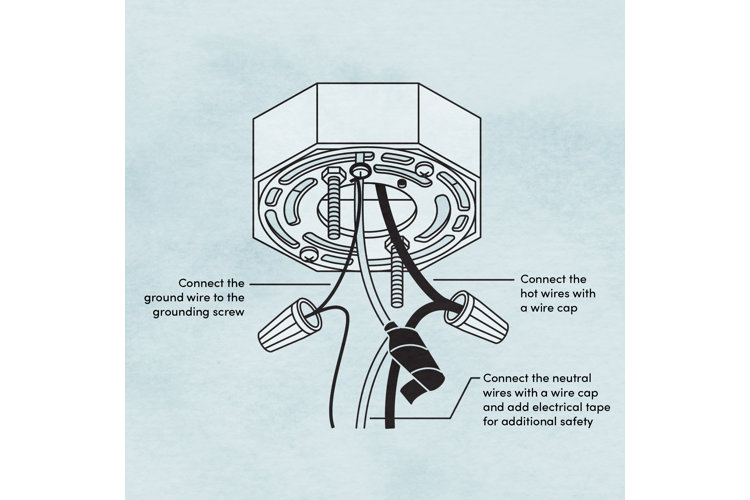
Image Source: assets.wfcdn.com
Getting Started: Essential Tools and Preparation
Before you begin to install ceiling light fixtures, gather your tools and prepare your workspace. This ensures a smooth and safe installation process.
Essential Tools You’ll Need
- Screwdriver Set: Both Phillips and flathead screwdrivers are crucial for removing and attaching wiring and mounting brackets.
- Wire Strippers/Cutters: These are vital for safely removing insulation from wires and cutting them to the correct length.
- Voltage Tester (Non-Contact): This is your most important safety tool. It detects the presence of electricity in wires before you touch them.
- Pliers: Needle-nose pliers are useful for bending and twisting wires, while regular pliers can help with gripping.
- Wire Nuts (or other connectors): These are used to securely connect wires together. Ensure they are the correct size for the wires you are using.
- Electrical Tape: For wrapping wire connections for added insulation and security.
- Ladder: A sturdy ladder is necessary to reach the ceiling safely.
- Safety Glasses: To protect your eyes from debris or accidental sparks.
- Gloves (optional but recommended): For added protection and grip.
- Stud Finder (if mounting to a new location): To locate ceiling joists for secure mounting.
- Drill and Drill Bits: May be needed for pilot holes or mounting hardware.
- Mounting Hardware: Often included with the light fixture, but ensure you have the correct screws or anchors for your ceiling type.
Safety First: Turning Off the Power
This is the most critical step. Never skip it.
- Identify the Correct Circuit Breaker: Go to your home’s electrical panel. Locate the breaker that controls the light fixture you’re replacing or the circuit where you’ll install a new one.
- Flip the Breaker to the “OFF” Position: Ensure the switch is firmly in the off position.
- Verify the Power is Off: Go back to the light fixture location. Try to turn the light on. It should not work. Then, use your non-contact voltage tester on the existing wires or at the switch to confirm there is no power. Test all wires in the junction box.
Understanding Your Light Fixture and Wiring
Each light fixture is different. Before you start, familiarize yourself with the components of your new light and the wiring it requires.
- Fixture Wires: Most modern light fixtures will have three wires:
- Black (Hot): Carries electrical current from the power source.
- White (Neutral): Completes the electrical circuit, returning current to the power source.
- Green or Bare Copper (Ground): Provides a safe path for electricity to flow to the ground in case of a fault, preventing electric shock.
- House Wiring: Your ceiling junction box will typically have wires in similar colors:
- Black (Hot): Connects to the fixture’s black wire.
- White (Neutral): Connects to the fixture’s white wire.
- Green or Bare Copper (Ground): Connects to the fixture’s ground wire and the junction box if it’s metal.
A ceiling lamp wiring diagram can be invaluable here. While specific diagrams vary, the principle of connecting like-colored wires (black to black, white to white, ground to ground) is standard.
Replacing an Existing Ceiling Lamp
This is the most common scenario for DIYers. It’s generally simpler than installing a new fixture where no wiring exists.
Step 1: Removing the Old Fixture
- Ensure Power is Off: Double-check this crucial step.
- Remove the Fixture Cover or Shade: Most have screws, clips, or a twist-off mechanism.
- Expose the Wiring: You’ll likely see wires connected with wire nuts.
- Disconnect Wires: Carefully unscrew the wire nuts. Gently pull the wires apart.
- Remove the Old Fixture: Unscrew the mounting bracket holding the old fixture to the ceiling box. Carefully lower the old fixture. You might need someone to help hold it.
- Inspect the Ceiling Box: Ensure the junction box is securely mounted to the ceiling joist and is rated for the weight of your new fixture.
Step 2: Preparing the New Fixture and Wiring
- Unpack and Inspect: Check your new fixture for any damage. Read the manufacturer’s instructions.
- Assemble if Necessary: Some fixtures require minor assembly before installation.
- Identify Fixture Wires: Locate the black, white, and ground wires on your new fixture.
- Prepare House Wires: Ensure the ends of the wires coming from the ceiling box are clean and free of damage. If necessary, use wire strippers to remove about 1/2 to 3/4 inch of insulation from the ends.
Step 3: Connecting the New Light Fixture
This is where you connect the house wiring to the fixture wiring.
- Connect the Ground Wire: Connect the green or bare copper wire from the fixture to the green or bare copper wire from the ceiling box. Use a wire nut. If your junction box is metal, also connect the ground wire from the ceiling to the grounding screw on the junction box.
- Connect the Neutral Wire: Connect the white wire from the fixture to the white wire from the ceiling box. Twist them together clockwise with a wire nut.
- Connect the Hot Wire: Connect the black wire from the fixture to the black wire from the ceiling box. Twist them together clockwise with a wire nut.
- Secure Connections: Ensure all wire nuts are twisted on tightly and that no bare copper wire is exposed beyond the wire nut. Gently tug each connection to ensure it’s secure. You can wrap electrical tape around the wire nut and wires for extra security.
- Tuck Wires: Carefully tuck the connected wires into the ceiling junction box.
Step 4: Mounting the New Fixture
- Attach the Mounting Bracket: Secure the new fixture’s mounting bracket to the ceiling electrical box using the screws provided. Ensure it’s level.
- Hang the Fixture: Most fixtures have a way to hang temporarily on the mounting bracket while you make the final wire connections, or you might need a helper to hold it.
- Secure the Fixture: Align the fixture with the mounting bracket and secure it according to the manufacturer’s instructions, usually with screws or a decorative canopy.
- Install Bulbs and Cover: Screw in the appropriate light bulbs and attach the shade or cover.
Step 5: Testing the New Light
- Turn the Power Back On: Go to your electrical panel and flip the circuit breaker back to the “ON” position.
- Test the Light: Flip the light switch. The new lamp should turn on.
Installing a Ceiling Lamp Where None Existed
This process is more involved as it requires running new electrical wiring. If you are not comfortable with this, hire an electrician.
Step 1: Planning and Preparation
- Determine Fixture Location: Decide exactly where you want the light.
- Locate Ceiling Joists: Use a stud finder to locate ceiling joists. The electrical box must be securely attached to a joist or a brace between joists.
- Source of Power: You’ll need to tap into an existing circuit. This could be from a nearby switch box or another junction box. You’ll need to run a cable from the power source to the new fixture location.
- Select the Right Cable: Use appropriate electrical cable (e.g., NM-B cable) with the correct gauge (usually 14-2 or 12-2 depending on the circuit breaker rating). The “2” in “14-2” indicates two insulated wires (black and white) plus a ground wire.
Step 2: Running the Electrical Cable
This is the most complex part of installing a new ceiling light.
- Access: You might need to cut a hole in the drywall to run the cable.
- Routing: Carefully route the cable through walls and ceilings, following building codes. Avoid sharp bends.
- Securing: Secure the cable with cable staples at appropriate intervals, typically every 4.5 feet and within 8 inches of electrical boxes.
- Install Electrical Box: Mount a suitable electrical box (ceiling fan rated if applicable, or a standard junction box) at the chosen fixture location, ensuring it’s firmly attached to a joist or brace.
Step 3: Connecting to the Power Source
- Turn Off Power: Again, turn off the power to the circuit you’re tapping into.
- Open Existing Box: Carefully open the existing electrical box (switch or junction box) where you’ll draw power.
- Connect Wires:
- Connect the black wire from your new cable to the black wire(s) feeding the circuit.
- Connect the white wire from your new cable to the white wire(s) on the circuit.
- Connect the ground wire from your new cable to the ground wire(s) and ground screw in the box.
- Use wire nuts to make secure connections.
- Close Box: Neatly arrange the wires and close the existing electrical box.
Step 4: Connecting the New Fixture
This follows the same procedure as replacing a fixture, connecting the wires from the new cable to your new light fixture.
- Ensure Power is Off: Essential for this step.
- Feed Cable: Run the cable from the power source to the new fixture’s junction box.
- Connect Fixture Wires: Connect the black, white, and ground wires from your new cable to the corresponding wires on your new light fixture, using wire nuts.
- Mount Fixture: Mount the fixture to the ceiling box as described in the “Replacing an Existing Ceiling Lamp” section.
Step 5: Testing
- Restore Power: Turn the circuit breaker back on.
- Test Fixture: Test the new light using its switch.
Specific Ceiling Light Installation Guides
Let’s delve into specific types of ceiling lights.
Chandelier Wiring
Chandelier wiring often involves heavier fixtures and sometimes more intricate wiring, especially for older or more elaborate designs.
- Weight Support: Chandeliers can be very heavy. Ensure your ceiling box is fan-rated or has a heavy-duty support brace capable of holding the chandelier’s weight. You might need to reinforce the ceiling joists.
- Wiring: Generally, the wiring principles are the same: black to black, white to white, ground to ground. However, some chandeliers may have multiple hot wires if they have separate light circuits or dimming features. Always refer to the chandelier’s specific wiring diagram.
- Canopy Installation: The canopy is the decorative piece that covers the junction box. It often has a hook or a threaded rod to support the chandelier’s weight. You’ll typically attach the mounting bracket to the box, run the wires through the canopy and bracket, and then attach the chandelier to the bracket or rod.
Pendant Light Installation
Pendant lights are popular for task lighting and accent lighting.
- Adjustable Height: Many pendant lights come with adjustable cords or chains. Plan for the desired height before final installation.
- Mounting: They usually hang from a single point. Ensure the junction box is securely mounted to support the pendant’s weight. Some may use a decorative canopy, while others might have a direct-mount system.
- Wiring: Standard three-wire connection (hot, neutral, ground) applies. If you have a dimmer switch, ensure your bulbs are compatible with it.
Flush Mount Ceiling Light Wiring
Flush mount lights sit directly against the ceiling.
- Low Profile: Ideal for rooms with lower ceilings.
- Enclosed Design: The wiring compartment is usually contained within the fixture’s base.
- Wiring Process: After connecting the wires from the ceiling to the fixture wires, you’ll typically tuck them into the fixture’s base before securing the fixture flush to the ceiling.
Recessed Lighting Installation
Recessed lights, also known as can lights or pot lights, are installed within the ceiling itself.
- Cutting Holes: This involves cutting precise holes in the drywall for each fixture.
- Running Wires: Cables are run from a power source (often a switch or a central junction box) to each recessed light, daisy-chained together.
- Box Types: There are different types of recessed lighting housings:
- Remodel (Old Work) Housings: Designed for installation from below the ceiling in existing drywall. They have clips to secure them to the drywall.
- New Construction Housings: Designed to be installed before the ceiling drywall is put up, attached directly to ceiling joists.
- Wiring: Each housing has a junction box where you’ll connect the incoming cable. You’ll then typically run a cable from that housing to the next in the series.
- Safety Features: Many recessed lights have thermal protectors that shut off the light if it overheats, which can happen if insulation is too close. Ensure proper clearance is maintained.
Troubleshooting Common Wiring Issues
Even with careful work, you might encounter problems.
- Light Doesn’t Turn On:
- Check the circuit breaker.
- Verify the light bulb is screwed in properly and is not burnt out.
- Double-check all wire connections. Ensure they are tight and the correct wires are joined.
- Confirm the switch is working correctly.
- Light Flickers:
- Loose wire connection is the most common cause. Re-secure all connections.
- Faulty light bulb or dimmer switch.
- Overloaded circuit.
- Breaker Trips:
- Short circuit: likely caused by bare wires touching each other or a metal box. Turn off power immediately and re-inspect all wiring.
- Overloaded circuit: too many appliances or lights on the same circuit.
Frequently Asked Questions (FAQ)
Q1: What safety precautions should I take before wiring a ceiling lamp?
A1: The most crucial safety precaution is to turn off the power at the circuit breaker and verify it’s off with a voltage tester before touching any wires. Wear safety glasses and use insulated tools.
Q2: Can I use wire nuts for all my electrical connections?
A2: Yes, wire nuts are the standard and safest method for connecting wires in residential electrical wiring. Ensure you use the correct size wire nuts for the number and gauge of wires being connected, and twist them on tightly until no bare copper is visible.
Q3: What is the purpose of the ground wire in a light fixture?
A3: The ground wire is a safety feature. It provides a path for electricity to flow safely to the ground in the event of a fault or a short circuit within the fixture. This helps prevent electric shock.
Q4: How do I know if my ceiling box is strong enough for a heavy fixture like a chandelier?
A4: Look for markings on the electrical box. If it is stamped “For Use With Support of 50 lbs or Less” or “Acceptable For Fixture Support Up To 150 lbs,” it should be adequate. For heavier fixtures, especially chandeliers or ceiling fans, you need a box specifically rated for that weight and securely attached to a ceiling joist or a brace.
Q5: What happens if I connect the wires incorrectly?
A5: Connecting wires incorrectly can lead to several problems: the light won’t work, the fixture could be damaged, the circuit breaker could trip, or it could create a fire hazard or electric shock risk. Always follow the color-coding and wiring diagram.
Q6: Do I need a dimmer switch for my new ceiling light?
A6: A dimmer switch is optional. If you want to control the brightness of your light, you’ll need to install a dimmer switch. Ensure that both the dimmer switch and the light bulbs you use are compatible with each other (e.g., LED bulbs are often marked as “dimmable”).
Q7: How do I determine the correct wire gauge to use?
A7: The wire gauge should match the rating of the circuit breaker. For a standard 15-amp circuit, use 14-gauge wire. For a 20-amp circuit, use 12-gauge wire. Always check your circuit breaker to be sure.
Q8: What is the difference between a “remodel” and “new construction” electrical box for recessed lighting?
A8: New construction boxes are designed to be installed before drywall is hung, attaching directly to joists. Remodel (or old-work) boxes are designed to be installed from below the ceiling after drywall is in place, using clips to secure them to the drywall.
By following these detailed steps and prioritizing safety, you can confidently wire and install your new ceiling lamp, bringing light and style to your home. Remember, if in doubt, consult a professional electrician.