
Can you wire a lamp yourself? Absolutely! Wiring a lamp is a manageable DIY project for most people, and this tutorial will guide you through the process safely and effectively. Whether you’re doing lamp rewiring steps for the first time or looking to refresh your skills, we’ll cover everything you need to know.
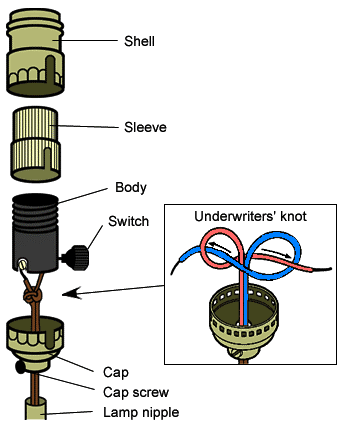
Image Source: copper.org
Tools and Materials You’ll Need
Before you begin, gather these essential tools and materials for your DIY lamp repair or rewiring project. Having everything ready makes the process smoother and safer.
- New Lamp Cord: Choose a cord that matches the appliance’s power needs and is rated for indoor use. Look for cords with a three-prong plug if your lamp has a metal base or frame, for grounding.
- Lamp Socket: If your old socket is damaged, you’ll need a replacement. Ensure it’s the correct type for your lamp (e.g., medium base, candelabra base).
- Lamp Plug: For replacing a damaged cord end or creating a new connection.
- Wire Strippers: Essential for removing insulation from wires.
- Screwdriver Set: You’ll likely need both Phillips and flathead screwdrivers.
- Wire Nuts: Small plastic caps that twist onto wires to create secure connections.
- Pliers: Needle-nose pliers are especially helpful for bending wire.
- Electrical Tape: For reinforcing connections if needed.
- Cutting Tool: Scissors or a utility knife can be used for cutting the cord.
- Screwdriver for Terminal Screws: Usually a small Phillips or flathead.
- Gloves (Optional): For a better grip and to keep your hands clean.
- Safety Glasses: Always protect your eyes when working with tools and electrical components.
Getting Started: Safety First!
Safety is paramount when working with electricity. Always disconnect the lamp from the power source before you start any work. Ensure the lamp is unplugged from the wall outlet. If the lamp has a switch, make sure it’s in the “off” position, though unplugging is the most critical step.
Lamp Wiring Basics: What You Need to Know
Fathoming lamp wiring basics is key to a successful repair. A typical lamp cord has three wires:
- Hot Wire (Black): This wire carries the electrical current from the outlet to the socket. It’s usually connected to the terminal screw that’s closer to the opening of the socket.
- Neutral Wire (White): This wire returns the current to the outlet. It’s typically connected to the terminal screw that’s on the side of the socket.
- Ground Wire (Green or Bare Copper): This wire provides a safety path for electricity in case of a fault. It connects to the metal casing of the lamp and the ground pin on the plug.
The lamp socket itself usually has two terminal screws for the hot and neutral wires. Some sockets might have a third terminal for the ground wire if the lamp is grounded.
Step-by-Step Tutorial for Wiring a Lamp
This tutorial covers replacing a lamp cord and socket, common tasks in lamp rewiring steps.
Step 1: Disconnecting the Old Cord and Socket
- Unplug the Lamp: This cannot be stressed enough! Make sure the lamp is completely disconnected from the power outlet.
- Access the Socket: Gently remove the lamp shade and any harp. The lamp socket is usually held in place by a threaded ring or a screw at the base of the socket. Unscrew this retaining ring or screw to loosen the socket from the lamp body.
- Expose the Wires: You may need to remove a portion of the socket’s outer casing to expose the terminal screws.
- Note Wire Connections: Before disconnecting anything, take a clear photo or make a note of which wire (black, white, and ground if present) is connected to which terminal screw on the old socket. This is crucial for correct reassembly.
- Disconnect the Wires: Loosen the terminal screws on the old socket and carefully unhook the wires.
- Remove the Old Cord: If you’re also replacing the cord, feed the old cord out from the lamp base. You might need to loosen a strain relief clamp or a threaded bushing where the cord enters the lamp base.
Step 2: Preparing the New Lamp Cord
- Feed the New Cord: Thread the new lamp cord through the entry point in the lamp base. Make sure to leave enough length to comfortably work with at the socket.
- Secure the Cord: If there’s a strain relief clamp or bushing, secure the new cord in place. This prevents the cord from being pulled directly on the wire connections.
- Strip the Cord End: Use your wire strippers to carefully remove about 1-2 inches of the outer jacket from the end of the cord that will connect to the socket. Be careful not to cut into the inner wire insulation.
Step 3: Connecting the Wires to the New Socket
This is where lamp wiring basics are most important.
- Strip Inner Wire Insulation: Now, strip about 1/2 inch of insulation from the ends of each inner wire (hot, neutral, and ground if applicable).
- Prepare the Wires: Gently twist the strands of each wire together. If you’re replacing a damaged lamp plug, you’ll strip the other end of the cord similarly.
- Connect to the Socket:
- Ground Wire (Green or Bare Copper): Connect this to the green terminal screw on the socket (if present). Loop the wire around the screw in a clockwise direction so it tightens as you screw it in.
- Neutral Wire (White): Connect this to the silver-colored or wider terminal screw. Loop the wire clockwise around the screw.
- Hot Wire (Black): Connect this to the brass-colored or narrower terminal screw. Loop the wire clockwise around the screw.
- Tighten Terminal Screws: Ensure all terminal screws are snug. The wires should be held securely and not wiggle free.
- Check Connections: Gently tug on each wire to confirm it’s firmly attached.
Step 4: Assembling the Socket and Lamp
- Secure the Socket: Reassemble any outer casing of the socket. Position the socket back into its mounting point on the lamp.
- Install Retaining Ring: Screw the retaining ring or securing screw back into place to hold the socket firmly.
- Install Lamp Harp: If your lamp uses a harp, slide the loops of the harp onto the ears of the socket and secure it with the finial.
- Install Light Bulb: Screw in the appropriate wattage light bulb.
Step 5: Connecting the Lamp Plug (If Applicable)
If you’ve replaced the entire cord or just the plug (lamp plug repair), follow these steps for the plug end:
- Prepare the Cord End: Strip about 1-2 inches of the outer jacket from the cord end. Then, strip about 1/2 inch of insulation from the ends of the hot (black) and neutral (white) wires.
- Assemble the Plug: Most replacement plugs have two prongs and a small screw that holds the casing together.
- Connect Wires to Plug Terminals:
- Hot Wire (Black): Connect to the terminal screw that is usually attached to the narrower prong.
- Neutral Wire (White): Connect to the terminal screw that is usually attached to the wider prong.
- Ground Wire (Green or Bare Copper): If your plug has a third prong (for grounding), connect the ground wire to the designated terminal, often a green screw.
- Tighten Screws and Assemble: Securely tighten the terminal screws. Tuck the wires neatly into the plug casing and screw the plug housing back together. Ensure no bare wire is exposed outside the plug.
Step 6: Testing the Lamp
- Double-Check Everything: Before plugging it in, take one last look at all your connections to ensure they are secure and that no wires are touching where they shouldn’t be.
- Plug In and Test: Plug the lamp into a working outlet. Turn on the lamp switch. If everything was wired correctly, your lamp should now light up!
Troubleshooting Common Lamp Wiring Issues
Sometimes things don’t go perfectly the first time. Here are some common issues and how to fix them.
Lamp Not Turning On
- Check the Bulb: Ensure the bulb is screwed in correctly and is not burnt out. Try a new bulb.
- Check the Outlet: Plug a different device into the outlet to confirm the outlet is working.
- Inspect Plug Connections: If you replaced the plug, ensure the wires are firmly attached to the correct terminals.
- Inspect Socket Connections: Make sure the wires are securely fastened to the socket terminals.
- Check the Switch: If your lamp has an inline switch, it might be faulty. You might need to perform a lamp switch repair.
Lamp Flickering
- Loose Connections: This is the most common cause. Recheck all wire connections at the socket and plug.
- Damaged Cord: Inspect the entire length of the cord for any nicks, cuts, or damage to the lamp cord insulation. If damaged, replacing the cord entirely (replacing lamp cord) is the safest option.
- Faulty Socket: The socket itself might be worn or damaged. A lamp socket replacement could be necessary.
Lamp Turns Off by Itself
- Overheating: This can happen if the bulb wattage is too high for the socket or if there’s a short circuit. Ensure you’re using the correct wattage bulb.
- Loose Connections: Again, loose connections can cause intermittent power.
Replacing a Lamp Harp
While not directly part of wiring, lamp harp installation is often done when rewiring.
- Identify Harp Type: Harps usually attach to the socket base with two “ears” or “fins.”
- Position the Harp: Place the loops of the harp over the corresponding ears on the socket base.
- Secure the Harp: Screw the finial onto the threaded post on top of the socket to hold the harp in place.
When to Call a Professional
While many lamp wiring tasks are DIY-friendly, there are times when it’s best to seek professional help.
- Complex Lamps: If you have an antique lamp with intricate wiring or a high-value piece, a professional restorer can ensure it’s handled correctly.
- Uncertainty: If you feel unsure or uncomfortable at any step of the process, it’s safer to consult an electrician or a lamp repair specialist.
- Persistent Problems: If you’ve tried troubleshooting and the lamp still doesn’t work, a professional can diagnose the issue more effectively.
Frequently Asked Questions (FAQ)
Q1: How do I know if I need to replace my lamp cord?
You should replace your lamp cord if it is frayed, cracked, has exposed wires, or if the insulation is damaged. It’s also a good idea to replace it if it feels stiff and brittle, as this indicates the insulation is degrading.
Q2: Can I use a three-prong cord on a two-prong lamp?
Yes, you can often adapt a three-prong cord to a two-prong lamp if the lamp itself doesn’t have a grounding point. In this case, you would connect the hot and neutral wires as usual, but you would cap off or ignore the ground wire. However, it’s best practice to use a two-prong cord if your lamp is not designed for grounding.
Q3: What’s the difference between a hot wire and a neutral wire?
The hot wire (usually black) carries the electrical current from the power source to the appliance. The neutral wire (usually white) provides the return path for the current back to the power source. The ground wire (green or bare) is a safety feature that diverts electricity away from you in case of a fault.
Q4: How tight should the terminal screws be?
The terminal screws should be snug enough to hold the wire firmly in place without damaging the wire or the screw. You don’t need to overtighten them, which could strip the threads or break the terminal.
Q5: Is it safe to reuse an old lamp socket?
It’s generally safer to replace an old lamp socket if it shows any signs of damage, such as cracked plastic, corroded terminals, or loose components. If you’re rewiring a lamp, replacing the socket at the same time is a good preventative measure.
Q6: How do I find the right replacement parts?
You can find replacement lamp cords, sockets, and plugs at most hardware stores, home improvement centers, and online retailers specializing in lighting parts. Bring your old parts with you if possible to ensure you get exact matches for type and size.
By following these detailed steps and prioritizing safety, you can confidently tackle DIY lamp repair and rewiring projects, bringing your favorite lamps back to life.