
Can I wire a lamp socket with two wires? Yes, you can wire a lamp socket with two wires by carefully stripping the wires and connecting them to the correct terminals. This guide will walk you through the process.
Wiring a lamp socket with two wires is a fundamental skill for anyone interested in lamp repair wiring or basic lamp wiring. It’s a straightforward process, but it requires attention to detail to ensure safety and proper function. Whether you’re replacing a damaged lamp cord, attaching a new lamp socket to a fixture, or embarking on a DIY lighting project, knowing how to connect lamp wires correctly is essential. This article will provide a comprehensive, step-by-step guide to successfully completing your two-wire lamp assembly.
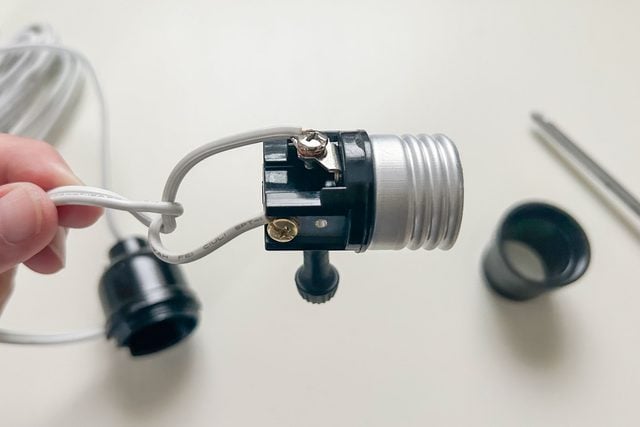
Image Source: www.familyhandyman.com
Gathering Your Materials
Before you begin, ensure you have all the necessary tools and materials. This will make the process smoother and safer.
Tools You’ll Need:
- Wire Strippers: Crucial for removing insulation from the lamp cord without damaging the copper wires.
- Screwdriver Set: A small Phillips head and flathead screwdriver will likely be needed for the socket terminals and potentially the plug.
- Pliers: Needle-nose pliers can be helpful for bending wire loops and gripping small components.
- Wire Cutter: Useful for cleanly cutting the lamp cord if needed.
- Electrical Tape: For insulating any exposed connections if required, though usually not necessary for standard socket connections.
- Lighter or Match: For safely melting and shaping the ends of thermoplastic wire insulation if necessary.
- Safety Glasses: Always protect your eyes when working with tools and electrical components.
Materials You’ll Need:
- Lamp Socket: The part that holds the light bulb. Ensure it’s rated for the voltage and wattage of your intended use.
- Lamp Cord (with Plug): This is the two-wire cable that supplies power. If you’re replacing a cord, make sure the new one is of adequate gauge for the lamp’s wattage. The cord will typically have two insulated wires inside, usually one with ribs or a stripe (hot) and one smooth (neutral).
- Wire Nuts (Optional): While not directly used for connecting wires to the socket, you might need them if you’re splicing wires.
Understanding the Components: Lamp Holder Wiring
A two-wire lamp socket assembly primarily involves three main parts: the lamp cord, the lamp socket itself, and the light bulb. The lamp cord brings electricity from the wall outlet. One wire in the cord carries the “hot” current, and the other carries the “neutral” current. The lamp socket is where the light bulb screws in. It has two terminals, one for the hot wire and one for the neutral wire.
Deciphering the Lamp Cord:
The lamp cord is your power source. It’s crucial to identify the two wires within it. Typically, they are distinguishable by their insulation:
- Ribbed or Striped Wire: This wire is usually the “hot” wire. It carries the electrical current to the bulb.
- Smooth Wire: This wire is the “neutral” wire. It completes the electrical circuit.
In some cords, especially older ones, the insulation color might be different (e.g., black for hot, white for neutral). However, the ribbing/stripping is a more reliable indicator on modern cords.
Exploring the Lamp Socket:
A standard lamp socket will have two terminals, usually brass or silver-colored screws.
- Hot Terminal: Often slightly smaller or located in a specific position, this terminal connects to the “hot” side of the socket.
- Neutral Terminal: Usually larger or in a different position, this connects to the “neutral” side of the socket.
For a two-wire lamp assembly, you’ll be connecting the ribbed wire to one terminal and the smooth wire to the other. The standard practice is to connect the hot (ribbed) wire to the terminal that connects to the center contact of the light bulb, and the neutral (smooth) wire to the terminal that connects to the outer screw shell of the bulb. This ensures that when the bulb is unscrewed, it’s the hot wire that is disconnected, making the bulb safer to handle.
Step-by-Step Guide to Connecting Lamp Wires
Now that you have your tools and materials, and you understand the components, let’s get started with the actual wiring.
Step 1: Prepare the Lamp Cord
First, if you are doing a lamp cord replacement, you’ll need to remove the old cord. If you’re attaching a new socket, you’ll start with a new cord.
- Position the Wire Strippers: Measure about 1-2 inches from the end of the lamp cord.
- Strip the Outer Jacket: Carefully place the outer rubber or plastic jacket of the lamp cord into the groove of your wire strippers. Select a groove size that’s just right for the cord’s thickness.
- Cut the Jacket: Gently squeeze the handles of the wire strippers. You want to cut through the outer jacket only, not into the insulation of the two inner wires.
- Remove the Jacket: Once the jacket is scored, you should be able to peel or pull it away from the wires.
Step 2: Strip the Inner Wires
Now you have exposed the two inner wires. Each of these needs its insulation stripped to expose the copper.
- Identify Inner Wires: You’ll see the ribbed wire and the smooth wire.
- Strip Insulation: Place the stripped end of the ribbed wire into the appropriate groove on your wire strippers (usually the smallest groove suitable for fine wires).
- Strip Gently: Squeeze the handles to cut the insulation without nicking the copper wire.
- Pull Away Insulation: Gently pull the stripped insulation off the end of the wire. You should have about ½ inch to ¾ inch of bare copper.
- Repeat for the Other Wire: Do the same for the smooth wire.
Important Safety Note: When stripping the wires, especially thermoplastic insulation found on many modern cords, you might find it easier and cleaner to use a lighter or match. Briefly pass the flame over the end of the wire, moving it constantly to melt the insulation. Once melted, quickly pull the insulation off with pliers. Be very careful not to burn yourself or melt the copper wire.
Step 3: Create Wire Loops (if necessary)
Many lamp sockets have screw terminals. For a secure connection, it’s best to create a small loop at the end of each bare copper wire to wrap around the screw.
- Use Pliers: Take your needle-nose pliers.
- Grasp the Wire: Grip the very end of the stripped copper wire.
- Bend a Loop: Carefully bend the wire to form a small hook or loop that will fit around the terminal screw. The loop should go in the direction the screw tightens (clockwise).
Step 4: Connect Wires to the Lamp Socket Terminals
This is the core step in attaching a lamp socket.
- Identify Terminals: Locate the two screw terminals on the lamp socket.
- Connect the Hot Wire: Take the ribbed wire. If you made a loop, place the loop around the screw terminal. Ensure the loop goes around the screw in a clockwise direction.
- Tighten the Screw: Use your screwdriver to tighten the terminal screw firmly. The screw should pinch the copper wire securely, holding it in place. Make sure no stray strands of copper are sticking out.
- Connect the Neutral Wire: Take the smooth wire. Place its loop around the other terminal screw. Again, ensure the loop is clockwise.
- Tighten the Second Screw: Tighten this terminal screw firmly.
Tip: For a secure electrical socket connection, ensure the bare copper wire is making good contact with the metal of the terminal. No insulation should be under the screw head, and no bare copper should be exposed outside the terminal area.
Step 5: Secure the Socket and Reassemble
Most lamp sockets have a cardboard or plastic liner and a threaded skirt that screws onto the base of the socket to hold everything together and provide insulation.
- Position the Liner: If your socket came with a fiber or plastic liner, slide it over the wired socket base.
- Thread the Skirt: Screw the threaded skirt onto the base of the socket. This often traps the lamp cord in place, preventing it from being pulled out of the socket.
- Tighten the Set Screw (if applicable): Some sockets have a small set screw on the side of the skirt that tightens against the cord to secure it. If yours has one, tighten it gently onto the cord’s outer jacket.
Step 6: Install the Light Bulb and Test
Now for the moment of truth!
- Screw in the Bulb: Gently screw your chosen light bulb into the newly wired socket.
- Plug it In: Plug the lamp cord into a working electrical outlet.
- Turn it On: Flip the lamp’s switch. If everything is connected correctly, the bulb should illuminate.
Troubleshooting Common Issues
If your lamp doesn’t light up, don’t panic. Here are some common issues and how to fix them:
- Loose Connections: The most frequent culprit. Double-check that all terminal screws are tight and that the wires are securely clamped.
- Incorrect Wire Connection: Although less common with two-wire systems as the polarity is less critical for basic function (unlike with a polarized plug), it’s good practice to ensure the hot wire goes to the correct terminal and the neutral to the other. However, for just making the lamp light up, either connection will usually work.
- Faulty Bulb: Try a different light bulb to rule out a burned-out bulb.
- Faulty Cord or Plug: If you’re doing a lamp cord replacement, the new cord itself might be damaged. Check the plug end for any loose connections or damage.
- Issue with the Lamp Switch: The problem might lie with the lamp’s internal switch rather than the socket wiring.
Lamp Repair Wiring: Advanced Considerations
When dealing with lamp repair wiring, you might encounter situations that require a bit more attention.
Polarity and Safety
While a simple two-wire lamp socket will function regardless of which wire goes to which terminal (it will light up), proper polarity is important for safety, especially if the lamp has a polarized plug. A polarized plug has one blade wider than the other, designed to connect the neutral wire to the neutral side of the circuit and the hot wire to the hot side.
- Hot Wire: Connect to the terminal that goes to the center contact of the light bulb.
- Neutral Wire: Connect to the terminal that goes to the outer screw shell of the light bulb.
This ensures that when you unscrew the bulb, you are disconnecting the hot side first, making the bulb safer to handle. Many modern lamp sockets are designed to facilitate this by having terminals that naturally align with the bulb’s contacts in the correct way.
Wire Gauge
The gauge of the wire in your lamp cord is critical. Using a wire that is too thin for the lamp’s wattage can cause it to overheat, posing a fire hazard.
| Wattage (Approximate) | Recommended Wire Gauge (AWG) |
|---|---|
| Up to 60W | 18 AWG |
| 60W to 120W | 16 AWG |
| 120W to 1800W | 14 AWG |
Always ensure your lamp cord and internal wiring are rated for the maximum wattage your lamp will use.
Two-Wire Lamp Assembly: Common Scenarios
- Replacing a Damaged Socket: If the old socket is cracked or the terminals are corroded, you’ll simply remove the old one and attach a new one following the steps above.
- Attaching a Lamp Socket to a New Fixture: If you’re building a custom lamp or repurposing an object, you’ll need to securely mount the socket and run the lamp cord through your fixture. Ensure the cord is protected from abrasion and sharp edges.
- How to Wire a Plug: If your lamp cord doesn’t have a plug, or you need to replace a damaged plug, the process is similar. You’ll strip the ends of the hot and neutral wires and connect them to the corresponding screw terminals on the new plug. The ribbed wire usually connects to the narrower blade (hot), and the smooth wire to the wider blade (neutral), though it’s best to follow the markings on the plug itself.
Comprehending Lamp Circuits: A Simple View
The basic principle of connecting lamp wires is to create a complete circuit.
- Power Source: Electricity comes from your wall outlet.
- Hot Wire: Carries the voltage to the lamp socket.
- Lamp Socket Terminals: Distribute this voltage to the light bulb.
- Light Bulb Filament: Resists the flow of electricity, generating heat and light.
- Neutral Wire: Provides a return path for the electricity back to the power source, completing the circuit.
The switch on your lamp simply interrupts or completes the flow of electricity through the hot wire.
Frequently Asked Questions (FAQ)
Q1: Do I need to match the wire colors to the socket terminals specifically?
A: For a two-wire lamp assembly, the primary goal is to connect the hot wire to one terminal and the neutral wire to the other to make the bulb light up. However, for safety, the hot wire (ribbed) should connect to the terminal that connects to the center contact of the bulb, and the neutral wire (smooth) should connect to the terminal that connects to the outer screw shell.
Q2: My lamp cord has three wires (including a ground wire). How do I wire that?
A: This guide focuses on a two-wire lamp socket. If your cord has a third, bare copper or green wire, that’s a ground wire. It connects to a ground screw on the lamp fixture or socket if available, for added safety. However, standard two-wire sockets typically don’t have a ground terminal.
Q3: Can I use electrical tape instead of wire nuts for connections?
A: Electrical tape is generally used for insulating exposed wires where a secure connection isn’t made, or to reinforce existing insulation. For connecting wires to terminals, especially screw terminals, direct contact is needed. Wire nuts are for joining two or more wires together.
Q4: What if my lamp socket has more than two terminals?
A: This guide is for standard two-wire lamp sockets. If your socket has more terminals, it might be for a dimmer switch, a three-way bulb, or a different type of fixture. Consult the socket’s specific instructions or a qualified electrician in such cases.
Q5: How much bare wire should I leave exposed at the terminal?
A: Aim for about ½ inch to ¾ inch of bare copper wire. Enough to make a good connection, but not so much that it can easily touch other components or come loose.
By following these steps carefully, you can confidently wire a lamp socket with two wires, ensuring a functional and safe lighting solution for your home. Remember to always prioritize safety by disconnecting power before you begin and using appropriate tools and materials.