
Image Source: content.instructables.com
How To Wire Lamp Socket: Easy DIY Steps
Can I wire a lamp socket myself? Yes, you absolutely can wire a lamp socket yourself with the right tools and a little guidance. This guide will walk you through the process, whether you’re performing a simple lamp socket repair, replacing a lamp cord, or wiring a light socket from scratch. We’ll cover everything from identifying the parts to safely connecting the wires, making lamp fixture wiring accessible for any DIY enthusiast. It’s also helpful if you’re learning how to assemble a lamp or working on lamp base wiring.
Tools and Materials You’ll Need
Before you start, gather these essential items. Having everything ready makes the job much smoother and safer.
- New Lamp Socket: Ensure it matches your old one in type (e.g., medium base, candelabra base) and electrical rating.
- Lamp Cord with Plug: A pre-assembled cord with a plug is the easiest. You might also need a cord grip or strain relief if your socket doesn’t have one built-in.
- Wire Strippers: Essential for removing insulation from wires.
- Screwdriver Set: Phillips and flathead screwdrivers will be needed.
- Wire Nuts or Terminal Connectors: For joining wires securely.
- Needle-Nose Pliers: Helpful for bending wire loops.
- Voltage Tester (Non-Contact): Crucial for ensuring the power is off.
- Electrical Tape: For extra insulation if needed.
- Small Pliers or Nut Drivers: For tightening terminal screws.
- Your Lamp Fixture: The lamp you’re working on.
Safety First: Disconnecting Power
This is the most important step. Never work on electrical wiring while the power is on.
- Unplug the Lamp: Ensure the lamp is completely unplugged from the wall outlet.
- Confirm Power is Off: Use your non-contact voltage tester near the existing plug and the lamp socket to be absolutely sure there is no electricity flowing. Touch the tester to the lamp cord and the socket area.
Deciphering Lamp Socket Components
Most lamp sockets have a few key parts that are easy to recognize.
- Socket Body: This is the main housing that holds the light bulb.
- Terminal Screws: These are small screws, usually brass or silver, where the wires connect.
- Cord Grip/Strain Relief: This part secures the lamp cord to the socket, preventing wires from being pulled loose.
- Insulating Shell/Liner: A plastic or ceramic piece that separates the live parts of the socket from the metal parts of the lamp.
Step-by-Step Guide to Wiring a Lamp Socket
Let’s get started on connecting your lamp socket.
Step 1: Accessing the Existing Socket
If you are performing a lamp socket repair or replacing a faulty socket, you’ll need to access the old one.
- Remove the Lamp Shade and Bulb: Take off any lampshade and unscrew the light bulb.
- Expose the Socket: Some lamps have a threaded collar that holds the socket in place. Unscrew this collar. You might also need to gently pry off a decorative cap or cover around the base of the socket.
- Identify Wire Connections: Look at how the wires are currently connected to the old socket. Take a mental note or a quick photo. You’ll typically see two wires from the lamp cord connecting to two screws on the socket.
Step 2: Removing the Old Socket (If Necessary)
If you are replacing the socket, carefully disconnect the old one.
- Loosen Terminal Screws: Use a screwdriver to loosen the terminal screws on the old socket.
- Remove Wires: Gently pull the wires free from the screws. If they are wrapped tightly, you might need to use needle-nose pliers to unhook them.
- Remove the Old Socket: Once the wires are disconnected, you can usually pull the old socket away. Note how it was secured, perhaps by a threaded nipple or a screw.
Step 3: Preparing the New Lamp Socket and Cord
This is where we get the components ready for connection.
-
Prepare the Lamp Cord:
- If using a new cord: Feed the lamp cord through the lamp base and up to the socket location. Make sure the cord grip or strain relief is on the cord before you strip the wires.
- Strip the Cord Ends: Use wire strippers to carefully remove about 1/2 inch to 3/4 inch of the outer insulation from the end of the lamp cord. You’ll see two wires inside: one usually has ribs or a colored stripe (the neutral wire), and the other is smooth (the hot wire).
- Separate and Strip Inner Wires: Carefully separate the two inner wires. Then, use the wire strippers to remove about 1/2 inch of insulation from the end of each inner wire. Be careful not to nick the copper wire itself.
-
Prepare the New Socket:
- Open the Socket: Most sockets can be opened by unscrewing a base or unscrewing the socket itself from its mounting.
- Thread the Cord Through: Feed the stripped end of the lamp cord through the opening in the socket base or through the cord grip. Make sure the cord grip is positioned correctly to secure the cord later.
Step 4: Connecting the Wires to the New Socket
This is the core of wiring a light socket. The key is connecting the correct wire to the correct terminal.
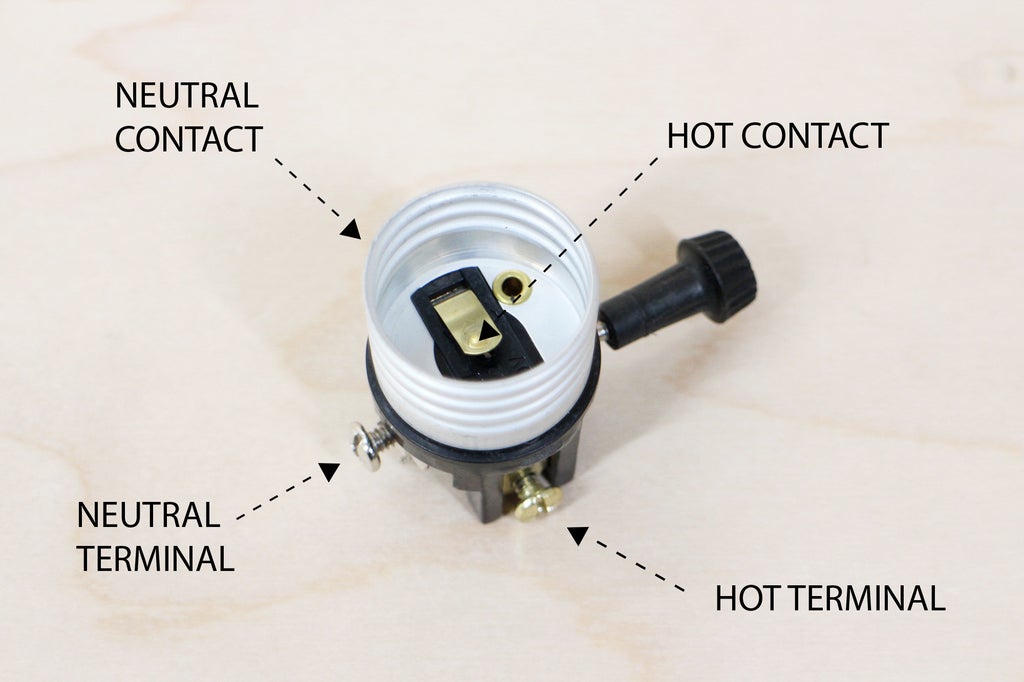
- Neutral Wire (Ribbed/Striped): This wire usually connects to the wider slot on a polarized plug, and on the socket, it should connect to the shell-side terminal screw. The shell-side terminal is typically silver.
- Hot Wire (Smooth): This wire connects to the narrower slot on a polarized plug, and on the socket, it connects to the center-terminal screw. This screw is usually brass.
How to Connect:
- Create Loops: Use needle-nose pliers to bend a small hook or loop at the end of each stripped wire.
- Attach to Screws:
- Place the loop of the neutral wire (ribbed/striped) around the silver terminal screw. Make sure the loop goes clockwise around the screw so that when you tighten the screw, it pulls the wire into a tighter loop.
- Place the loop of the hot wire (smooth) around the brass terminal screw, also in a clockwise direction.
- Tighten Screws: Use your screwdriver to tighten each terminal screw firmly. Ensure no stray wire strands are sticking out.
- Check Connections: Gently tug on each wire to ensure it’s securely attached to its terminal.
Table: Wire-to-Terminal Guide
| Wire Type | Wire Appearance | Terminal Screw Color | Terminal Location (General) |
|---|---|---|---|
| Neutral | Ribbed or Striped | Silver | Shell-side |
| Hot | Smooth | Brass | Center-terminal |
Step 5: Securing the Socket and Cord Grip
Now, you’ll put the socket back together and secure the cord.
- Position Insulating Liner: Make sure the insulating liner (if your socket has one) is correctly placed over the terminal screws and wires.
- Assemble the Socket: Carefully reassemble the socket body. Screw the socket onto its base or screw the threaded collar back into place. Ensure everything fits snugly without pinching wires.
- Secure the Cord Grip: If your socket has a separate cord grip or strain relief, position it to clamp firmly onto the lamp cord, just where the outer insulation begins. Tighten the screws on the cord grip. This prevents the wires from being pulled directly from the terminals if the cord is tugged. This is a critical step for safe lamp fixture wiring.
Step 6: Testing Your Work
Before plugging it in, double-check everything.
- Visual Inspection: Look closely at the socket. Are the wires properly insulated? Are the terminal screws tight? Is the cord securely held by the strain relief? Is the bulb seated correctly?
- Plug In and Test: Plug the lamp into a known working outlet. Turn it on. If it doesn’t work, immediately unplug it and recheck all your connections. If it still doesn’t work, you may need to check the plug itself or the entire lamp cord replacement.
Common Lamp Socket Issues and Solutions
Sometimes, you might encounter problems. Here are a few common scenarios for lamp socket repair or troubleshooting.
The Lamp Doesn’t Turn On
- Check the Bulb: Is the bulb burned out? Try a new one.
- Check the Plug: Is the plug firmly seated in the outlet? Is the outlet working?
- Check Connections: Unplug the lamp and re-examine all wire connections at the socket and the plug. Ensure wires are not loose or shorting.
- Check the Switch: Many lamps have an inline switch on the cord. Ensure this switch is functioning correctly and is in the “on” position.
Flickering Light
- Loose Bulb: Ensure the light bulb is screwed in tightly.
- Loose Wire Connections: This is a common cause of flickering. Unplug the lamp and check all wire connections at the socket.
- Faulty Socket: The internal contacts of the socket might be worn or dirty. You may need to replace the entire lamp socket.
Socket Cracking or Melting
- Wrong Wattage Bulb: Using a bulb with a higher wattage than the socket is rated for can cause it to overheat and melt or crack. Always use bulbs within the specified wattage.
- Faulty Socket: In rare cases, a defective socket can overheat even with the correct bulb. Replace the socket immediately if you notice any signs of damage or melting. This is an important part of lamp socket repair.
Wiring a Lamp Cord (Replacing the Plug)
If your lamp cord is frayed near the plug, you’ll need to replace the plug. This is a common lamp cord replacement task.
Tools and Materials
- New Lamp Plug (ensure it’s a polarized plug if your cord is)
- Wire Strippers
- Screwdriver
- Lamp Cord with Strain Relief (if needed)
Steps
- Unplug the Lamp: Always start with the lamp unplugged.
- Cut Off Old Plug: Cut off the old plug from the lamp cord.
- Prepare Cord Ends: Strip about 1/2 inch to 3/4 inch of insulation from the ends of the two wires. If the cord doesn’t have a strain relief at the plug end, you might need to add one by sliding it onto the cord before attaching the new plug.
- Attach New Plug: Most replacement plugs have screw terminals.
- Neutral Wire (Ribbed/Striped): Connect to the wider blade terminal (usually connected to the wider slot on the plug).
- Hot Wire (Smooth): Connect to the narrower blade terminal.
- Bend the wires into loops and wrap them clockwise around the screws. Tighten securely.
- Secure the Plug: Close up the plug housing, ensuring the cord is held firmly by the strain relief mechanism within the plug.
- Test: Plug it in and test.
Wiring a Lamp Socket From Scratch (Assembling a Lamp)
If you are creating a lamp from parts, the process is similar to replacing a socket, but you’ll be connecting the cord directly to the socket.
- Prepare the Lamp Base: Run the lamp cord through the lamp base and any risers or harps. Ensure it exits where the socket will be located.
- Connect Cord to Socket: Follow Step 4 and Step 5 above for connecting the wires to the new socket and securing the cord.
- Attach Socket to Lamp: Secure the socket to the top of the lamp fixture, often with a threaded nipple and a retaining nut.
- Install Bulb and Shade: Screw in the light bulb and attach the shade.
- Test: Plug in and test the lamp.
Important Considerations for Lamp Fixture Wiring
- Polarized Plugs: If your original lamp had a polarized plug (one prong wider than the other), your replacement cord and plug should also be polarized. This ensures the neutral wire always connects to the switched side of the circuit, which is a safety feature.
- Wire Gauge: Ensure the wire gauge of your replacement cord is appropriate for the lamp’s wattage. Most standard lamps use 18-gauge wire.
- Heat Resistance: The socket material should be heat-resistant, typically bakelite or ceramic, especially for sockets intended for higher wattage bulbs.
- Local Codes: While lamp wiring is generally straightforward, always be mindful of any local electrical codes that might apply to your specific situation, especially for permanent installations.
Frequently Asked Questions (FAQ)
Q: What if my lamp socket has three wires?
A: A third wire is usually a ground wire (often green or bare copper). If your lamp base is metal, it should have a ground screw on the socket or fixture. Connect the ground wire to this screw. If your cord doesn’t have a ground wire and your lamp base is metal, you should consider a cord replacement that includes a ground wire for safety.
Q: Can I use electrical tape instead of wire nuts?
A: For joining wires that will be inside the socket assembly, wire nuts are the standard and safest method. Electrical tape should only be used as a supplementary measure for insulating exposed wire ends or connections if absolutely necessary, but it’s not a substitute for secure wire connectors.
Q: My lamp fixture is old. Do I need to replace the whole cord?
A: If the cord is brittle, cracked, or shows signs of damage, it’s always best to replace the entire lamp cord. Even if the plug is fine, a damaged cord is a fire hazard.
Q: What do the ribbed and smooth wires mean?
A: The ribbed or striped wire is the neutral wire, and the smooth wire is the hot wire. In a properly wired fixture, the neutral wire connects to the wider slot of a polarized plug and the shell-side terminal of the socket. The hot wire connects to the narrower slot of the plug and the center-terminal screw of the socket. This helps ensure the switch is on the hot side of the circuit.
Q: How do I know if my lamp socket is broken?
A: Signs of a broken socket include flickering lights, the bulb not turning on even with a new bulb, visible cracks or melting on the socket, or the bulb feeling loose even when screwed in tightly. In these cases, lamp socket repair or replacement is necessary.
By following these detailed steps, you can confidently tackle wiring a lamp socket, performing necessary lamp socket repair, or undertaking a lamp cord replacement. Remember to prioritize safety by always disconnecting power before you begin. Happy wiring!