
If your LED light remote isn’t working, the most common reasons are a dead battery, a need for re-pairing, or an issue with the LED controller itself. This guide will help you troubleshoot why your LED remote is not responding.
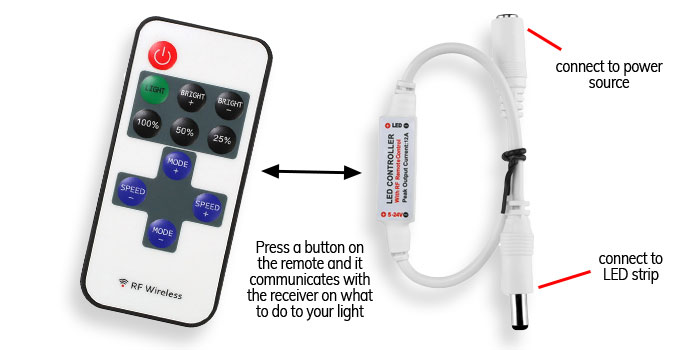
Image Source: www.ledsupply.com
Is Your LED Remote Not Responding? Let’s Figure It Out!
It’s frustrating when your smart LED remote problems strike, leaving you in the dark. You bought those cool LED lights for ambiance, a touch of magic, or just to change your room’s mood with a click. But now, your LED light remote battery might be dead, or perhaps your light remote no signal is a sign of a deeper issue. This article dives deep into why your LED strip remote not working and how to fix it, covering everything from simple fixes to more complex LED controller issues. We’ll explore common culprits behind LED bulb remote failure and provide clear steps to get your lights back under your command.
Common Reasons Your LED Remote Isn’t Cooperating
Many things can stop your LED remote from working as it should. We’ll break down the most frequent offenders.
1. The Humble Battery: Powering Your Remote
This is, by far, the most common reason for an LED remote not responding. Think of it like the fuel in a car; without it, nothing moves.
Checking and Replacing the Battery
- Locate the Battery Compartment: Most remotes have a small sliding cover on the back or bottom. You might need a fingernail or a small, flat object (like a coin edge) to gently pry it open.
- Note the Battery Type: Look closely at the old battery. It will usually be labeled with its type (e.g., CR2032, AAA, AA).
- Install a Fresh Battery: Make sure to insert the new battery with the correct polarity (+ and – signs facing the right way). This is a crucial step for troubleshooting LED remote issues.
- Test the Remote: After replacing the battery, try turning your lights on or changing a color.
Important Tip: Even if a battery looks okay, it might have lost its charge over time, especially if the remote has been sitting unused for a while or if it was accidentally switched on.
2. The Pairing Puzzle: Connecting Remote to Lights
Modern LED lights often use radio frequency (RF) or infrared (IR) signals to communicate. Sometimes, this connection can get lost. This is especially common with LED strip remote not working.
Why Pairing Matters
Your remote and your LED lights need to be “talking” to each other. This is called pairing or synchronization. If this link is broken, your light remote no signal is expected.
Steps for Re-Pairing Your LED Remote
The exact method for LED light remote pairing varies between brands and models. However, a general approach usually works:
- Turn Off the Power: Before you start, unplug your LED lights from the wall socket or switch off the main power supply to the lights.
- Insert New Batteries: If you haven’t already, put fresh batteries in your remote.
- Power On and Pair:
- Plug the LED lights back in or switch the power on.
- Immediately, within a few seconds, press and hold a specific button on your remote. This is often the “On/Off” button, a “Mode” button, or a dedicated “Pairing” button. Check your remote’s manual for the exact button.
- Keep holding the button. You might see the LED lights flash, change color, or turn on/off in a specific sequence to confirm the pairing is successful.
- Release the button once you see a confirmation.
- Test Again: Try controlling your lights with the remote.
Pro-Tip: Some systems might require you to perform the pairing process while the lights are powered on for a specific duration before turning the remote on. Always consult your product’s manual.
3. The Controller: The Brain of the Operation
The LED controller is the small box that usually connects directly to your LED strip or bulb and receives signals from the remote. This is a key component when dealing with LED controller issues.
What is the LED Controller?
The controller is like the receiver for your remote’s commands. It translates the signals from the remote into instructions for the LED lights, telling them what color to be, how bright to be, or what mode to run.
Troubleshooting the Controller
- Check Connections: Ensure all wires are securely plugged into the controller and the LED lights. Loose connections are a common cause of failure.
- Inspect for Damage: Look for any visible damage to the controller box, such as burnt spots, cracked plastic, or damaged ports.
- Power Cycle the Controller: Just like a computer, sometimes the controller just needs a reset.
- Unplug the power adapter from the controller.
- Wait for about 30 seconds.
- Plug the power adapter back in.
- Try the remote again.
- Is the Controller Compatible? Make sure your remote is designed to work with your specific LED controller model. Using an incompatible remote will result in light remote no signal.
4. Signal Interference: Invisible Roadblocks
Your remote and controller communicate using signals. Other devices can sometimes interfere with these signals, preventing them from reaching their destination.
Common Sources of Interference
- Other Wireless Devices: Wi-Fi routers, Bluetooth devices, cordless phones, and even microwaves can sometimes emit frequencies that clash with your LED remote’s signal.
- Physical Obstructions: While most LED remotes (especially RF ones) can work through some materials, thick walls, metal objects, or even very dense furniture can block or weaken the signal. Infrared (IR) remotes, in particular, need a clear line of sight.
Minimizing Interference
- Relocate Devices: Try moving your Wi-Fi router or other wireless devices away from the LED controller and lights.
- Clear the Path: Ensure there are no large physical objects directly between your remote and the controller, especially if you have an IR remote.
- Test from Different Locations: Try operating the remote from different positions in the room to see if proximity to certain objects makes a difference.
5. The Remote Itself: More Than Just Batteries
Sometimes, the remote unit itself might be faulty. This is a reason for LED bulb remote failure or an LED strip remote not working.
Issues with the Remote Unit
- Physical Damage: Has the remote been dropped? Cracked buttons or internal damage can stop it from working.
- Dirty Contacts: The battery contacts inside the remote can sometimes get dirty or corroded, preventing a good connection even with new batteries.
- Internal Malfunction: Like any electronic device, the remote’s internal circuitry can fail.
Fixing Remote Unit Problems
- Clean Battery Contacts: You can gently clean the metal contacts inside the battery compartment with a pencil eraser or a cotton swab lightly dipped in rubbing alcohol (ensure it dries completely before reinserting batteries).
- Inspect Buttons: Check if any buttons are stuck or not springing back properly. You might be able to carefully clean around them with a dry cotton swab.
- Consider Replacement: If you’ve tried all other troubleshooting steps and the remote still doesn’t work, it might be time to purchase a replacement remote designed for your specific LED lighting system.
6. The LED Lights: When the Problem Isn’t the Remote
It’s possible the issue isn’t with your remote at all, but with the LED lights themselves. This could manifest as the LED light not turning on via remote.
Signs the Lights Might Be the Issue
- No Response to Any Input: If even turning the lights on manually (if possible) doesn’t work, the problem is likely with the lights or their power supply.
- Flickering or Dimness: While sometimes a remote issue, this can also indicate failing LEDs or a faulty controller.
- Specific Sections Not Working: If only parts of an LED strip are lit, it might be a connection issue along the strip or a problem with the controller’s ability to power all segments.
Troubleshooting the LED Lights
- Check Power Supply: Ensure the power adapter is correctly plugged in and providing power. Try a different outlet if possible.
- Inspect LED Strip/Bulb: Look for any visible damage to the LED strip itself or the bulb.
- Verify Controller Output: If you have a multimeter, you can check if the controller is outputting the correct voltage to the lights (consult your product’s manual for expected voltage).
A Step-by-Step Troubleshooting Guide
Let’s consolidate the common fixes into a practical checklist.
Table: Your LED Remote Troubleshooting Checklist
| Step | Action | Notes |
|---|---|---|
| 1 | Check and Replace Battery | Use a fresh, correctly sized battery. Ensure correct polarity. |
| 2 | Verify Remote-to-Light Pairing | Follow the specific pairing steps for your model. This is key for LED light remote pairing. |
| 3 | Inspect Controller Connections | Ensure all wires are secure and properly inserted into the controller. |
| 4 | Power Cycle the Controller | Unplug the controller, wait 30 seconds, plug it back in. |
| 5 | Check for Obstructions/Interference | Remove physical barriers and move other wireless devices away. Crucial for light remote no signal. |
| 6 | Clean Remote Battery Contacts | Use an eraser or alcohol-soaked cotton swab on battery terminals. |
| 7 | Test Remote in a Different Environment | Rule out environmental interference. |
| 8 | Inspect LED Lights/Bulbs for Damage | Check for visible signs of wear or damage. |
| 9 | Consult Product Manual | Specific models have specific troubleshooting steps. |
| 10 | Consider Remote or Controller Replacement | If all else fails, a component may be faulty. |
Advanced Scenarios and Specific Issues
Sometimes, the problem goes beyond the basics. Let’s look at some more specific smart LED remote problems.
Remote Not Working After Power Outage
Power surges or outages can sometimes reset or corrupt the memory of the LED controller. This often means you need to re-pair your remote. The process will be similar to the general LED light remote pairing steps outlined earlier.
Different Remotes for Different Lights
If you have multiple sets of LED lights, ensure you are using the correct remote for each. Many remotes use similar frequencies, but they are often programmed to work with a specific type of controller. Using the wrong remote will lead to light remote no signal.
Smart Home Integration Issues
For smart LED bulbs or strips that integrate with platforms like Alexa, Google Home, or Apple HomeKit, smart LED remote problems can also stem from the smart home hub or the app connection.
- Check Wi-Fi/Network: Ensure your Wi-Fi is working and the smart hub is connected.
- App Permissions: Verify the smart home app has the necessary permissions to control the lights.
- Re-sync Smart Hub: Sometimes, re-syncing your smart home devices can resolve communication issues.
Infrared (IR) vs. Radio Frequency (RF) Remotes
Knowing the type of remote you have is essential.
- IR Remotes: These work like your TV remote. They require a direct line of sight between the remote and the controller’s IR receiver. Obstructions will block the signal. If your LED light not turning on, ensure the path is clear.
- RF Remotes: These use radio waves and can often transmit through walls and objects. They generally have a longer range and don’t require direct line of sight. However, they are still susceptible to strong radio interference.
When to Call for Help or Replace Parts
If you’ve gone through all the troubleshooting steps and your LED light remote battery has been replaced, pairing attempted, and connections checked, but your LED remote not responding, it’s time to consider that a component might be broken.
Diagnosing a Broken Component
- Remote Failure: If you have another compatible remote for the same system and it works, your original remote is likely faulty.
- Controller Failure: If a known-good remote doesn’t work with the controller, but works with another identical controller, the controller is likely the issue.
- LED Strip/Bulb Failure: If the controller appears to be working (e.g., lights flash during pairing attempts) but the lights themselves don’t illuminate correctly, the LED strip or bulb may have failed.
Replacing Parts
- Remote Replacement: You can often buy replacement remotes directly from the manufacturer or online retailers. Make sure to get a remote compatible with your specific LED model.
- Controller Replacement: Similarly, replacement controllers are usually available. This is a good option if you have a whole set of lights that are working but the controller has failed.
- LED Strip/Bulb Replacement: If the LEDs themselves are faulty, you might need to replace the entire strip or bulb.
Frequently Asked Questions (FAQ)
Here are some common questions people ask when their LED remotes stop working.
Q1: My LED remote suddenly stopped working. What’s the first thing I should check?
A1: The very first thing to check is the battery. Replace it with a fresh one, ensuring it’s inserted correctly.
Q2: How do I know if my LED remote needs pairing?
A2: If you’ve replaced the battery and the remote still doesn’t control the lights, or if the lights behave erratically or are stuck on a single color, pairing might be needed. Often, the product manual will detail specific symptoms that indicate a need for re-pairing.
Q3: Can I use a remote from a different brand of LED lights?
A3: Generally, no. Unless the remotes and controllers are explicitly designed to be universal or compatible, using a remote from a different brand is unlikely to work and might even cause issues. This is a crucial point for troubleshooting LED remote control.
Q4: My LED strip remote is not working, and the lights are just red now. What does that mean?
A4: If your LED strip is stuck on a single color (like red) and unresponsive to the remote, it often signifies that the controller has lost its connection to the remote, or the controller itself is in a default mode. Re-pairing is the most likely solution for this specific LED strip remote not working scenario.
Q5: I tried re-pairing, but my light remote still has no signal. What else could it be?
A5: If re-pairing fails, consider other issues: the battery might be low even if new (rare, but possible), there could be strong signal interference, physical obstructions blocking the signal (especially for IR remotes), or the remote or controller itself might be faulty.
Q6: My smart LED remote problem is with voice control. The remote works, but Alexa/Google doesn’t. What should I do?
A6: This is a smart LED remote problem related to your smart home integration. Check your Wi-Fi connection, ensure the smart home app is updated, verify the lights are still linked correctly in your smart assistant app, and try re-linking the LED device to your smart home platform.
Q7: My LED light is not turning on at all, even with the remote. Is it the remote or the light itself?
A7: If the LED light not turning on when controlled manually (if possible) or via the remote, it’s likely an issue with the power supply, the controller, or the LED strip/bulb itself. Check all power connections first, then investigate the controller.
By systematically working through these steps, you should be able to identify why your LED remote isn’t working and get your lights back to their full colorful glory!